

Label Report
Student Manager Reports can create mailing or other types of labels. For example, you can create mailing labels to send birthday cards to contacts, name badges for a conference, envelopes, and so forth. After selecting the fields for the label, you can select what type of label, by Avery label number, to print on.
To create a label, follow the steps in the Creating a Report topic, and select the Label report type.
Step 1 Main Report Information
The first step in this wizard is to enter the following information:
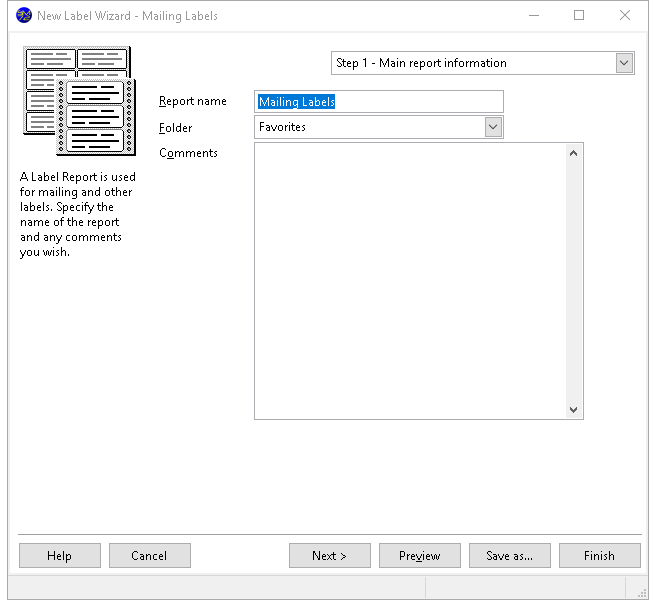
Report name: the name of the report. If you enter the name of an existing report, an error message displays. You can't use a backslash ("\") in a report name; the computer will beep if you press that key. You cannot go to the next step until you have entered a valid report name.
Folder: the folder this report belongs in. The default is the current folder in the Reports Explorer. You can select the desired folder by clicking the down arrow beside the folder name and choosing the folder in the list that appears. To expand a folder, click the + sign in front of the folder name; the + sign changes to a - sign. To collapse a folder, click the - sign in front of the folder name; the - sign changes to a + sign. To select the desired folder, either click it and click the down arrow again to close the list or double-click it.
- Comments: any comments entered here appear in the Reports Explorer when the report is selected.
Step 2 Data Selection
In Step 2, select which fields appear in the report. Note that if you turn on Advanced layout in Step 5 (see below), the options in this step are disabled (with the exception of the Advanced button) and a message appears indicating why this is the case.
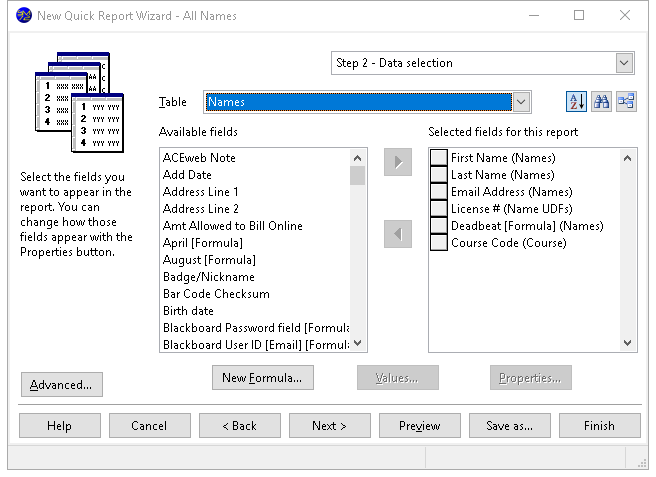
The options in this step are:
Table: a drop-down list that displays the names of the tables you can select fields from.
Sort: Student Manager Reports by default displays fields in alphabetical order. This makes it easy to find a field in the list. However, sometimes it makes more sense to display fields in the order they appear in the table. For example, for typical address fields, you would see this order alphabetically:
Address
City
Contact Name
Country
Customer Name
Postal Code
Region
whereas they'd appear like this in table order:
Customer Name
Contact Name
Address
City
Region
Postal Code
Country
Click this button to display fields in table order. Click it again to display them alphabetically. The setting of this button is remembered, so if you edit a report later, it has the same setting.
Find: a long list of fields can make it difficult to find the ones you're interested in. If you know part of the field caption you're looking for (such as a field with "tax" somewhere in the caption), click this button, enter the text, and click OK. If there are any fields that match, the first one is selected. Press F3 to find the next one containing the same text.
Relation: a long list of tables can make it difficult to find the ones you're interested in. Once you've selected fields from one table, chances are you're next going to select fields from a directly-related table. For example, if you chose a field from Customers, you are more likely to choose a field from Orders than from Products. Click this button to reduce the list of tables to only those directly related to ones you've already selected fields from. Click it again to restore the list to all tables.
Available fields: a list containing all reportable fields from the table shown in the Table list that have not already been selected.
Selected fields for this report: a list showing the fields to be included in the report, with the table the field is from shown in parentheses. Fields in this list may be moved up and down to change the order in which the columns are printed on the report; to do this, click the button in front of the field to move and drag the button up or down in the list.
Add: clicking this button adds the selected field in the Available list to the Selected list. You can select several fields by holding down the CTRL key as you select them; clicking Add adds all selected fields to the Selected list. You can also add the field by double-clicking it in the Available list, selecting it and pressing ENTER, or dragging the field from the Available list to the Selected list. The field is removed from the Available list.
If you select a field from a table that is not related in any way to the other tables involved in the report, you will get a warning message.
Add all: clicking this button adds all fields from the selected table to the Selected list.
Remove: clicking this button removes the selected field (or fields if you have selected more than one) from the Selected list. You can also remove the field by dragging it from the Selected list to the Available list. The field is added to the Available list (although you may not see it if the table the field is from is not the selected table).
Remove all: clicking this button removes all fields from the Selected list, and adds them to the Available list (although you only see those fields from the selected table).
Advanced: click this button to customize how the report runs.
New Formula: click this button to define a new formula. The new formula is automatically added to the report.
Edit Formula: click this button, which appears instead of New Formula when you have selected an existing formula, to edit the formula.
Values: displays a list of the unique values in the field selected in either the Available or Selected list, depending on which one was selected last. This is handy if you're not sure what data a field contains.
Properties: clicking this button displays the Properties dialog. You can also display this dialog by double-clicking the field in the Selected list or selecting it and pressing ENTER. This dialog allows you to specify how the field looks, how grouping is performed, and whether summary totals are shown or not. See Field Properties below for more information.
Field Properties
The Properties dialog allows you to specify how the field is formatted in the report. You can display this dialog for the field highlighted in the Selected list in Step 2 of the Label Wizard by clicking the Properties button, double-clicking the field, or selecting the field and pressing ENTER.
Format Page
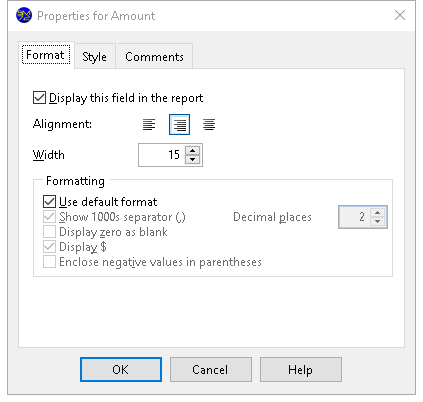
The options in the Format page of this dialog are:
Display this field in the report: if this option is turned off (it's on by default), the field will be retrieved from the database but not displayed in the report. This is useful when you want to sort on the field or include it in the query so you can link on it, but not print it.
Alignment: text alignment options for field headings and field contents. By default, numeric fields are right-aligned and all others are left-aligned.
Width: this is used as the width for the field in the report. Normally, Student Manager Reports will automatically size the field appropriately.
Use default format: if this option is turned on, which it is by default, Student Manager Reports uses the defined format for the field. If the format for the field changes in the future, the report uses the new format automatically. If you wish to change any of the formatting options, turn this setting off. This option is only available for numeric and date/time fields.
Show 1000s separator: if this option is turned on, the data in the field is formatted with the thousands separator defined in the Regional Settings applet of the Windows Control Panel. This option is only available for numeric fields.
Display zero as blank: if this option is turned on, a blank is displayed rather than a zero value. This option is only available for numeric fields.
Display $: turning this option on displays the currency symbol defined in the Regional Settings applet of the Windows Control Panel in front of the field's value. This option is only available for numeric fields.
Enclose negative values in parentheses: turn this option on to display negative numbers in parentheses rather than with a minus sign; for example, (123.45) instead of -123.45. This option is only available for numeric values.
Display empty date as blank: if this option is turned on, a blank is displayed rather than " / / " for blank dates. This option is only available for date/time fields.
Display date only: turning this option on displays only the date portion of the field's value. This option is only available for date/time fields.
Decimal places: the number of decimals to display for numeric fields.
Make this field taller if the contents take more than one line: normally, the Label Wizard only allows one line of text per field so fixed label heights are respected. Turn this option on if you want a field that takes more than one line (for example, a formula that combines Address Line 1 and Address Line 2 into a single, two-line field) to appear on more than one line. (This option only appears for fields containing text.)
Style Page
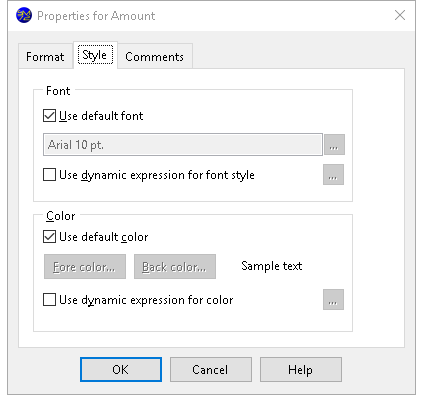
The options in the Style page of this dialog are:
Use default font: if this option is turned on, which it is by default, this field uses the default font for the report, even if the default font is changed after the field is added to the report. To change the font, turn this option off.
Font: the font name, size, and style to use for this field. To change any of these, click the font selection button (which appears as "...") and select the desired font name, size, and style from the Font dialog that appears. Note that if you select a font script other than Western, the script name (such as "Greek") appears after the font name, size, and style.
Use dynamic expression for font style: if you want the font name, size, or style of the field to change depending on the contents of this or some other field, turn this setting on and click the ...button. The following dialog appears:
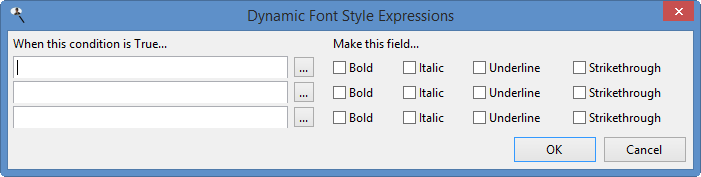
In this dialog, enter the expression you wish to look for (you can click the Expression Builder button to launch the Expression Builder which makes it easier to enter the expression) and the font style to use when that expression is true. You can use "{VALUE}" as a placeholder for the value of the current field being output rather than specifying the field name. You can enter up to three expressions to change the font style. If none of the expressions is true, the font style specified for the field is used.
Note that using this option significantly increases report generation time, so use it only when required.
Use default color: if this option is turned on, which it is by default, this field uses the default color specified in the template for the report, even if the default color is changed after the field is added to the report. To change the color, turn this option off.
Fore color: the foreground, or text, color for the contents of the field. The default color is the color used in the template for the report; to change it, click this button and select the color from the Color dialog that appears. The sample text show what the field looks like in the report.
Back color: the background color for the field. The default color is the color used in the template for the report; to change it, click this button and select the color from the Color dialog that appears. The sample text show what the field looks like in the report.
Use dynamic expression for color: if you want the color of the field to change depending on the contents of this or some other field, turn this setting on and click the button with the ellipsis. The following dialog appears:
In this dialog, enter the expression you wish to look for (you can click the Expression Builder button to launch the Expression Builder, which makes it easier to enter the expression) and the color to use when that expression is true. You can use "{VALUE}" as a placeholder for the value of the current field being output rather than specifying the field name. You can enter up to three expressions to change the color. If none of the expressions is true, the color specified for the field is used.
Note that using this option significantly increases report generation time, so use it only when required.
Comments Page
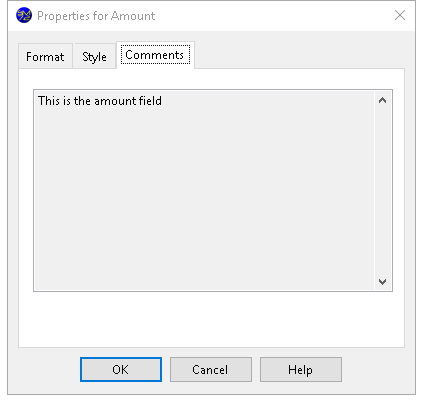
The Comments page shows any comments about the field, which is often used to provide a description of the field's contents.
Step 3 Standard Filter Options
Step 3 allows you to specify a filter used by default for this report. You can skip this step if no filter is normally used.
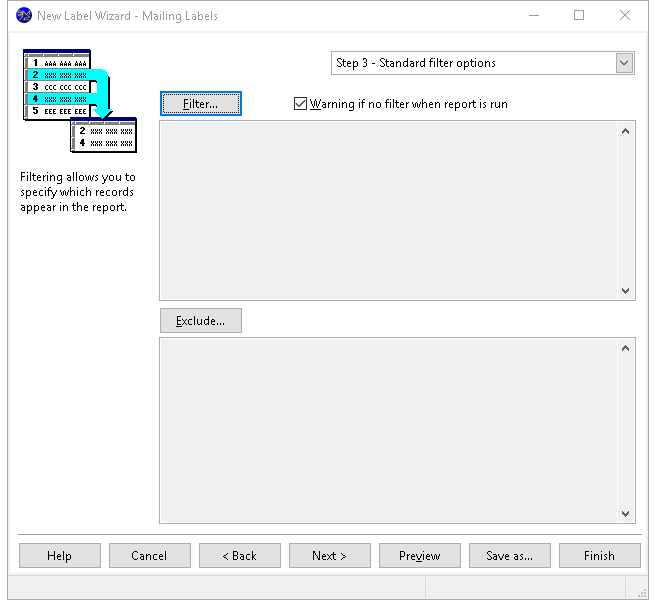
To specify a filter, click the Filter or Exclude button, and enter the filter conditions using the same procedures described in the Filter Records topic.
Step 4 Standard Sort Options
You can specify how the data in the report is sorted in Step 4.
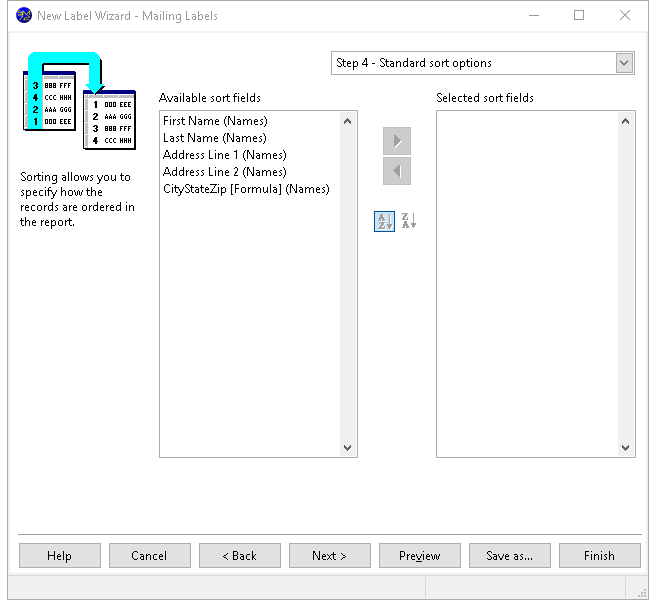
You can specify a sort order using the same procedures described in the Choosing a Sort Order topic.
Step 5 Formatting Options
Step 5 allows you to specify formatting options for the report and to fine-tune the label dimensions.
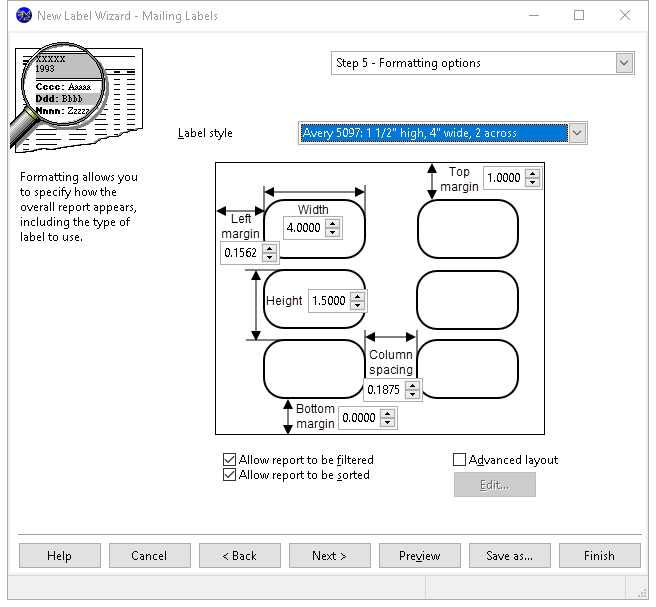
The options in this step are (note that all label dimensions are in inches):
Label style: choose the desired Avery label number from the drop-down list of choices. In addition to showing the number, the dimensions of the label are also displayed. Note that if you choose a label that isn't tall enough for the fields in the report (for example, the report has eight fields but you specify a 1" high label which can only accommodate six lines), the text in the label is cut off. Be sure to preview the report to ensure you've selected the correct label size. A rule of thumb to use is that labels will print six lines per inch. This option is disabled for advanced layout reports.
Top margin: the distance from the top of a label page to the first label. This and the other dimensions are automatically set when you choose a label style and should only be changed if labels do not quite print exactly where you need them to.
Left margin: the distance from the left edge of a label page to the first label.
Width: the width of a label.
Height: the distance from the top of one label to the top of the next one down (including any space between them).
Column spacing: the distance between labels horizontally.
Bottom margin: the distance from bottom on the last label on the page to the bottom of the page.
Allow report to be filtered: turn this option on if someone can specify a filter for the report in the Reports Explorer. This should normally be turned on, but if you specify a filter in Step 3, you may wish to turn this off.
Allow report to be sorted: turn this option on if someone can specify a sort order for the report in the Reports Explorer. If you group on any field, or specify a sort order in Step 4, you may want to turn this option off.
If you are defined as an advanced user in the Maintain Users and Groups dialog and you have a Premium or Ultimate license, two other options are available:
Advanced layout: by default, labels print each field on its own line, starting at the left edge of a label. If you want more flexibility in labels, such as several fields on one line or fields that appear in the upper-right corner of the label, use the Advanced Report Designer. To do that, turn the Advanced layout option on. Once you've done this, you can no longer add or remove fields using the items in Step 2; you must add or remove them using the Advanced Report Designer instead. If this option is turned off for a report that has an advanced layout, any advanced layout for the report is discarded (you are asked to verify that you want to do this).
Edit: click this button, which is only enabled if the Advanced layout option is turned on, to display the Advanced Report Designer.
Here are some tips:
- Size the Detail band to the height of your labels (the ruler at the left edge of the Advanced Report Designer shows the height). Size the Page Header band so it's the distance from the top of the page to the first label (measure that with a ruler).
- In the Page Layout page of the Report Properties dialog, set the Number setting under Columns to the number of labels across each page. Set Spacing to the amount of space between labels (you likely need to measure that with a ruler). Set Left margin to the amount of space between the left edge of the page and the start of the first label (measure that as well). Select the Left to right button under the Column print order setting so labels print left-to-right rather than top-to-bottom.
- Adjust the width of any field that extends beyond the right edge of the label.
- From the Report menu, choose Print Preview to ensure the labels look the way you expect them. If not, make any adjustments necessary.
- To test that the labels correctly print on your label stock, create a filter in the Filter page of the Reports Explorer that prints only enough records for two pages of labels (you can click Preview after setting the filter to see how many pages are used, and adjust the filter accordingly until the desired number appears). Load the labels into your printer and click the Print button to print the labels. Ensure the records print properly on each label, especially at the top of the second page. If necessary, click the Edit button and used the Advanced Report Designer to adjust the layout as necessary. Repeat until the labels print correctly.
Step 6 Security Options
The options in Step 6 allow you to determine who can access your report and what they can do with it.
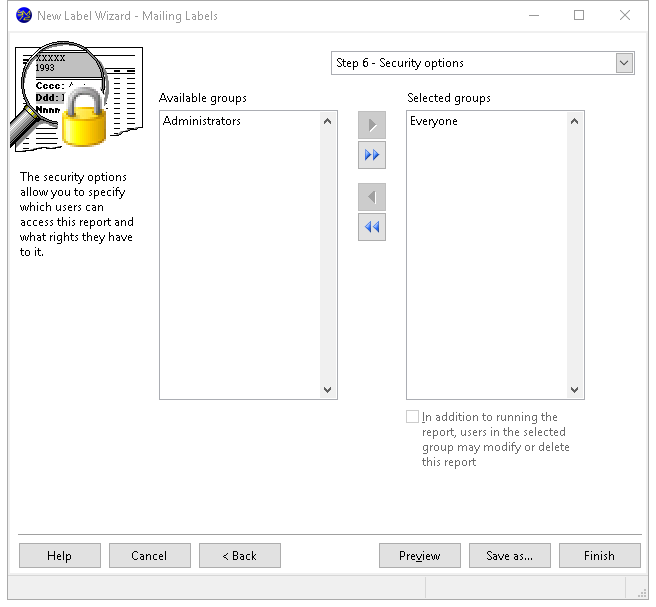
The options in this step are:
Available groups: this shows which user groups do not have access to this report.
Selected groups: this shows which user groups have access to this report. By default, the Everyone group has access to a new report, so all users can see it. If you want only certain users to see it, remove the Everyone group from the Selected list and add the appropriate groups from the Available list. If no groups have access to the report, the report is essentially private, available only to you.
Add: clicking this button adds the selected group in the Available list to the Selected list. You can select several groups by holding down the CTRL key as you select them; clicking Add adds all selected groups to the Selected list. You can also add the group by double-clicking it in the Available list, selecting it and pressing ENTER, or dragging the group from the Available list to the Selected list. The group is removed from the Available list.
Add all: clicking this button adds all groups from the Available list to the Selected list.
Remove: clicking this button removes the selected group (or groups if you have selected more than one) from the Selected list. You can also remove the group by dragging it from the Selected list to the Available list. The group is added to the Available list.
Remove all: clicking this button removes all groups from the Selected list, and adds them to the Available list.
In addition to running the report, users in the selected group may modify or delete this report: turn this option on if the selected group in the Selected list can edit or delete this report; if this item is turned off, only you are able to do so.