

Student Manager Quick Start Guide - Print Version
- Launching Student Manager
- Main Menu
- Quick Launch Toolbar
- Shortcut Keys
- Navigation Tools
- Adding Records
- Entering Data
- Saving Changes to Records
- Record Information
- Finding Records
- Deleting Records
- Running Reports
- Finding the Right Report
- Report Areas
- Report Options
- Selecting/Running a Query
- Default vs Additional Reports
- Previewing/Printing the Report
- Exiting Student Manager
- Student Manager Glossary of Terms
Terms of Use
By accessing, reading, or using this guide, you agree to be bound by the terms and conditions outlined in this agreement.
This guide is provided solely for the internal training and professional development of authorized employees, students, or participants. You may view and print individual pages for personal, non-commercial use related exclusively to your training.
All content within this guide, including text, graphics, logos, layouts, and software, is the exclusive property of ACEware Systems, Inc. and is protected by applicable copyright and intellectual property laws.
You may not, without the prior written consent of ACEware Systems, Inc.:
- Distribute, sell, lease, or license this material to any third party.
- Modify, translate, or create derivative works based on this content.
- Upload the guide to any public server, network, or file-sharing website.
 800-925-2493 ● info@aceware.com ● support@aceware.com
Website: www.aceware.com ● Help Center: help.aceware.com
Launching Student Manager
Double-click the icon on the computer's desktop (or wherever your system administrator placed the shortcut) to start Student Manager.
The Login screen opens. Enter the login information.
See the Remember Me on this Computer topic for information on the feature.
- Press the ENTER key.
You’ll now be at the main Student Manager screen.
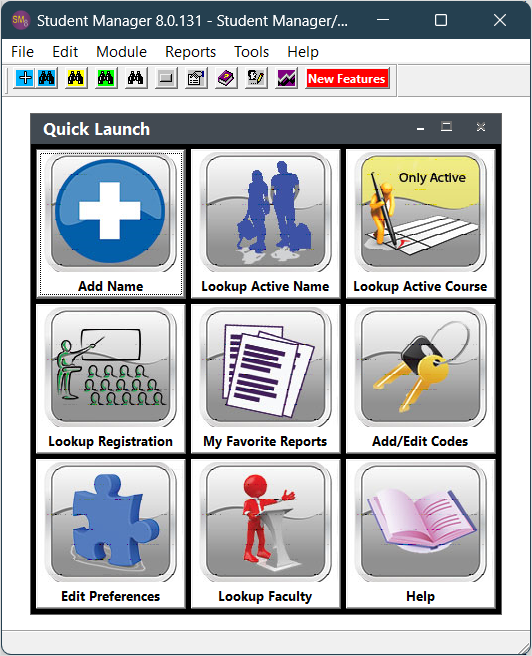
Remember Me on This Computer
Student Manager offers a "Remember Me" option to remember your user credentials. Checking the Remember Me on This Computer box during the log in process will remember your credentials so you won't need to enter them every time your start Student Manager.
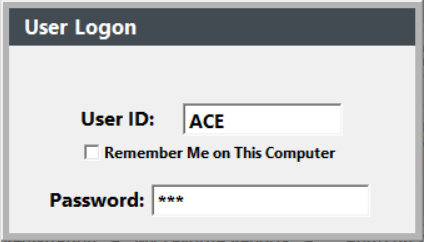
Remember Me
To remember your logon credentials, enter your credentials in this order:
- Enter the User ID first.
- Check the Remember Me on This Computer box.
- Enter your Password.
- Press the Enter key.
Forget Me
To forget your user credentials on this computer, select .
Main Menu
Access the following from the Main Menu.

- File – Create and Find records, Save changes to current record, and Exit Student Manager.
- Edit – Undo, Copy, Edit, Paste, Clone and Paste Name record, Preferences and User Profile.
- Module - Access Names, Course, Registration, Firms, Zip Codes, Locations, Holidays, and Optional modules.
- Reports - Run reports.
- Tools - Import/Export Reports (Report Tools), Browse databases (Database Admin), Set/Remove filters, Import/Export data, Update Counts, Manage Credit Cards, Set up Users (Password Maintenance), and check for Callbacks and Reminder Notes.
- Help - Access Help, Technical Support Information, the Student Manager website, and Student Manager System information (About Student Manager).
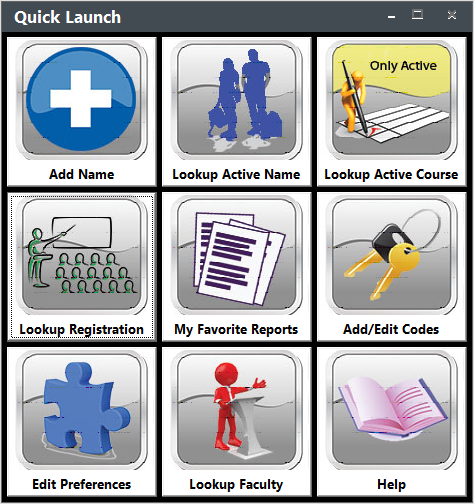
Quick Launch
Access popular routines from the Quick Launch window.
Add Records
There are several ways to add records to a table:
File > New Menu
Select an option from the File > New menu to create a new record in the selected table. For example, to create a new Name record, select .
Module Menu
Select Module > appropriate module > Add to create a new record. For example, to create a new Course record, select .
Module Screen
If you have the appropriate screen open, you can click the Add button in the Module Button bar to create a new record. For example, if you have the Names screen open, click the Add button to add a new Name record.
Shortcut Key
Use the appropriate shortcut key from the Main Student Manager screen to create a new record. For example, to create a new Name record, press ALT+A.
Entering Data
Here are some hints to help you easily enter data in records:
Field Capitalization
Many field entries are automatically capitalized (e.g. First and Last Name). For this reason, we strongly discourage using the using the CAPSLOCK key when entering data.
Move to Next Field
Press the TAB key to move to the next field. All screens have a tab order set that is natural to the way you would enter data into the record. For example on a new Name record, tabbing will move you from First Name to Middle Initial to Last Name.
Move to Previous Field
Press SHIFT+TAB to move to a previous field. For example, if you are in the Last Name field and realize that you misspelled the First Name, press Shift+Tab twice to move back to the First Name field.
Fields with Drop Down Lists
When you tab into a field with a drop drown list, the list will automatically open for you to make a selection. Scroll down the list to the value you want to select, or type in the value--the cursor moves down the list as you type. Once you the value highlighted, press the ENTER key to enter the value in the field and move to the next field.
Removing a Value from a Validated Field
To remove a value from a field with a drop down list, click into the field then press the DELETE key. The value is removed from the field.
Fields with Pink Hash Marks
In these fields, you enter the value then press the TAB key. If the entry is found, the associated fields will be auto-entered for you. For example, enter a zip code into a Name record then tab out. If the zip code is a valid code (there is a zip code record in the Zip Code table), the system looks up the zip code record then enters the associated city, state, county, country and area codes into the appropriate fields for you.
Checkboxes
You can check/uncheck a box on a screen by clicking the box with your mouse. You may also check/uncheck a box by pressing the SPACE BAR when you tab to the checkbox. Note: a highlighted checkbox’s label is surrounded by a dotted line.
Save Changes to Records
You have several options to save changes to a record:
File > Save
You can save any changes to the open record by selecting .
File > Save and Close
You can save any changes to the open record AND close the screen by selecting .
Save button
You can save any changes to the open record by clicking the Save button in the module's Module Button Bar.
OK/Close button
You can save any changes to the open record AND close the screen by clicking the OK/Close button on the module's Module Button Bar.
Other Saving Routines
The Top, Prior, Next, Bottom, Add and Find buttons on the Module Button Bar also save changes to the record before moving on to the next record you select.
Record Information
Information such as the date the record was added to the system, last updated, user who created and last updated record appears at the bottom of Student Manager screens and is viewable from all tabs.

Finding Records
When you select a find routine (e.g. look up option from toolbar or menu, or Find button on a module screen), the Student Manager Search window opens with the list of records in that table so you can search for the one you want to open.
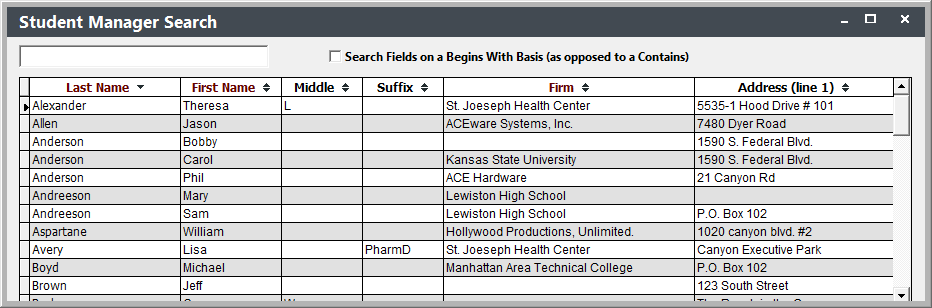
Search for a Record
Type a search term and the system will return records containing your search term
If you have the Disable 1st Word Auto-Search preference enabled, you must click the Search button to see results.
Name Search: Student Manager supports partial name searches. You can enter 2 or 3 characters of the last name, a space, then 2 or 3 characters of the first name (e.g. hav ch).
Date Search: enter the date in mm/dd/yy format. You can also enter a partial date, e.g. 06/02 (June 2nd).
Open a Record
- Press the TAB or ENTER key to move from the Search field to the list of records.
- If more than 1 record meets your search term, scroll to the record then press the ENTER key to open it.
Search Keys
You will have several search keys depending on what Find Records option you are accessing. For instance, in the Search Names routine, you can search for records by Name, ID, Firm, Zip Code, Day Phone or Home Phone.
The Search routine will return records that have your search value in any of the searchable fields.
Column Sorting
If you have a set of records showing and you want to sort that list, click on the column Header (e.g. Firm, Begin Date) to order the list by the column you clicked.
Resizing the Search Window
You can resize the find window to your desired preferences. Just drag the margins to where you want (we suggest making the WIDTH as wide as your screen for better viewing). Student Manager will remember your customized window width.
Delete Records
Click the Delete button in the Module Buttons to delete a record.
Parent Records
You CANNOT delete 'parent' records until you have deleted all associated 'child' records.
For example, you cannot delete a Name record if the individual has enrolled in courses. You must first delete the registration records then you can delete the Name record.
VFP Database Users
In VFP databases, records are marked for deletion and are not removed from the data tables until you run the Pack procedure.
Deleted records do not appear in Find routines or when clicking the Next/Previous buttons in the Module Buttons.
-You can undelete selected Pay records from the F7 Pay Grabber tool --IF-- you haven't run the Pack procedure yet.
SQL Database Users
In SQL databases, records are immediately removed from the data tables.
Delete Course/Room Use
If you delete a course record, all the associated Room Use records are removed from the system.
If you restore the course record, you must recreate the Room Use records for the course:
- Click into the Sessions field.
- Re-enter the number of sessions.
- Tab out of the Sessions field.
- Save the course record.
Finding the Right Report
How to find the report you need.
How do I start?
You must first determine what you want contained in your report. If you can put into words what the desired output will be, you are half way there.
For instance, “I want to generate letters for all individuals who currently have a credit balance, informing them of the dollar amount of that balance and proposing that they use it for an upcoming class.”
Where do I go?
Once you’ve decided what information you want on your report, you must determine which report to use. Begin by determining what reporting area accesses that information. For example, to get information on registrants, you would choose the Registration reporting area, not the Faculty reporting area.
Default vs Additional reports?
Every report area provides one Default report that displays the most common elements for the particular report area. For example, the default Name Roster report may list registrant data in a columnar format.
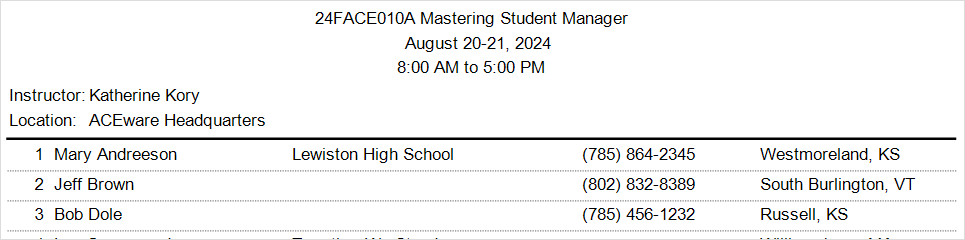
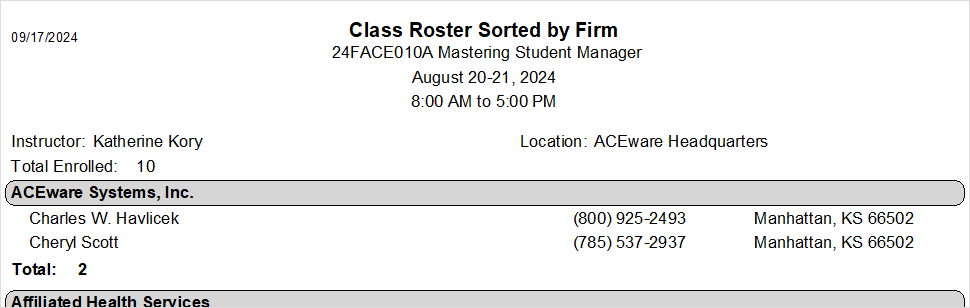
Most report areas also provide Additional reports. These are report templates that display the same data in a different format. Or they are report templates designed for specific purposes.
For example, this is a Name Roster that sorts registrants by Firm assigned.
Report vs Query?
Query - a query is a request for information. You request specific information from the data tables to be displayed on the report. E.g. return all people which took courses starting between 2 dates.
Report - a report is a template which displays the information you've requested in a certain manner. For instance, a mailing label template displays information from the Name record in a block form for printing mailing labels.
Reporting Areas
Run reports from these areas:
Module Reports (Quick Reports and Receipts)
Quick reports give you data for a specific record.
- Course Quick Report button – print rosters, name tags, mailing labels, certificates, course description, or faculty contracts for particular course.
- Names Quick Report button– print fax cover, envelope, transcript, or letter for particular individual.
- Registration Print Receipt button – print receipts for particular individual or for the registration group.
- Payment Print Receipt and Close button - print receipts for particular individual or for the registration group.
- Budget Quick Reports button - print budget reports for the course.
- Faculty Manager Reports button - run faculty reports. Note: you can only run reports from the Reports > Faculty > Faculty Only Reports report area. If you want to run other faculty reports (e.g. contract agreements, instructor lists), you must run them from the Reports > Faculty menu.
- Pocket Ledger Print Requisition button (requires Pocket Ledger)- print requisition orders for a particular expense record.
Student Manager Report Menu (Main Menu Item)
This is the main reporting area in Student Manager. Reports are grouped according to the type of information contained in the report:
- Accounting – Income, Cash Box, Financial
- Demographics – Name information, Firm information, Mailing Labels, and Transcripts
- Courses – Details, CEU Reporting, Course Income/Enrollment Summary, and Catalog
- Registrations – Registration Details, Deadbeat, Receipts, Rosters, Transcripts, Name Tags, Table tents, and Certificates
- Faculty – Agreements, Instructor Lists, Performance Data, Check Requests, Faculty Reports
- Invoices – Invoices, Aging Reports
- Pocket Ledger – Income/Expense Listings, Balances, Budgets and Snapshot
- Workshops – Rosters/Certificates, Enrollment Summary
- Statistics – Names Demographic Sorting and Performance Summary, Tracking Codes, Course Data Summary and Performance Review.
- Codes – Student Manager Codes Listings
When running reports from the Report Menu, you must also run an appropriate query to get the data you want displayed on the report.
Special Reports
These reports are run from the main screen with the specified keyboard shortcut:
- F2 Quick Counts Report - view or print enrollment counts for upcoming courses.
- CTRL+F2 Quick Room Use Report - view or print enrollment counts for upcoming courses from 2 to 90 days out.
- F3 Faculty Talent Search - Search for instructors by several criteria.
- F4 Registration Search - search for registration records.
- F5 Search Names - search for name records.
- F7 Pay Grabber - search for payments.
- F9 Dashboard Report - quick look at courses with low enrollment, courses full or nearly full, summary of enrollments and income.
- F10 Membership Retention Wizard - returns students' retention status, courses they have taken, or a list of students meeting the criteria
- F11 Attendance Tracker - view/print/export attendance tracking information for a specific student.
- F12 Financial Aid Reporter - returns information about student awards/draws.
Report Options Screen
Many report areas will display the Report Options screen for you to select your report options. For example, this is the Mailing Labels Report Options screen:
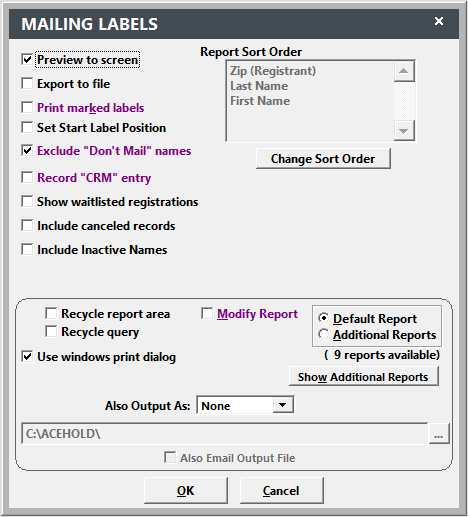
Several report options are available in all report areas, such as Print to screen and Modify report. Some are only available in certain report areas. For example, Show Waitlisted Registrations is only available in report areas accessing registration information.
To run the report, select the appropriate options then click the OK button.
Option Descriptions
Here a brief description of the available options:
- Print to screen – check to see an on-screen preview of the report before sending it to the printer.
- Export to file – check to export the data in the report to an external file (i.e. Microsoft Excel, Text file, etc.).
- Print New Invoices – if checked, will print invoices for all billing records which have not yet been assigned an invoice number.
- Print Marked Labels – if checked, all Name records which have the Print Label checked are included in your report.
- Set Start Label Position - allows you to print on a partially used label/name tag sheet.
- Exclude "Don't Mail" Names – if checked, will not include any Name record which has the Don't Mail box checked.
- Record "CRM" Entry – if checked, after the report runs, you'll be given the opportunity to create a CRM entry for all Name records in the report.
- Report Sort Order – allows you to change the sort order for records included in report. CAUTION: you may receive unexpected results because report grouping and justdoit functions will override your sort order options.
- Show Waitlisted Registrations – check to include waitlisted registrations in your report.
- Include canceled records – check to include canceled records in your report (i.e. canceled courses, registrations, etc.).
- Include Inactive Records - in Mailing Labels and Names w/Codes, check to include inactive Name records.
- E-mail Separately? - if checked, the system will create individual pdf files and email them to the individuals in the report.
- Include Third Party Billing Reggies – check to include registrations marked as billing records in your report.
- Generate Individual PDFs - if checked, will generate individual PDF transcripts for all users in the report.
- Clear Selected Fields from cursor - if checked, adds an additional step to select fields you want to keep in the report cursor.
- Recycle Report Area – if checked, you’ll be returned to the Report Options screen after running the report to run another report.
- Recycle Query – if checked, you’ll be able to run reports in this report area with the same query.
- Also Output As (PDF) – export the report as a PDF file.
- Modify Report – check to modify the report. For more information, see next section.
- Default Report/Additional Reports – select the report you want to run.
- Show User Reports – click this button to see the list of additional reports in this reporting area.
- Use Windows Print Dialog – this option opens the standard Windows Print Dialog box when you print the report.
Selecting/Running a Query
A query is a request for specific information to display on the report template.
For example, if you want to print rosters for all courses which begin between two dates, you would select a query that asked for a date range. To select a query, highlight it then click the Select button.
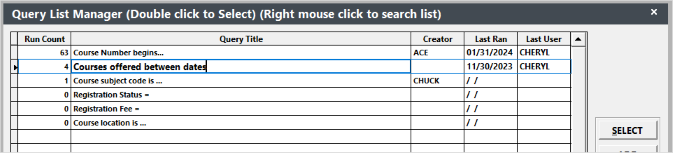
You’ll be asked to enter the dates next. Enter the appropriate dates, or select dates using the Date Picker icon, then press the OK button.
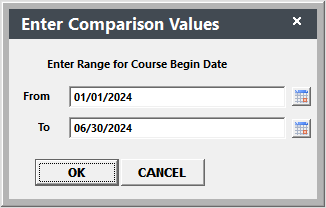
Other queries might ask for something like the Course Code Begins with:
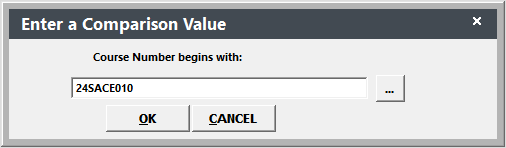
You select the query that gets you the data you want to see on your report.
Default vs Additional Report
Every report area provides one Default report that displays the most common elements for the report area. For example, the default Name Roster report may list registrant data in a columnar format.
Most report areas also provide Additional reports. These are report templates that display the same data in a different format. Or they are report templates designed for specific purposes.
For example, this is a Name Roster that sorts registrants by Firm assigned.
After running your query
If you selected the Default report and Print Preview options, the Print Preview opens.
If you selected the Addtional Report option, the Additional Report list opens for you to select the Additional Report you want to run.
!(../images/additionalreports.png)
Select the report you want to run by highlighting it and pressing the Enter key.
Previewing/Printing the Report
If you selected the Print to Screen Report Option screen, the Print Preview window opens. From here you can preview and print the report.
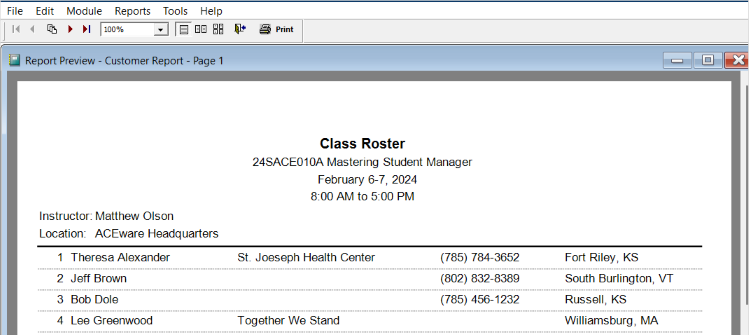
Use the Print Preview Tool Bar to view pages of the report, zoom in or out, print, or close the Report Preview Window.
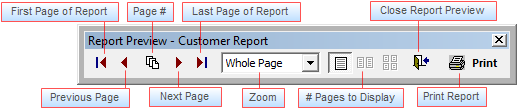
Exit Student Manager
Before exiting Student Manager, you must close all module screens and/or reports. Once you close the module screens, you have 3 ways to exit Student Manager:
- – select to exit Student Manager.
- – press ALT+Q to exit Student Manager.
- - click the X button in the top right of the Student Manager screen.
Student Manager Glossary
The following is a glossary of Student Manager terms:
Module
The different components of the Student Manager program, e.g. Names module, Course module, Registration module, Payment module, Faculty Manager module etc.
Screen
The form on which you enter data is called a Screen. For instance, the data form on which you enter an individual’s personal information is called the Names screen.
Tab
A tab is a partition on a screen where specific fields from the record is viewed/edited. For example, on the Names screen, comments are viewed on the Comments/History tab.
Window
These are informational messages which appear when performing certain tasks in Student Manager. Some windows require you to confirm your action by clicking OK or YES to continue with the task. Other windows give you additional options when performing tasks.
Record
A record is made up of all the data pertaining to one individual, one course, etc. For example, a Course record consists of all the data you entered in the various fields about the course, including title, department, begin/end date, etc.
Table
Student Manager Tables are made up of columns and rows.
- Each column corresponds to a field in the table. For example, each field in the Course table has its own column.
- Each row corresponds to a record. For example, a row contains all the data about the individual.
Field
The data you enter into records is stored in fields. E.g. First Name, Day Phone, Course Title, etc.
Student Manager Fields fall into one of these 5 data types:
- Character: fields that allow entry of letters, numbers and symbols. Names, titles, and codes are examples of Character fields.
- Numeric: fields that only allow you to enter numbers. Dollar amounts and number of items are examples of numeric fields.
- Date: fields that only allow you to enter dates. These fields always follow the MM/DD/YYYY format.
- Logical: fields that are either true or false. Check boxes on module screens are examples of logical fields.
- Memo: fields that can hold information up to 64,000 characters in length (e.g. multiple paragraphs of information).
In addition to the data types, Student Manager uses 2 field types:
Editable Fields: fields that contain data which can be edited. These fields appear as white 3-D boxes with a descriptive label to the left of the box telling you what type of data to enter in the field. Examples are first name, course title, start date, etc.

Display Only Fields: fields that are populated by the system and are not editable. These fields are displayed as data only. Examples are Add Date and Created By fields:

Unique Identifier
Each record in a table must have a unique identifier to distinguish it from the other records in the table. Records in the table may have some of the same data but NO two records in the table can have the same identifier. The unique identifier for the Names table is the ID field. The unique identifier for the Course table is the Course Code.
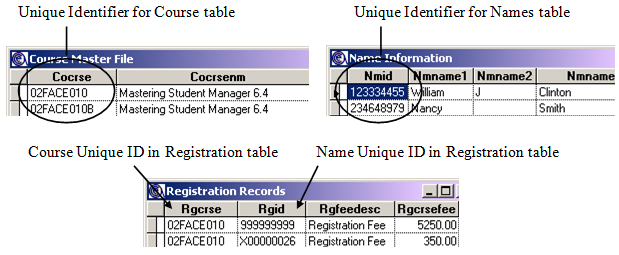
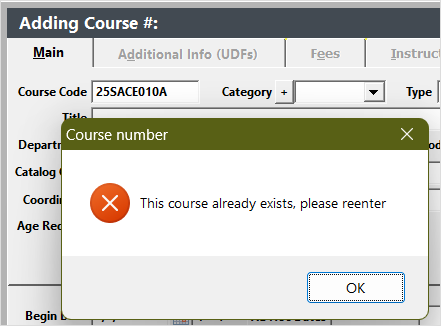
If you try to enter the same unique identifier on a record, the system warns you that you already have a record created with that unique identifier. For example, when creating a new course record and entering a course code that is assigned to another record:
Validation
Validated fields only allow pre-specified data, called Codes, to be entered in them. Most of these validated fields have drop down menus from which you select the appropriate code.
Shortcut Keys
Keyboard Shortcuts to perform open screen or perform tasks in Student Manager. You can also download a PDF copy of the Keyboard Shortcuts.
Activate Main Menu Items
ALT+F= Activates File Menu
ALT+E= Activates Edit Menu
ALT+M= Activates Module Menu
ALT+R= Activates Reports Menu
ALT+T= Activates Tools Menu
ALT+H= Activates Help Menu
ALT+G= Activates Module > Registrations Menu
ALT+P= Activates Module > Pocket Ledger Menu
ALT+S= Activates Reports > Statistics Menu
Note: once you activate a Menu, you can select a specific item from the menu by pressing the underlined letter. For example, if you activate the Module menu you can select the Codes option by pressing O.
Student Manager Actions
F1= Show List of Student Manager shortcut keys
CTRL+U= Shows who is logged into Student Manager (Tools > Show Users)
CTRL+B= Checks for Student Call Backs (Tools > List Student Callbacks)
ALT+K= Checks for Instructor Call Backs (Tools > List Instructor Callbacks)
CTRL+E= Opens System Information window (Help| About Student Manager)
ALT+Q= Exits Student Manager (File > Quit)
ALT+1= Opens course Mass Change/Update/Delete/Archive screen
Module Shortcuts
ALT+C= Opens new Course record (Module > Courses > Add Course)
ALT+J= Opens Find Course window (Module > Courses > Find Course)
CTRL+K= Opens Find Active Course window (Module > Courses > Find Active Course)
ALT+A= Opens new Name record (Module > Names > Add New Name)
ALT+L= Opens Find Names window (Module > Names > Lookup Name)
CTRL+F= Opens Find Firm window (Module > Firms > Find Firm)
ALT+I= Opens new Faculty Manager record (Module > Faculty > Add Instructor)
CTRL+I= Opens Faculty Manager Find window (Module > Faculty > Find Instructor)
ALT+Z= Starts Speed Registration Entry routine (Module > Registrations > Speed Registration Entry)
ALT+O= Opens Find Outstanding Invoices window (Module > Invoices > Outstanding Invoices)
Course Record Shortcuts
ALT+3= Copies code, title, dates, instructor(s) names, time, description, location, and main registration fee from the open Course record to the Clipboard (for recalling into a document, e.g. letter, email, etc.)
CTRL+T= Copies all of the email addresses of students in the course, separated by semicolon, onto your clipboard (for pasting into an email client or document, etc.)
Faculty Record Shortcuts
ALT+3= Copies name, title, firm, address, day phone, and email address (in block format) from the open Faculty record to the Clipboard (for recalling into a document, e.g. letter, email, etc.)
F3= Faculty Talent Search
Name Record Shortcuts
F5= Find Names Tool
ALT +0 (Zero)= Manually edit the City and State
ALT+3= Copies name, title, firm, address, day phone, and email address (in block format) from the open Name record to the Clipboard (for recalling into a document, e.g. letter, email, etc.)
ALT+F9= Shows payment history of individual (can also be ran from Registration screen)
ALT+F12= Opens Log CRM Entry screen
ALT+W= Clones current Name record (Edit > Clone Name)
ALT+V= pastes data from cloned record into open Name record (Edit > Paste Name)
ALT+Y= create an Instructor record from the open Name record
Shift+F5= Opens Blacklist
Shift+ALT+P= ACEweb Users Only: blanks the Password field
Firm Record Shortcuts
ALT+3= Copies firm name, contact, address, and phone (in block format) from the open Firm record to the Clipboard (for recalling into a document, e.g. letter, email, etc.)
Registration Record Shortcuts
F4= Find Registrations Tool
F8= Mass Group Registrations
ALT+4= Switches between open and validated Fee Adjustment Descriptions
ALT+F9= Shows payment history of individual (can also be ran from Names screen)
CTRL+F12= Registration Import Wizard
Workshop Record Shortcuts
CTRL+T= Copies all of the email addresses of students in the workshop, separated by semicolon, onto your clipboard (for pasting into an email client or document, etc.)
Attendance Tracking Shortcuts
ALT+9= adds a custom Attendance Tracking record
F11= Attendance Tracker Report
Screen Shortcuts
Ctrl+Tab= Move FORWARD through screen tabs
Ctrl+Shift+Tab= Move BACKWARD through screen tabs
Tab= Move FORWARD through fields
Shift+Tab= Move BACKWARD through fields
Esc= Escape screen WITHOUT saving changes; escape Find window WITHOUT selecting record
CTRL+A= Selects all data in a field
CTRL+Z= Undo
CTRL+X= Cut
CTRL+C= Copy
CTRL+V= Paste
CTRL+Y= Deletes characters from where the cursor is to the end of the field
CTRL+Left Arrow Key= Moves the cursor to the front of next word in a field
CTRL+Right Arrow Key= Moves the cursor to the front of the previous word in a field
Home= Moves to the beginning of a field
End= Moves to the end of a field
F4= Opens drop down list
Open Report Shortcuts
CTRL+M= Mailing Labels (Reports > Demographics > Mailing Labels)
CTRL+P= Names w/codes (Reports > Demographics > Names w/code)
ALT+D= Deadbeat (Reports > Accounting > Special 1 Reg/1 Line [Deadbeat])
CTRL+R= Name Roster (Reports > Registrations > Rosters > Name Roster)
F2= Quick Count Enrollment Report
CTRL+F2= Quick Room Use Report
CTRL+F3= Course Packaging Report Area
F7= Pay Grabber Report
F9= Student Manager Dashboard
F10= Membership Retention Wizard
F11= Attendance Tracker Report
Report Designer Shortcuts
CTRL+I= Preview Report
CTRL+F4= Close the Modify Report screen
“Special” Action Shortcuts
ALT+F1= Repeats last Course Code entered in Query, last course record edited, or last registration added
ALT+F2= Repeats last text value entered into a query field
Shift+F2= Stamps current date into a date field
ALT+F3= Recalls user message/data into field (enter message on Edit > My User Profile
ALT+F4= Recalls user message/data into field (enter message on Edit > My User Profile screen)
ALT+F5= Recalls user message/data into field (enter message on Edit > My User Profile screen)
F6= Resets system to recover from error. NOTE: any unsaved changes will be lost