
Skip to content
Help Center
Main Navigation
Screen Layout
Courses
Names
Registrations
Payments
Reporting
Report Area Guide
Reporting-Data Structures
ACEweb
Budget Builder
Catalog Builder
Company Invoicing
Emailing
Faculty Manager
Pocket Ledger
Workshops
Tools
Guides
Webinars
Integrations
Create HTML Emails
On-Premises Requirements

Appearance

Sidebar Navigation

Welcome

Student Manager Modules

Quick Start Guide

Launching Student Manager

Navigation Tools

Quick Launch Settings

Screen Options

Adding Records

Entering Data

Saving Changes

Record Information

Finding Records

Deleting Records

Running Reports

Finding Reports

Report Areas

Report Options

Selecting/Running Queries

Default vs Additional Report

Previewing/Printing Report

Exiting Student Manager

Glossary of Terms

Screen Layout

Course

Names

Registration

Payment

Firm

Location

Attendance Tracking

Budget Builder

Catalog Builder

Faculty Manager

Financial Aid

Pocket Ledger

Workshops

Courses

Course Module

Adding a Course

Setting Date/Time

Selecting a Location

Room Use Records

Generate Room Use

Adding Additional Information

Adding UDFs

Adding Unlimited UDFs

Adding Main Fees

Adding Other Fees

Coupon Codes

Delete Course Fees

Assign Instructors

Adding Comments

Adding ACEweb Info

Event Type Courses

Hybrid Courses

Membership Courses

View Student Lists

Course Reports

F2 Quick Counts

CTRL+F2 Quick Room Use

Course Bookmarks

Printing Rosters

Course Documents

Cloning Courses

Cancelling Courses

Mass Change/Update/Delete/Archive

Certificate Programs

Certificate Wizard

Names

Names Module

Adding a Name

Entering a Firm

Setting Default Fee Category

Adding Interest Codes

Setting Flag Fields

Demographics

Adding Comments

Adding Additional Information

Adding Unlimited UDFs

Adding Credentials

Keeping a Contact Log

Call Back System

Name Grouping

F5 Name Search

Cloning Name Records

Name Additional Documents

Courses Taken

Payment History

Name Reports

Deactivate Names

Combine Names

Delete Names

Registrations

Registration Module

Registering Individual in a Course

Assessing Additional Charges

Assign a Proxy

Adding Additional Information

Who Approved Registration

Reserve Seats

Grouping Registrations

Ungrouping Registrations

Transfer Registrations

Speed Registration

Mass Registration

Make Credential

Student Documents

F4 Find Registrations

Full Courses

Waitlisting

Cancel Registration with No Payment

Cancel Registration with Payments

Cancel Course Wizard

Printing Receipts

Registration Reports

Payments

Payment Module

Making Payments

Making Payments to Groups

Payment Plans

Cancelling Registration with Payment

Refund to Escrow

Refund without Cancelling Registration

NSF (Bad) Checks

Transfer Payments

Printing Receipts

Print Receipt Options

F7 Pay Grabber

Payment Mistakes

Void Receipt Tool

ACEweb

ACEweb Online Registration

Course Lookup Options

Course Search Options

Student Options

Registration Process

ACEweb User Passwords

Opening Day Tips

Course Publication Checklist

Student Manager Preparation

Course Setup

Course Group Setup

Course Fees Setup

Hiding Course Groups from ACEweb

Characters Used in Codes

Interest, Source, Tracking Code Display

Workshop Setup

WWWEB User

Previewing Course Information Page

Customize ACEweb

Course Listing/Look Up Options

Student Options

INI Settings

Editing INI Settings

INI Settings by Category

Other INI Files

HTML Templates

Customizing HTML Templates

Web Page Generation

Template Listing

Custom Templates

Google Analytics

Express Registration Templates

Email Templates

Template Functions

ACEweb Options

Instructor Access

Optional Modules

Attendance Tracking

Attendance Tracking Module

Enabling Attendance Tracking

Record Attendance

Email Absent Students

Attendance Tracking Reports

F11 Attendance Tracker

Budget Builder

Budget Builder Module

Setting Fees Estimates

Adding Per-Person Charges

Estimating Expenses

Budget Results

Budget Reports

Catalog Builder

Catalog Builder Module

Course Descriptions

HTML Editor

Spell Checker

Prerequisites and Related Courses

Import Catalog Records

Memo Text

Email Templates

Marketing Campaigns

ACEweb Bulletins

Company Invoicing

Company Invoicing Module

Invoice Preferences

Creating Invoices

Invoice Criteria

Paying Invoices

Reprint Invoices

Reinvigorate Invoices

Aging Report

ACEweb Invoicing

Contract Training

Contract Training

Billing Record

Suggestions

Course Packaging

Course Packaging

Credit Card Management

Credit Card Management Module

Processor Set Up

Timeouts

Suspend/Resume Charging

Reconciliation Reports

CRM

Customer Relationship Management

Log Contacts

Log Emails

Log Mailings

Log Entry when Printing Marked Labels

View Log

Edit Entries

CRM Reports

Email Module

Email Module

Email Setup

Sample Templates

New Email Templates

Template Coding

Template Coding (Legacy)

Including Attachments

HTML Formatting

Selecting Email Sender

Emailing Individual

Emailing Registrants in a Course

Emailing Registrants in a Workshop

Emailing Receipts

Mass Emailing Receipts

Emailing Roster to Instructor

Mass Emailing Roster to Instructor

Email Instructor When Min is Met

Emailing Certificates

Emailing Course Reminders

Emailing Course Follow-ups

Emailing Instructor Reminder/Follow-ups

Emailing Emergency Emails

Emailing Building-Specific Emergency Emails

Mass Email Wizard

Merge Email Wizard

Emailing Invoices

Email Link to Pay Outstanding

Email Link to Pay Group Balance

Emailing a Report

Blacklist Emails

Update Email Status

Exporting Data

Export Data Options

CASS Certification

CollegeNet Export

Export Report Data

Faculty Manager

Faculty Manager Module

Adding Faculty Record

Assiging Instructor to Course

F3 Talent Search

Contract Agreements

Emailing Rosters to Instructors

Add Student Link

Add Registration

Call Back System

Mass Change Faculty Status

Faculty Reports

Financial Aid

Financial Aid Module

Financial Aid Setup

F12 Financial Aid Reporter

Gift Cards

Gift Cards in Student Manager

Gift Cards in ACEweb

Importing Data

Importing Data Options

Course Import Wizard

Name Import Wizard

Registration Import Wizard

Ed2Go Import

Protrain Import

Pocket Ledger

Pocket Ledger Module

Add Pocket Ledger Record

Cost Center Codes

Instructor Pay

Mass Distribute Pocket Ledger Records

Pocket Ledger reports

Reporting

Student Manager Reporting

Finding the Right Report

Report Area Guide

Report Options

Running A Query

Report Preview

Output in Other Formats

Emailing a PDF

Exporting Report Data

Importing/Exporting Report Templates

Report Favorites

ACEweb Abandoned Cart Viewer

Searching for Reports

Searching for Queries

Special Reports

Modifying Reports

Modify a Report

Report Controls

Adding Elements

Formatting Elements

Complex Expressions

Field Calculations

Report Bands

Print Whens

Page Setup

Saving Changes

Table Names

Data Structure

Managing Queries

Query Guidelines

Query List Manager

Creating Queries

Editing Queries

Activate/Deactive Reports

Rename/Move Reports

Delete Additional Reports

Delete Queries

SMS Text Messaging

Sending Text Messages

Send SMS to Class

Send SMS to Person

Send SMS Class Reminder

Emergency SMS

Send SMS to Faculty

Send SMS to Names in Report

SMS Templates

Workshops

Workshop Tracking Module

Add Workshop Records

Register Individuals in Workshops

Workshop Reports

Reference

Student Manager Set Up

Setting Up Student Manager

User Records (Security)

Student Manager Security

Student Manager User Records

Add Users

Setting User Passwords

User Access Levels

User Groups

Resetting User Password

Setting Default Preferences

Remember Me on This Computer

My User Profile

Registrar Only Mode

Preferences

Student Manager Preferences

System Preferences

Names Preferences

Course Preferences

Course Fields Preferences

Registration Preferences

Registration Fields Preferences

Organization Defaults

Pocket Ledger Preferences

Firm Preferences

Faculty Preferences

Pay Preferences

Pay Types

UDFs

User Defined Fields

Enable/Label UDFs

UDF Display

UDF Display Coding

Validating UDFs

Course Specific Registration Labels

Unlimited UDFs

Exporting Unlimited UDFs

Codes

Student Manager Codes

Characters Used in Codes

Code Editor Screen

Course Coding Scheme

Name ID #

Course Type

Grouping Codes

Course Holidays

Interest Codes

Source/Tracking Codes

Zip Codes

Coupon Limits

Default Expire Date for Early Bird Fees

Inventory Items

Maintenance

Maintenance Tools

System Information

System Lockout

Show Users

Address Cleanup

Archive Data

Backing Up Data

Broken Firm Links

Combining Faculty

Combining Firms

Combining Locations

Combining Series of Names

Combining Workshops

Data Cleanup-Catalog Records

Data Cleanup-Code Areas

Data Cleanup-Documents

Data Cleanup-Locations, Course Names, Fees

Data Cleanup-Name Interest Codes

Data Cleanup-Orphan Registrations and Payments

Data Cleanup-The Catch All Tool

Escrow Cleanup

Pack/Reindex

Zap Charge

Zip Code Updates

Auto Tasks

Event Log

Report Functions

What are Report Functions?

Functions by Category

ACEDAY

ADDAPAY

ADDCODE

ADDCOUNL

ADDCRDAT

ADDCRSE

ADDCUDFS

ADDFEE

ADDFEE2

ADDFINAID

ADDFIRM

ADDFIRM2

ADDGIFT

ADDGRPAY

ADDINT

ADDLABEL

ADDLOC

ADDLOC2

ADDNAME

ADDNMUNL

ADDNUDFS

ADDOMNI

ADDOPT

ADDPAY

ADDREG

ADDRGUNL

ADDRUDFS

ADDTCH

ADDTIME

ADDUUDFS

ADDWKCODE

ADDWORK

ADDZIP

AGE

AGECL

AT

AVAILFINAID

BASEFEE

BETWEEN

BESTENRL

BIGSTATE

BUDG_EXP

BUDGPICT

CAT2XML

CDOW

CERTDATE

CHKRM

CHR

CIVTIME

CLSHIST

CLSTEACH

CMONTH

CNTCURFIELD

CNTCURS

CODERPT

CONFCERT

CONFIRM

COPAYDTL

COPY2XLS

COUNTCOD

COUNTCX

COUNTIT

COUNTNAME

COUNTNAMEUDFS

COUNTREG

COUNTMWK

CPCREATE

CREDEXP

CRMRPT

CRSATTHRSSUM

CRSEINC

CSZR

CTNAMEREG

CTOD

CTWORK

CURSINC

CURSSUM

CURSWORK

CUSTWKCD

DATE

DATELIST

DATETH

DBXTRACT

DEADBEAT

DEADDUMP

DECRYP

DOCHART

DOEMAIL

DOW

DTOC

EMPTY

FASHOWDRAW

FEEDETL

FEETOTS

FILLBLANK

FILLCAL

FINDCRED

FINDGRP

FINDINT

FINDINST

FIRMEXP

FULLCENT

GETCBUCL

GETCEU

GETCIV

GETCRSEAID

GETDATA

GETFEE

GETFINAID

GETHOUR

GETMEMO

GETSQLCOUNT

GETTEST

GRABREG

GRADCRED

GRADCRED2

GRADREPT

GRADSPEC

GRADSPEC2

GRPGTBAL

GRPGTDUE

GRPGTPAID

GRPSTUD

GTACCTPD

GTCOBAL

GTADD

GTBAL

GTDUE

GTCODUE

GTCODUE3

GTCODUE4

GTCOINVBAL

GTCOPAID

GTFEESUM

GTINVBAL

GTINVDUE

GTINVSTAT

GTLEDG

GTPAID

HASCLASS

HASCOURSE

HASOPT

HOLIDAY

HOWMANY

IIF

INVDETL

INVSS

HRSONADATE

HRSTODATE

INSTCONF

INTLPHON

INVSUM

JUMPMON

JUSTAFTER

JUSTDOIT

LASTCLAS

LASTPAY

LEN

LISTCRM

LISTSTUD

LISTWORK

LOADDATE

MAILXPAND

MAPPING

MASSSMS

MATCHREF

MEETDATES

MEMOEXP

MERGMAIL

MONTH

NAMEEXP

NAMEGRP

NAMER

NAMERXT

NCRPT

NETPAY

NICEDATE

NICELOC

NICETIME

NOSTATE

NUM2FRACTION

NUM2STR

NUMNODEC

NUMSESS

NUMTAUGHT

NUMWEEKS

ORGPAY

OTHPAYER

PACKAGES

PAD,L,C

PADCDOW

PAY1099

PAYCOMB

PAYDESC

PAYTOT

PAYTYPE

PREFADDR

PREFEXP

PRETTYNUM

PYWASINV

QTYPTCAL

QUIKCODE

QUICKINST

QUIKWORK

RANDPICK

RANDPICK2

RCPTINFO

RCTTPAY

RGFEEDIST

RGHASPAY

RGINVBAL

RGINVPD

RIGHT

ROSTXPAND

ROUND

SAVE2CAT

SEEFIRM

SEETITLE

SELEWORK

SELEWORK2

SHOGCODE

SHOHDATE

SHORTCAT

SHORTSTATE

SHOUPCLS

SHOUPCLSREC

SHOWCLAS

SHOWCODE

SHOWDOCS

SHOWDOW

SHOWDUPE

SHOWEXP

SHOWFEES

SHOWFINAID

SHOWMEMB

SHOWOPTS

SHOWPAID

SHOWPHON

SHOWPDSTAT

SHOWSSN

SHOWTEACH

SHOWTEST

SHOWTF

SHOWWORK

SQLDATE

STAMPCRED

STAMPCRS

STAMPCUDF

STAMPGRP

STAMPINT

STAMPNAME

STAMPNUDF

STAMPRUDF

STAMPTCH

STAMPUNL

STAMPWORK

STR

STRTRAN

STRIPHTML

SUBSTR

SUMREG

SUMWHAT

SUMWORK

SWAPVAL

TKCOST

TKINCOME

TIME

TNAMER

TRANSFORM

TRIM

TRIMDATE

TOTPACK

UPPER

VAL

WHAZZIS

WHOPAY

WHOSTHIS

WHORECT

YEAR

ZIPRADIUS

Troubleshooting Student Manager

Troubleshooting ACEweb

ACEweb Setup

Getting Started

Server Configuration

Installing ACEweb

Security Information

Permissions

ACEweb Mode Setup

Accessibility Compliance

ACEweb Administration

ACEweb Administration Pages

ACEweb Administration Tools

ACEweb Access Levels

Emailing Errors

Cleanup Files

ACEweb Compiler

Template Manager

Custom Phrasebook/Vocabulary

Interface Manager

Registration Defaults

Search Logging

Validate Web Firms

Staff Web Access

ACEweb INI Settings

Editing ACEweb.INI

Other INI Files

ACEweb.INI Setting Descriptions

Accessible

ACEwebURL

AddOwnAccount

AdjustWKSFees

AdminEmail

AdminLevel

AdminMailServer

AdminSendErrorEmail

AdmLogonAttrib

AllowAlphaInFax

AllowAlphaInPager

AllowDeposit

AllowDupes

AllowWaitlist

AlternateSQL

AlternateURL

AltPS

AltSettings

ArchivePath

AsyncFields

AsyncLink

AsyncTypes

AuthenticateSendMail

AutoAssign

BillFirm

BonusDeal

CatLinkStatus

ChargeMsg

CheckSum

CloseCountdown

CouponLimits

CourseOrder

CourseService

CustomEmail

CustomerAddress

CustomerCity

CustomerCode

CustomerName

CustomerState

CustomerZip

DataPath

DebugFlag

DebugMode

DefaultGrade

DefaultPayType

DupeCheck

ECDC

ECheckType

ECTableClass

ECTableColors

ECTableTags

EnforceMandFees

EscrowCutoff

EscrowPayments

FailOption

FeeBreakdown

FeeLimits

FeeOrder

FullMsg

GiftCard

GroupInit

GroupList

GroupOption

HelpEmail

HelpPerson

HelpPhone

HideInstTypes

HideSessionCt

HTMLPagePath

IDAlias

IDPrefix

InstructorFields

IntCodeCols

InterestScope

InvoiceMsg

MailServer

MarketerEmail

MaxTableSize

MemberLookup

MemberRegLimits

MemberTimeExt

MgrWebLevel

MultiEmailResponse

NameIDLength

NotifyOffice

NullEmptyDates

OfficeEmail

OneTimeCoupon

OnlyActiveInstruct

OrgHours

OrgName

PageParseMode

PartnerFeeKey

PayOption

PayService

PCCEmail

PCCMercNum

PCCPath

PCCPrefix

PostPayerInfo

PreGenReceipt

PrintCourseNotes

PrintRegWarn

ProxyReg

ProxyType

PSHandlerLag

PubPassword

RecapSitekey

RegenSession

RegFirmFields

RegStatusExclude

RegStatusFields

ReportCertificate

ReportReceipt

ReportTranscript

RequiredFields

RequireMercnumMatch

RequirePaidMem

RollWorkshopCEUs

RosterFields

ScheduleFields

SearchLogging

SeatEnrollment

SenderEmail

SenderName

SessionCutoff

SessionTimeout

ShortTime

ShowCatalog

ShowContacts

ShowInstructor

ShowLocation

SignOn

SilentPostEmail

SMVersion

SpecialFee

SQLConnectString

SSL

SSOPreLog

SSSLevel

StopMultiReg

SuperInstFilter

SysopEmail

TableClass

TableColors

TableTags

TaxRate

ThirdParty

TransactionFee

TranscriptFields

UseCoAlias

UseIDSource

UseStdHeader

ValidateEmail

VerboseFullMsg

VirtualPath

VoidPendingPmts

WaitRedirect

WarningEmail

WebRegHome

WebRegURL

WksCodeMatch

WorkshopFields

Xpages

Hosted Customers

Flexdesk Guide

Flexdesk Password Requirements

Student Manager REPORTING GUIDE ​

  • Running Reports
  • Finding the Right Report
  • Reporting Areas
  • Report Options Screen
  • Selecting/Running a Query
  • Default vs Additional Report
  • Previewing/Printing the Report
  • Searching for Reports
  • Output Reports in Other Formats
  • Report Favorites
  • Creating a Query
  • Editing Queries
  • Query List Manager
  • Query Creation Guidelines
  • Basics
  • Modify a Report Template
  • Student Manager Data Structure
  • Student Manager Tables
  • Report Controls
  • Adding Report Elements
  • Formatting Elements
  • Page Setup
  • Saving Changes to the Report Template
  • Advanced
  • Report Banding
  • Complex Expressions
  • Field Calculations
  • Print Whens
  • What are Report Functions?
  • Report Functions by Category
  • JUSTDOIT
  • JUSTAFTER

Terms of Use

By accessing, reading, or using this guide, you agree to be bound by the terms and conditions outlined in this agreement.

This guide is provided solely for the internal training and professional development of authorized employees, students, or participants. You may view and print individual pages for personal, non-commercial use related exclusively to your training.

All content within this guide, including text, graphics, logos, layouts, and software, is the exclusive property of ACEware Systems, Inc. and is protected by applicable copyright and intellectual property laws.

You may not, without the prior written consent of ACEware Systems, Inc.:

  • Distribute, sell, lease, or license this material to any third party.
  • Modify, translate, or create derivative works based on this content.
  • Upload the guide to any public server, network, or file-sharing website.
ACEware Systems, Inc. 800-925-2493 ● info@aceware.com ● support@aceware.com
Website: www.aceware.com ● Help Center: help.aceware.com

Running Reports ​

Finding the Right Report ​

How to find the report you need.

How do I start? ​

You must first determine what you want contained in your report. If you can put into words what the desired output will be, you are half way there.

For instance, “I want to generate letters for all individuals who currently have a credit balance, informing them of the dollar amount of that balance and proposing that they use it for an upcoming class.”

Where do I go? ​

Once you’ve decided what information you want on your report, you must determine which report to use. Begin by determining what reporting area accesses that information. For example, to get information on registrants, you would choose the Registration reporting area, not the Faculty reporting area.

Default vs Additional reports? ​

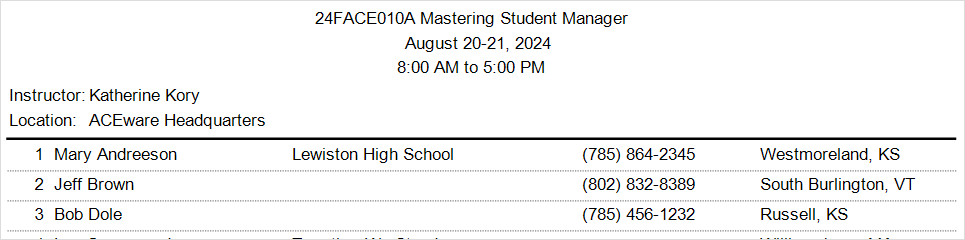
Every report area provides one Default report that displays the most common elements for the particular report area. For example, the default Name Roster report may list registrant data in a columnar format.

Name Roster Columnar

Most report areas also provide Additional reports. These are report templates that display the same data in a different format. Or they are report templates designed for specific purposes.

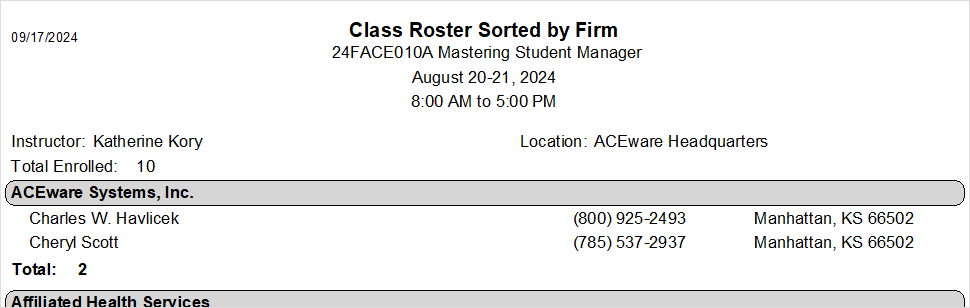
For example, this is a Name Roster that sorts registrants by Firm assigned.

Name Roster by Assigned Firm

Report vs Query? ​

  • Query - a query is a request for information. You request specific information from the data tables to be displayed on the report. E.g. return all people which took courses starting between 2 dates.

  • Report - a report is a template which displays the information you've requested in a certain manner. For instance, a mailing label template displays information from the Name record in a block form for printing mailing labels.

Reporting Areas ​

Run reports from these areas:

Module Reports (Quick Reports and Receipts) ​

Quick reports give you data for a specific record.

  • Course Quick Report button – print rosters, name tags, mailing labels, certificates, course description, or faculty contracts for particular course.
  • Names Quick Report button– print fax cover, envelope, transcript, or letter for particular individual.
  • Registration Print Receipt button – print receipts for particular individual or for the registration group.
  • Payment Print Receipt and Close button - print receipts for particular individual or for the registration group.
  • Budget Quick Reports button - print budget reports for the course.
  • Faculty Manager Reports button - run faculty reports. Note: you can only run reports from the Reports > Faculty > Faculty Only Reports report area. If you want to run other faculty reports (e.g. contract agreements, instructor lists), you must run them from the Reports > Faculty menu.
  • Pocket Ledger Print Requisition button (requires Pocket Ledger)- print requisition orders for a particular expense record.

Student Manager Report Menu (Main Menu Item) ​

This is the main reporting area in Student Manager. Reports are grouped according to the type of information contained in the report:

  • Accounting – Income, Cash Box, Financial
  • Demographics – Name information, Firm  information, Mailing Labels, and Transcripts
  • Courses – Details, CEU Reporting, Course Income/Enrollment Summary, and Catalog
  • Registrations – Registration Details, Deadbeat, Receipts, Rosters, Transcripts, Name Tags, Table tents, and Certificates
  • Faculty – Agreements, Instructor Lists, Performance Data, Check Requests, Faculty Reports
  • Invoices – Invoices, Aging Reports
  • Pocket Ledger – Income/Expense Listings, Balances, Budgets and Snapshot
  • Workshops – Rosters/Certificates, Enrollment Summary
  • Statistics – Names Demographic Sorting and Performance Summary, Tracking Codes, Course Data Summary and Performance Review.
  • Codes – Student Manager Codes Listings

When running reports from the Report Menu, you must also run an appropriate query to get the data you want displayed on the report.

Special Reports ​

These reports are run from the main screen with the specified keyboard shortcut:

  • F2 Quick Counts Report - view or print enrollment counts for upcoming courses.
  • CTRL+F2 Quick Room Use Report - view or print enrollment counts for upcoming courses from 2 to 90 days out.
  • F3 Faculty Talent Search - Search for instructors by several criteria.
  • F4 Registration Search - search for registration records.
  • F5 Search Names - search for name records.
  • F7 Pay Grabber - search for payments.
  • F9 Dashboard Report - quick look at courses with low enrollment, courses full or nearly full, summary of enrollments and income.
  • F10 Membership Retention Wizard - returns students' retention status, courses they have taken, or a list of students meeting the criteria
  • F11 Attendance Tracker - view/print/export attendance tracking information for a specific student.
  • F12 Financial Aid Reporter - returns information about student awards/draws.

Report Options Screen ​

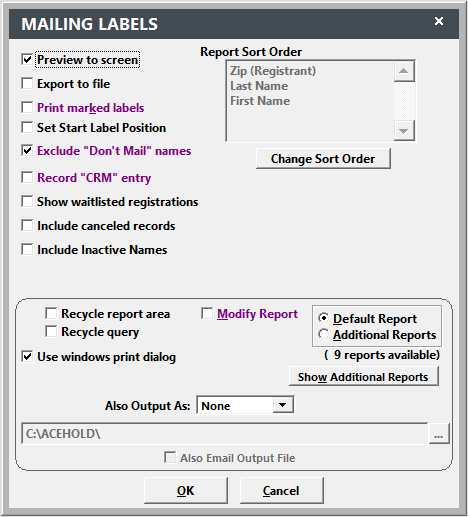
Many report areas will display the Report Options screen for you to select your report options. For example, this is the Mailing Labels Report Options screen:

Mailing Labels Print Options

Several report options are available in all report areas, such as Print to screen and Modify report. Some are only available in certain report areas. For example, Show Waitlisted Registrations is only available in report areas accessing registration information.

To run the report, select the appropriate options then click the OK button.

Option Descriptions ​

Here a brief description of the available options:

  • Print to screen – check to see an on-screen preview of the report before sending it to the printer.
  • Export to file – check to export the data in the report to an external file (i.e. Microsoft Excel, Text file, etc.).
  • Print New Invoices – if checked, will print invoices for all billing records which have not yet been assigned an invoice number.
  • Print Marked Labels – if checked, all Name records which have the Print Label checked are included in your report.
  • Set Start Label Position - allows you to print on a partially used label/name tag sheet.
  • Exclude "Don't Mail" Names – if checked, will not include any Name record which has the Don't Mail box checked.
  • Record "CRM" Entry – if checked, after the report runs, you'll be given the opportunity to create a CRM entry for all Name records in the report.
  • Report Sort Order – allows you to change the sort order for records included in report. CAUTION: you may receive unexpected results because report grouping and justdoit functions will override your sort order options.
  • Show Waitlisted Registrations – check to include waitlisted registrations in your report.
  • Include canceled records – check to include canceled records in your report (i.e. canceled courses, registrations, etc.).
  • Include Inactive Records - in Mailing Labels and Names w/Codes, check to include inactive Name records.
  • E-mail Separately? - if checked, the system will create individual pdf files and email them to the individuals in the report.
  • Include Third Party Billing Reggies – check to include registrations marked as billing records in your report.
  • Generate Individual PDFs - if checked, will generate individual PDF transcripts for all users in the report.
  • Clear Selected Fields from cursor - if checked, adds an additional step to select fields you want to keep in the report cursor.
  • Recycle Report Area – if checked, you’ll be returned to the Report Options screen after running the report to run another report.
  • Recycle Query – if checked, you’ll be able to run reports in this report area with the same query.
  • Also Output As (PDF) – export the report as a PDF file.
  • Modify Report – check to modify the report. For more information, see next section.
  • Default Report/Additional Reports – select the report you want to run.
  • Show User Reports – click this button to see the list of additional reports in this reporting area.
  • Use Windows Print Dialog – this option opens the standard Windows Print Dialog box when you print the report.

Selecting/Running a Query ​

A query is a request for specific information to display on the report template. For example, to print rosters for all courses which begin between two dates, you would select a query that asked for a date range.

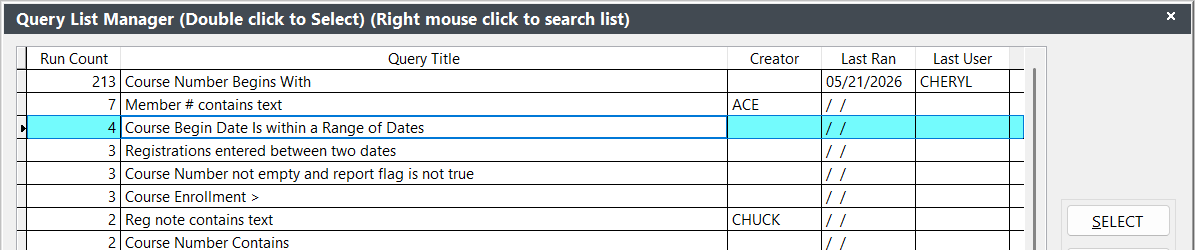
To select a query, highlight it then click the Select button.

Select Query

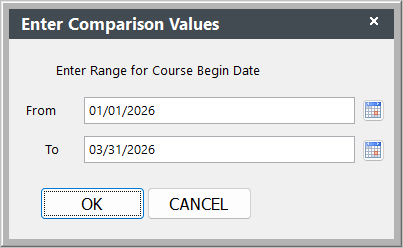
You’ll be asked to enter the dates next. Enter the appropriate dates, or select dates using the Date Picker icon, then press the OK button.

Course Begin Date Range

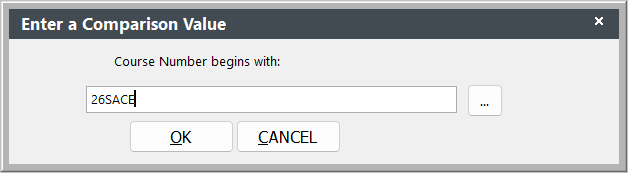
Other queries might ask for something like the Course Code Begins with:

Course Code Begins With

You select the query that gets you the data you want to see on your report.

Default vs Additional Report ​

Every report area provides one Default report that displays the most common elements for the report area. For example, the default Name Roster report may list registrant data in a columnar format.

Name Roster Columnar

Most report areas also provide Additional reports. These are report templates that display the same data in a different format. Or they are report templates designed for specific purposes.

For example, this is a Name Roster that sorts registrants by Firm assigned.

Name Roster by Assigned Firm

After running your query

  • If you selected the Default report and Print Preview options, the Print Preview opens.

  • If you selected the Addtional Report option, the Additional Report list opens for you to select the Additional Report you want to run.

!(../images/additionalreports.png)

Select the report you want to run by highlighting it and pressing the Enter key.

Previewing/Printing the Report ​

If you selected the Print to Screen Report Option screen, the Print Preview window opens. From here you can preview and print the report.

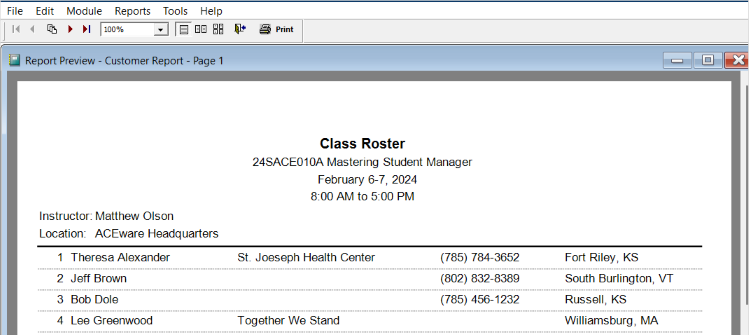
Print Preview

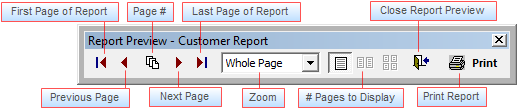
Use the Print Preview Tool Bar to view pages of the report, zoom in or out, print, or close the Report Preview Window.

Preview Toolbar

Searching for Reports ​

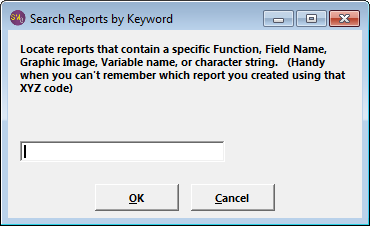
To search for a report, select Tools > Reports > Search Report for Keyword. This feature allows you to search reports by report title, field/variable name, function or character string.

Search Reports by Keyword Window

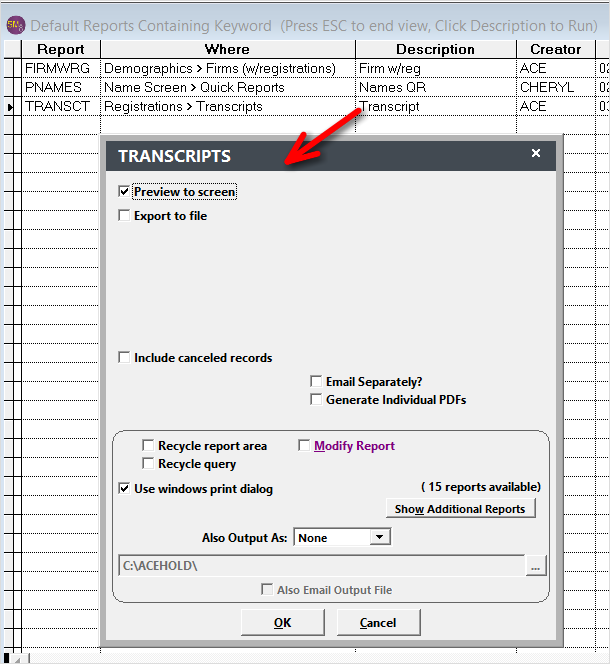
Enter your search string then press the ENTER key. Student Manager will search all reports and give you a list of Default and Additional Reports (separate lists) that contain the search string.

Search Results

To run a report click the appropriate Description value.

Run Report

Output Reports in Other Formats ​

You can choose to print a report, or you can output the report in other formats.

IMPORTANT

Microsoft Office must be installed on the user's computer to output in Excel or Word formats. If using Remote Desktop to access Student Manager on the server, it must be installed on the server.

To output a report in another format:

  1. Select the appropriate Report area.
  2. On the Report Options screen in the Also Output As drop down list, select the desired output format:

Also Output As Option

  1. Enter the path (location for the saved file)* and name for the file. You can enter it directly into the path field (C:\ACEHOLD\13SACE010A.PDF in this example),

Enter Location/File Name

or you may click the ... button to the right of the Path field to open the standard Windows Save screen (i.e. select the location, enter the file name, then click the OK button).

*We STRONGLY discourage saving files into your Student Manager directory. Instead, create a folder on your C:\ drive called ACEHOLD and save the Output files to this location.

  1. Select any other appropriate options (e.g. Additional Report, Include Canceled, etc.), then click the OK button.
  2. If you are running a report from the Reports Menu, select and run the appropriate query. If you are running a Quick Report, this step will be skipped.
  3. If you selected the Additional Report option, select the appropriate report.
  4. The Report Preview opens (if you have the Preview option enabled). When you close the Report Preview window, the output file is created in the location you specified in step 3.

Also Email Output File ​

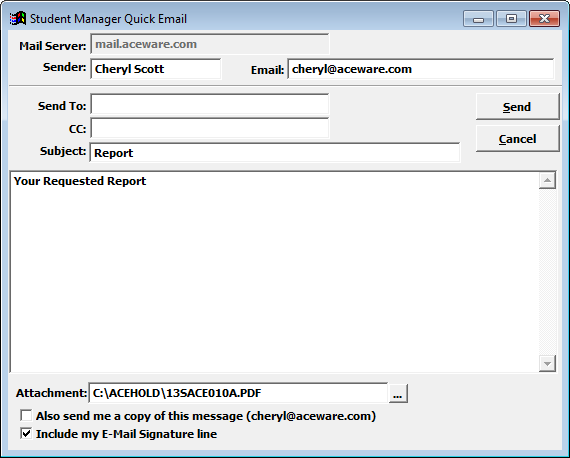
If you would also like to email your output file, in step 4 above, check the Also Email Output File. After the system saves you file, the Student Manager Quick Email screen opens with your output file attached.

Enail Screen

HTML Output ​

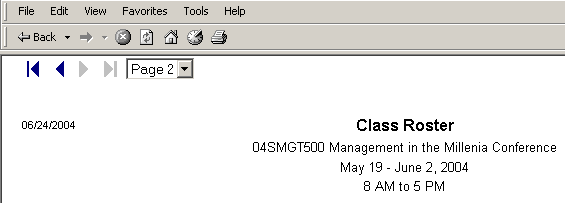
If you select the HTML format, the system will create an HTML page of the report for web viewing. If the report is more than one page, the system will also create navigation icons for the web page.

HTML Option

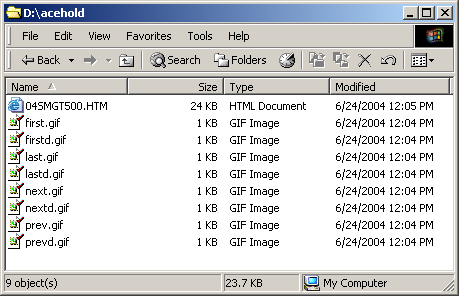
You must copy the HTML page AND all associated graphics to you Web page folder or users will not be able to move from page to page.

HTML Page Files

Report Favorites ​

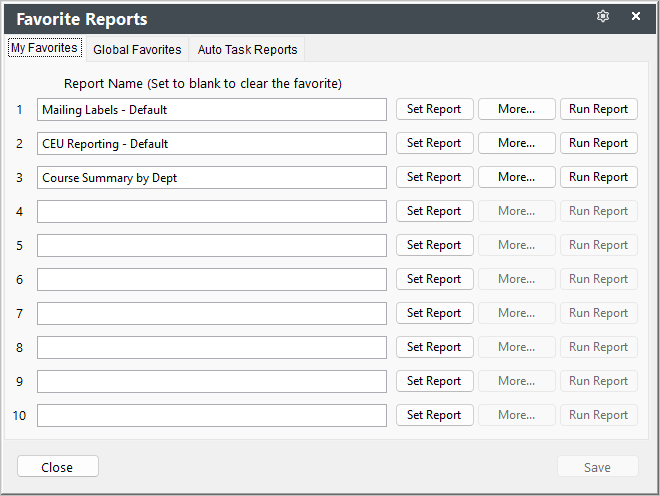
Student Manager users can identify up to 10 reports as Favorites so they can be easily found and run.

Notes

  • The Student Manager administrator can set favorite reports for users.
  • User Report Favorites are set per user. Global Report Favorites can be accessed by all staff.
  • Cashbox, Invoice, and Statistical reports cannot be set as Report Favorites.

Set User Favorite Report ​

  1. Select Reports > Favorites or use the keyboard shortcut CTRL+F1 to open the Favorite Reports screen.
  2. Click the Set Report button.
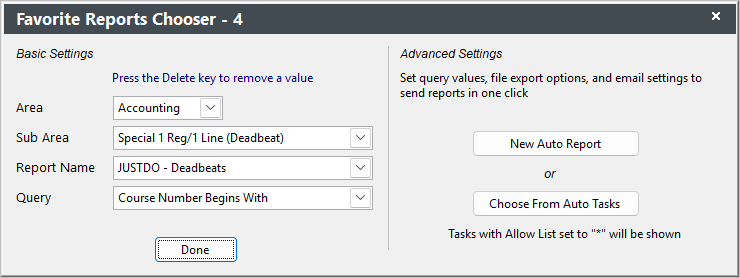
  3. On the Favorite Report Chooser window, select the report area, sub area, name and query.

Adding Favorite Report

  1. Click the Done button.
  2. The report is added.

Favorite Report Saved

  1. Repeat steps 2-4 to set more report favorites.
  2. Click the Save button to save your report favorites.

Run Favorite Report ​

  1. Select Reports > Favorites or use the keyboard shortcut CTRL+F1 to open the Favorite Reports screen.
  2. Click the appropriate Run Report button:

Run Favorite Report

  1. Select any other report options on the Report Options screen (e.g. Include Canceled records, also output as, etc.), then click the OK button.
  2. Enter the query value(s) then click the OK button.
  3. The report now runs.

Change User Favorite Report ​

  1. Select Reports > Favorites or use the keyboard shortcut CTRL+F1 to open the Favorite Reports screen.
  2. Click the appropriate Set Report button.
  3. Make the appropriate changes (e.g. change the report area, sub area, name and/or query).

Change Favorite Report

  1. Click the Done button.
  2. Click the Save button to save your changes.

Delete User Favorite Report ​

  1. Select Reports > Favorites or use the keyboard shortcut CTRL+F1 to open the Favorite Reports screen.
  2. Click the appropriate Set Report button.
  3. The Area value will be highlighted. Press the Delete key on your keyboard to clear the value.

Delete Favorite Report

  1. Clearing the Area value will also clear the other fields:

Favorite Report Values Cleared

  1. Click the Done button.
  2. Click the Save button to save your changes.

Global Reports ​

Global Report Favorites are reports that can be ran by all Student Manager users. *You can identify up to 10 reports as Global Favorites.

*Note: you must have level 5 access to set, change, or delete Global Favorite reports.

Set and run Global Reports from Reports > Global Favorites.

Creating a Query ​

To create a new query:

  1. On the Query List Manager window, click the Add button.
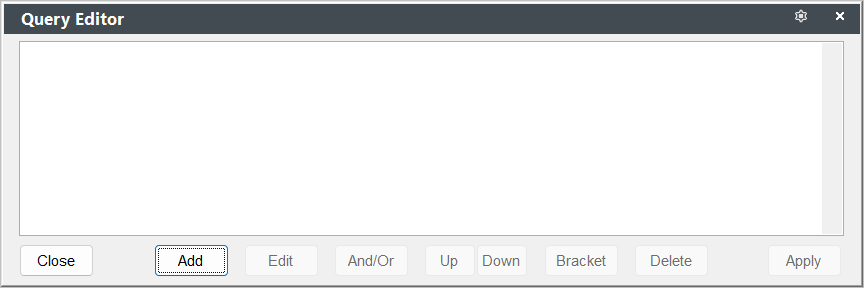
  2. The Query Editor window opens for you to add query elements.

Query Screen

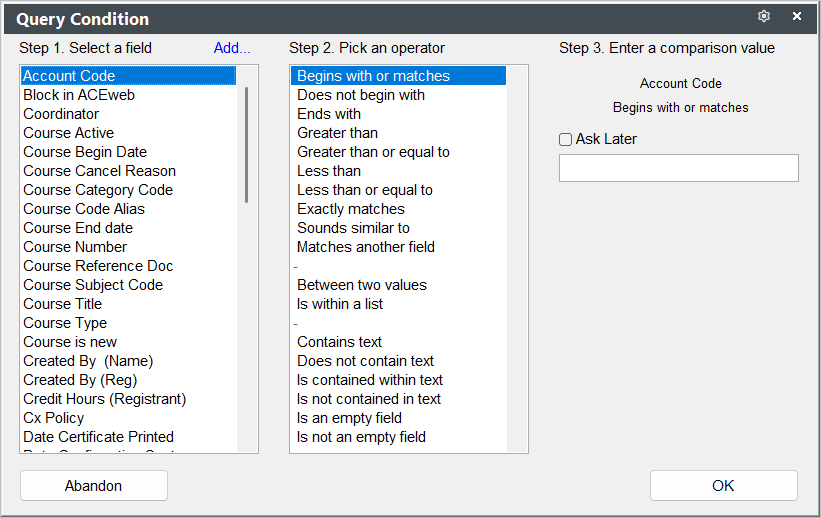
  1. Click the Add button to add a query element.

Query Condition

  1. In Step 1: Select a field, the available query fields for this report area are listed. Select the appropriate field from the list (e.g. for courses between two dates, select Course Begin Date).

Field Not Listed?

If the field you want is not listed, you may be able to add it with the Add option.

  1. In Step 2: Pick an operator, the operators for the field you selected in Step 1 are listed. Select the appropriate operator (e.g. for a courses between two dates query, you would pick 'Between two dates').
  2. In Step 3: Enter a comparison values*, the values you are searching for are entered.

Most of the time you should select Ask Later. This keeps the query as generic as possible so that it can be used over the long term (e.g. if you enter dates instead of selecting Ask Later, every time you run the query it will only report courses which begin between those two dates).

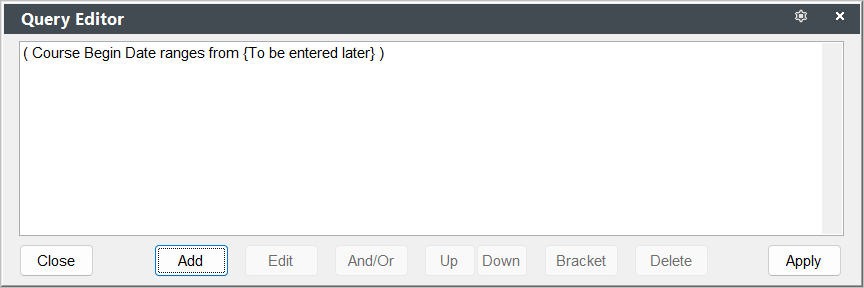
  1. You're returned to the Query Editor window.
  • If you are finished adding query elements, click the Apply button.
  • If you need to add more query elements, click the Add... link to add another element.

For more information about adding multiple query elements, see the Editing a Query topic.

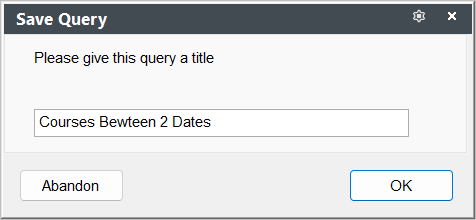
  1. When you click the Apply button, you will be asked to enter a title and save your query. Enter the title then click the OK button.

Query Condition

Editing Queries ​

You can edit, copy, and rename queries.

Edit Query ​

  1. Highlight the query you want to edit.
  2. Click the Edit button.
  3. The Query Editor window opens.

Query Screen

You can now edit the query elements.

Add Additional Elements ​

To add another element to a query:

  1. Click the Add button.
  2. Continue with steps 4-6 of the query process.
  3. When you are returned to the Query Editor window, you may need to switch the connector using the And/Or button. The default connector is And.
  • And - means that BOTH items must be true for a record to be included in the result.
  • Or - means that if ‘EITHER ONE’ of the items is true it will be included.

Edit Query Elements ​

To edit a query element:

  1. Click the element you want to edit to highlight it.
  2. Click the Edit button.
  3. The Query Condition window opens for you to edit the element (steps 4-6 of the query process.
  4. Once you are returned to the Query Editor window, click the Apply button to save your query changes.

Delete Query Element ​

To delete a query element:

  1. Click the element you want to delete to highlight it.
  2. Click the Delete button.
  3. Click the Apply button to save your query changes.

Move Query Elements ​

To move a query element:

  1. Click the query element you want to move up or down to highlight it.
  2. Click the Up or Down button to move the element up or down.

Connector or Brackets

When moving queries, you may also need to change the connector (And/Or) or re-bracket elements.

Multiple Element Connectors ​

You may occasionally need to create a query with a combination of elements. For example, you need courses between two dates except for courses which have "MGT" in the course code AND are offered by a specific department.

The most important thing to keep in mind is whether you want one, some, or all the conditions to be true:

  • All conditions must be true - make certain you use the AND connector. This means that if any single condition is not met, the record is not included (e.g. the course must begin between the two dates, AND not include "MGT" in the course code, AND have a specific coordinator).

  • One of the conditions must be true - use the OR connector. This means that if the record meets one of the conditions, it will be included (e.g. the course must begin between two dates, OR must not contain "MGT" in the course code, OR must have a specific coordinator).

  • Combination of conditions must be true - you may need to use a combination of connectors along with the bracketing feature to govern how the query is analyzed.

Bracket Query Elements ​

Some queries cannot be reliably used unless elements are bracketed to determine the order of execution of the elements. Conditions inside the brackets will always be evaluated before any conditions outside of the brackets. If you are using a combination of ANDs and ORs you should ALWAYS use brackets!

To insert brackets:

  1. Click the first query element you want to bracket to highlight it.
  2. Click the Bracket button.
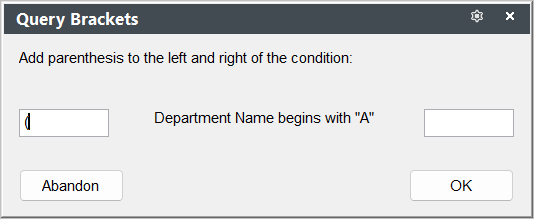
  3. Enter a parenthesis in the first field:

Bracketed Elements

  1. Click the OK button.
  2. Click the last query element you want to bracket to highlight it.
  3. Click the Bracket button.
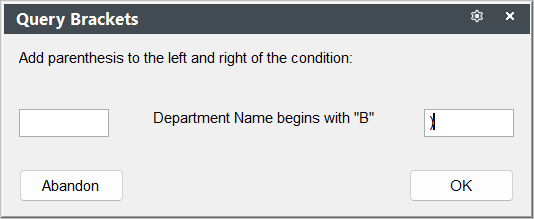
  4. Enter a parenthesis in the last field:

Bracketed Elements

  1. Click the OK button.

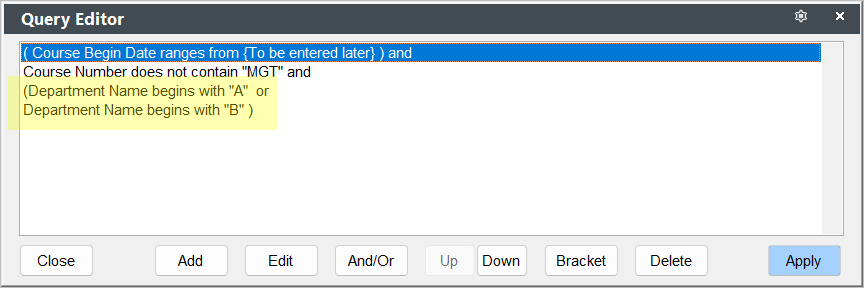
You're conditions will now be bracketed (i.e. parenthesis are placed around the conditions):

Bracketed Elements

Query List Manager ​

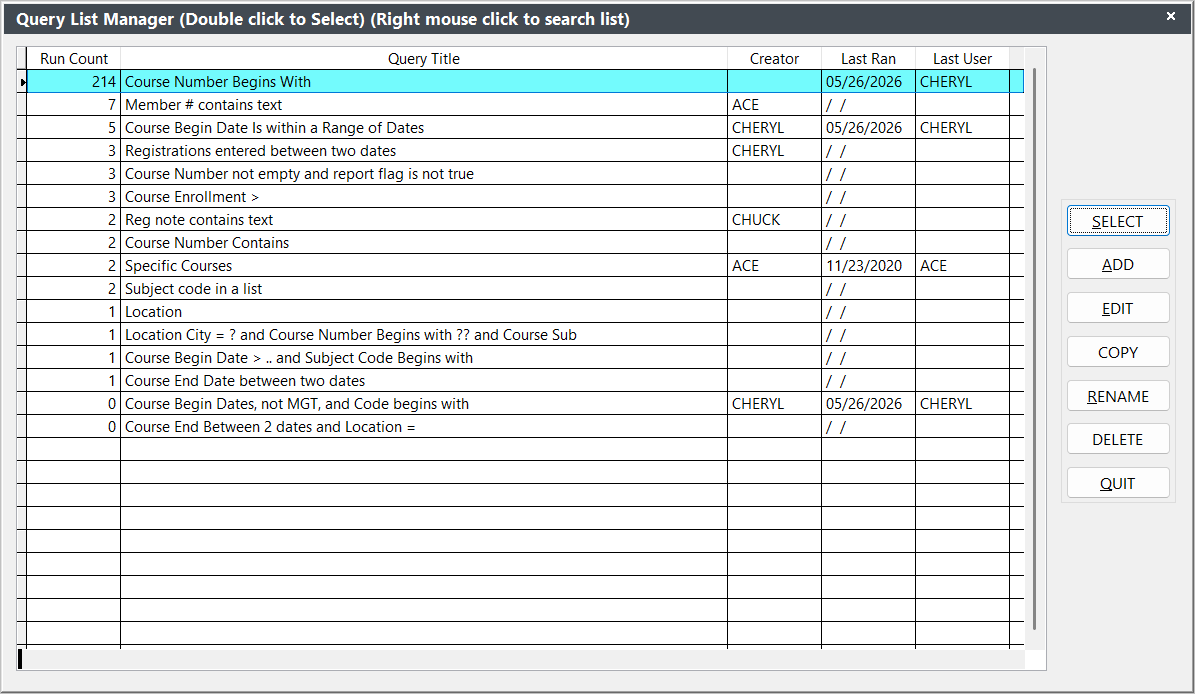
The Query List Manager has several features to help you manage your queries.

Query List Manager

  • Run Count - the number to the left of the Query Title indicates the number of times the particular query has been run. This helps you determine which queries in a given area are useful and which can be deleted.
  • Query Title - tells the user what the query does. This should be as descriptive as possible so that all users know what information the query will request from the data tables.
  • Creator - the user who created the query.
  • Last Ran - date the query was last ran.
  • Last User - user name of person who last ran the query.
  • Query Highlight - when a query in the list is highlighted (clicked on once), a message appears in the upper right of the Student Manager screen telling the user what query elements are in the query.

Search Queries ​

You can search query titles and fields by right-clicking on the query window and selecting the appropriate option:

  • Title - search query titles, e.g. search for all queries which have "Course" in the title.
  • Field - search query fields, e.g. search for all queries which reference the cocrse field (course code field from the Course table).

Sort Queries ​

By default, queries are sorted by the Run Count.

  • To sort queries by Query Title, click on the Query Title Column Header. This will sort your queries in A-Z order.
  • To sort queries in Z-A order, click the Query Title Column Header again.
  • To sort queries by Run Count again, click the Run Count Column Header.

Character Type Queries ​

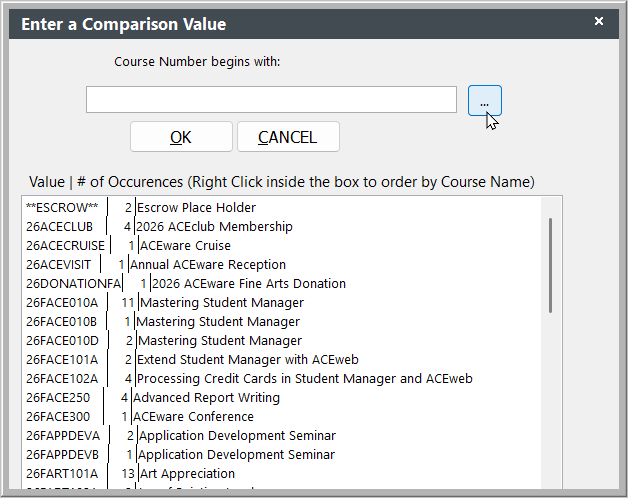
Queries that have Character type elements (e.g. Course Number begins, Subject Code is, etc.) offer users the ability to select a query item from the list of available field values. For instance, a Course Number Begins query allows you to select the course number from a list of all course records in your system.

The query item is selected by clicking the ... button to the right of the Query field. This opens the list of available values for the query element:

List of Available Values

The list shows the number of Occurrences for the particular value (e.g. how many are enrolled in the course, how many names have the particular subject code assigned, etc.).

Double-click a value in the list to select it and add it to the Query field.

Copy Query ​

If you need a query that is similar to one already created, you can copy the existing query then edit it to include/remove query elements.

  1. Highlight the query you want to copy in the Query List Manager.
  2. Click the Copy button.
  3. Enter a title for the new query then click the OK button.

The new query is added to the Query List Manager window and you can now edit it.

Rename Query ​

Query Names should be as descriptive as possible so that all users know what information the query will request from the data tables. If you edit a query, then you may also need to rename it.

To rename a query:

  1. Highlight the query in the Query List Manager window.
  2. Click the Rename button.
  3. Make the appropriate changes to the name.
  4. Click the OK button to save the new name and return to the Query List Manager.

Delete Query ​

To delete a query:

  1. Highlight the query you want to delete.
  2. Click the Delete button.
  3. Confirm the delete procedure by clicking Yes on the Confirmation dialog box.

You can also use the Delete Queries tool to clean up queries.

Query Creation Guidelines ​

Although the most common queries are already created in Student Manager, most organizations will need to create or modify queries to meet their specific needs. Here are some general rules to follow when creating queries:

  1. The field you want to use in your query must be available in the report area.
  2. You may create an unlimited amount of queries in each report area. Although, it is best to only maintain those queries that you most commonly use.
  3. Queries can only be used in the particular report area in which they are created.
  4. Some report areas have options that can affect your query. For example, if you want canceled records in your report, you must select the Include Canceled Records option or canceled records will not be included in the report, no matter what you put in your query (e.g. a query that only selects canceled records will return 'No Matching Records Found' if you haven't selected the Include Canceled Records option).

Report Areas with No Queries ​

In some report areas, it's not necessary to use a query. Those are:

  • Codes Section (Reports > Codes)
  • Cash-Box  (Reports > Accounting > Cash Box)
  • New Invoices (Reports > Invoices > Run Invoices)
  • Quick Reports (Name, Course, Faculty Manager)
  • Receipts (Registration and Payments)

Basics ​

Modify a Report Template ​

To modify a report template:

  1. Select the report area from the Reports Menu, or open the appropriate Quick Reports window.
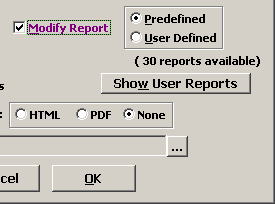
  2. On the Report Options screen, check Modify Report (and any other applicable options, i.e. Include Canceled Records, Additional Reports, etc.).

Modify Report Checkbox

  1. Select and run your query. Note:  if you selected a Quick Report, the system will skip this step and take you directly to step 4.
  2. If you selected an Additional Report, select the appropriate report from the User Defined list.
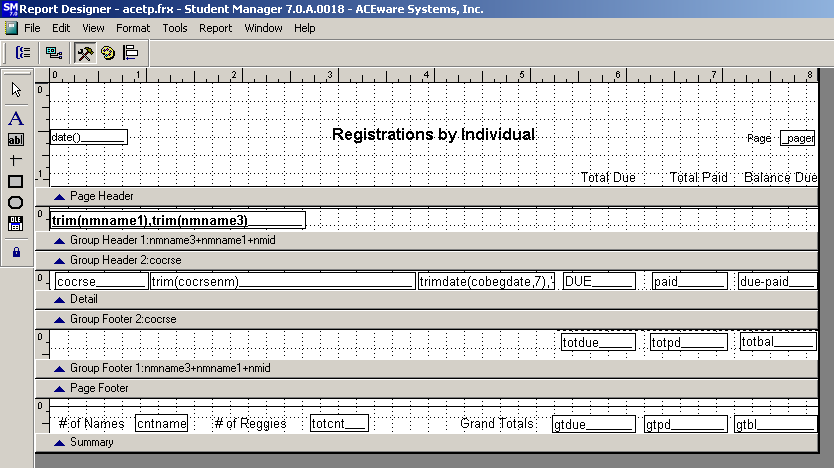
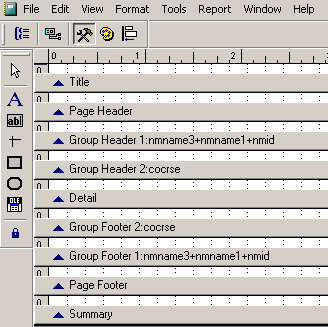
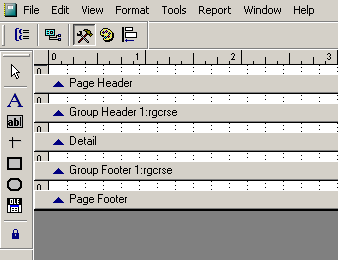
  3. The report you selected now opens in "modify" mode. The Report Designer screen displays the report template which consists of white spaces separated by gray horizontal bars called bands. The white space above each band contains the report elements that will display on the report (e.g. text entries, expressions, lines, etc.).

Report Modify Screen

  1. You can now use the Report Controls to add/edit/delete report elements.

Modifying Report Elements ​

  • Adding Elements
  • Formatting Elements
  • Print Whens
  • Field Calculations
  • Complex Expressions
  • Report Banding
  • Page Setup
  • Saving Changes

Student Manager Data Structure ​

A list of Student Manager tables and fields within the table. Most fields are listed by the label that appears on the associated screen. The exception to this rule are fields that can be relabeled by the organization (e.g. cocoord, nmmisc, all udfs fields).

ATTEND ​

LabelField NameTypeLengthDecimals
Attendance CodeATCODEC60
Course CodeATCRSEC120
GradeATGRADEC30
IDATIDC90
ModuleATMODULEC120
NameATNAMEC750
Session DateATDATED80
Session HoursATHOURSN42

BUDGET ​

LabelField NameTypeLengthDecimals
Course CodeBUCRSEC120
Estimated Enrollment for FeeBUFEENUMN40
Fee AmountBUFEEAMTN72
Fee LabelLBUFEEDESCC250
Fee TypeBUFEETYPEC10

CATALOG ​

LabelField NameTypeLengthDecimals
ActiveCAACTIVEL10
Add DateCAADDATED80
AudienceCAAUDIENCEM100
Begin DateCABEGDATED80
Begin TimeCABEGTIMEC50
BenefitsCABENEFITSM100
Bio/CredentialsCABIOM100
CodeCACODEC100
Contact EmailCACEMAILC500
Contact NameCACNAMEC500
Contact PhoneCACPHONEC200
Web AddressCAWEBADDRC750
Created ByCACREATORC80
End TimeCAENDTIMEC50
Fee (Proposed)CAPROPFEEN72
FeaturesCAFEATURESM100
GraphicCAPICC750
HoursCAHOURSN62
Instructor ExpensesCAINEXPM100
KindCAKINDC10
LocationCALOCC400
MaterialsCAMATERIALM100
NameCANAMEC950
Optional 1CAOPT1C950
Optional 2CAOPT2C950
Prerequisite DescriptionCAPREREQM100
Primary DescriptionCADESCM100
Publish on Web?CAPUBLISHL10
ScheduleCASCHEDULEC600
Secondary Description (Web)CADESC2M100
# of SessionsCASESSN30
StatusCASTATUSC100
Subject CodeCASUBJC80
Text BookCATEXTC1000
ThumbnailCATHUMBM100
Updated ByCAUSERC80
Update DateCAUPDATED80

CATGROUP ​

LabelField NameTypeLengthDecimals
Catalog CodeCGCATALOGC120
Grouping CodeCGCODEC60

CHOICES ​

LabelField NameTypeLengthDecimals
Active Code?CHACTIVEL10
ChoiceCHOICEC150
Cost of PromotionCOSTN60
CreatorCREATORC80
DescriptionDISCRIPTC500
DetailCHMEMOM100
IdentifierIDENTIFIERC300
Major Expense CategoryTIMEUPDATEC80
Number of BrochuresNO_BROCHN60
Order PointORDERPTN40
Promotion DateDATEUPDATED80
Scope ByINTIDENTC10
Show/Hide from WebMARKEDL10
Specific Course/File Name for ImageCRSEC120
UpdatedUPDATED80
UserUSERC80

COURSE ​

LabelField NameTypeLengthDecimals
Account CodeCOACCOUNTC300
ACEweb Publish PropertiesCOWEBREGN10
Active FlagCOACTIVEL10
Add DateCOADDATED80
Age RequirementCOAGEREQN20
Allow Web WaitlistCOWEBWAITL10
Alternate Display Course CodeCOALIASC320
Attachment (email receipt)CORECATTC2500
Begin DateCOBEGDATED80
Budget Add DateCOBUADDD80
Budget BreakevenCOBUBREAKN50
Budget Go No-GoCOBUNOGON50
Budget NotesCOBUNOTEC1000
Budget OverheadCOBUOVERN20
Budget Profit ShareCOBUSHAREN20
Budget UpdatedCOBUUPDATED80
Budget UserCOBUUSERC80
Canceled FlagCOCANCELL10
Catalog CodeCOCATCODEC100
CategoryCOCATEGORYC120
CEUSCOCEUSN63
Comments (Reminder Note)CONOTENPRTM100
CoordinatorCOCOORDC200
Course CodeCOCRSEC120
Course TimeCOCRSETMC850
Created ByCOCREATORC80
CreditsCOCREDITN31
Date Opened for EnrollmentCOOPENDATD80
Days of WeekCODOWC70
DepartmentCODEPTC350
Email Reminders to StudentsCOEREMFLL10
Email Reminders DatetimeCOREMDTD80
End DateCOENDDATED80
End HoursCOENDHRSN20
End MinutesCOENDMINN20
Enrollment CountCOENROLLEDN50
Estimated EnrollmentCOESTENRLN40
Gift Exp DateCOGIFTEXPDD80
Gift Exp DaysCOGIFTEXPNN40
Group CountCOGRPCTN50
HoursCOHOURSN62
Instructor ID (No longer in use)COINSTIDC120
Lag Days for ACEwebCOWEBLAGN30
Lag Days for Billing on ACEwebCOBILLAGN30
Location IDCOLOCIDC120
Locked FlagCOLOCKEDL10
Maximum SizeCOMAXN50
Membership RequisitesCOMEMREQC1000
Merchant NumberCOMERCNUMC150
Minimum SizeCOMINN30
Months to CompleteCOEXPTIMEN20
Must Logon to View (Express)COLOGFIRSTL10
New Course FlagCONEWL10
Note (Printed on Receipt)CONOTEPRTM100
Online Course ProviderCOSERVICEC30
Online NoteCONOTEONLM100
Persons to Notify Via ACEwebCONOTIFYC1500
Physical MaxCOPHYSMAXN30
Print Location FlagCOLOCPRTINL10
Publish DateCOPUBDATED80
Proxy TypeCOPROXYTYPC100
Qualifies for Tax Credit FlagCOTAXCRL10
Reason Course was CanceledCOWHYCXC500
Receipt TemplateCORECCODEC100
Reference DocumentCOREFDOCC1000
Registration TimeCOREGTIMEC800
Registration Warning MessageCOREGWARNC800
Registrant Information Shown on ACEweb
RostersCOLISTCLASM100
Remind WhenCOREMWHEND80
Remind WhoCOREMWHOC80
Sessions NumberCOSESSN30
Short TitleCOSHORTNMC300
Show on Web TranscriptCOWEBTRANN10
Settings for ACEweb Special FunctionsCOWEBCFGM100
Special ACEweb Data Capture PageCOWEBCARDC200
Special ACEweb Information PageCOWEBSTATC200
Sponsoring FirmCOFMIDC120
Start HourCOSTHRSN20
Start MinuteCOSTMINN20
Subject CodeCOSUBCODEC80
TitleCOCRSENMC1250
Track AttendanceCOTRKATTL10
TypeCOTYPEC120
Update DateCOUPDATED80
Update TimeCOUPTMC100
Updated ByCOUSERC80
URLCOURLC2500
Waitlist CountCOWAITNUMN50
Web CertificateCOWEBCERTC500
Web Grade Book Access LevelCOWEBGRADEN10
Web Workshop MessageCOWEBWKMSGM100
Workshop Enabled (No Longer Used)COWKSHOPL10
Workshop MaximumCOWKMAXN20
Workshop MinimumCOWKMINN20
Additional Character Field (label specified by organization)COCHAR1C150

CREDINDV ​

LabelField NameTypeLengthDecimals
Course CodeCICRSEC120
Credit CodeCICODEC80
IDCIIDC90
NoteCINOTEC300
TypeCITYPEC60
UnitsCIUNITN52

CREDMAST ​

LabelField NameTypeLengthDecimals
Course CodeCMCRSEC120
TypeCMTYPEC60
UnitsCMUNITN52
Credit CodeCMCODEC80
NoteCMNOTEC300

CRM ​

LabelField NameTypeLengthDecimals
CourseCRCRSEC120
DateCRDATED80
IDCRIDC90
SubjectCRSUBJECTC600
TypeCRTYPEC10
UserCRUSERC80

CRSEREM ​

LabelField NameTypeLengthDecimals
Course CodeREMCRSEC120
Remind Who?REMWHOC80
When?REMWHEND80
Reminder NoteREMNOTESM100
OIDREMOIDC120

CRSEUDFS ​

Label UDFs on the UDF screen. See the Course-specific Labels topic for information on labeling Course Specific Registration Labels.

LabelField NameTypeLengthDecimals
Course CodeCUCRSEC120
User defined Character 1CUDFC1C350
User defined Character 2CUDFC2C350
User defined Character 3CUDFC3C500
User defined Character 4CUDFC4C700
User defined Date 1CUDFD1D80
User defined Date 2CUDFD2D80
User defined Date 3CUDFD3D80
User defined Date 4CUDFD4D80
User defined Logical 1CUDFL1L10
User defined Logical 2CUDFL2L10
User defined Logical 3CUDFL3L10
User defined Logical 4CUDFL4L10
User defined Numeric 1CUDFN1N72
User defined Numeric 2CUDFN2N72
User defined Numeric 3CUDFN3N72
User defined Numeric 4CUDFN4N72
Course Specific Character 1 Registration LabelCULBLC1C150
Course Specific Character 2 Registration LabelCULBLC2C150
Course Specific Character 3 Registration LabelCULBLC3C150
Course Specific Character 4 Registration LabelCULBLC4C150
Course Specific Date 1 Registration LabelCULBLD1C150
Course Specific Date 2 Registration LabelCULBLD2C150
Course Specific Date 3 Registration LabelCULBLD3C150
Course Specific Date 4 Registration LabelCULBLD4C150
Course Specific Logical 1 Registration LabelCULBLL1C150
Course Specific Logical 2 Registration LabelCULBLL2C150
Course Specific Logical 3 Registration LabelCULBLL3C150
Course Specific Logical 4 Registration LabelCULBLL4C150
Course Specific Numeric 1 Registration LabelCULBLN1C150
Course Specific Numeric 2 Registration LabelCULBLN2C150
Course Specific Numeric 3 Registration LabelCULBLN3C150
Course Specific Numeric 4 Registration LabelCULBLN4C150

CRSROOM ​

LabelField NameTypeLengthDecimals
Add DateCRMADDDATED80
Course CodeCRMCRSEC120
Created ByCRMCREATORC80
DateCRMDATED80
End HoursCRMENDHRSN20
End MinutesCRMENDMINN20
Location IDCRMLOCIDC120
Start HoursCRMSTHRSN20
Start MinutesCRMSTMINN20
TimeCRMTMC300
UpdatedCRMUPDATED80
Updated ByCRMUSERC80

FEES ​

LabelField NameTypeLengthDecimals
AmountFEFEEN82
Coupon/Inventory CodeFEINVNOC80
Course CodeFECRSEC120
Expires (days)FEEXPN40
Fee DescriptionFEDESCC500
Hide from Web FlagFEWEBHIDEL10
HybridFEHYBRIDC10
Mandatory FlagFEAUTOL10
OrderFEORDERN20
TypeFEIDENTC10
MaxFEMAXN40
Member Expires (Date)FETERMDATED80
Member Expires (# of Days)FETERMOFFN50
Member CodeFEMEMCODEC100

FINAIDI ​

LabelField NameTypeLengthDecimals
Add DateFAIADDATED80
Amount ExpectedFAIEXPECTN82
Date ExpectedFAIEXPECTDD70
Course AppliedFAICRSEC120
ID (Name)FAIIDC90
NotesFAINOTEC1000
ReceivedFAIRECEIVEN72
Updated ByFAIUSERC80
Update DateFAIUPDATED80

FINAIDM ​

LabelField NameTypeLengthDecimals
Award DateFAMAWARDEDD80
Date AddedFAMADDATED80
EFCFAMEFCN72
ID (Name)FAMIDC90
Payment TypeFAMPYTYPEC10
ReturnedFAMRETURN172
Total ExpectedFAMTOTALN72
TypeFAMTYPEC300
UpdatedFAMUPDATED80
Updated ByFAMUSERC80

FIRM ​

LabelField NameTypeLengthDecimals
# of EmployeesFMEMPLOYN50
$ CreditsFMCREDITSN82
Add DateFMADDATED80
Additional InformationFMEXTRAC650
Address Line 1FMADDR1C500
Address Line 2FMADDR2C500
Bill Address Line 1FMBADDR1C500
Bill Address Line 2FMBADDR2C500
Bill CityFMBCITYC170
Bill CountryFMBCNTRYC200
Bill PhoneFMBPHONEC150
Bill StateFMBSTATEC20
Bill to Attention ofFMBATTNC300
Bill ZipFMBZIPC100
CityFMCITYC170
CommentsFMCOMMM100
ContactFMCONTACTC750
Contact 2FMCONTACT2C750
CountyFMCOUNTYC150
CountryFMCNTRYC200
EmailFMEMAILC600
Email 2FMEMAIL2C600
Fax PhoneFMFPHONEC150
Federal IDFMFEDIDC120
Fee CategoryFMFEECATC300
Firm NameFMFIRMC750
Firm IDFMIDC120
Firm RepresentativeFMREPC60
Link FileFMLINKFILEC500
Org CodeFMORGC60
Parent CompanyFMCORPC350
PhoneFMPHONEC150
ProvinceFMPROVINCEC200
Qualification CodeFMQUALIFYC20
SICFMSICC90
Size (in $000’s)FMSIZEN70
StateFMSTATEC20
TypeFMIDENTC10
Update DateFMUPDATED80
URLFMURLC750
UserFMUSERC80
ZipFMZIPC100
Firm Character Field 1 (label specified by organization)FMCHAR1C120
Firm Character Field 2 (label specified by organization)FMCHAR2C120
Firm Logical Field 1 (label specified by organization)FMLOG1L10
Firm Logical Field 2 (label specified by organization)FMLOG2L10

GIFTCARD ​

LabelField NameTypeLengthDecimals
NumberGCNUMC80
Sub IDGCSUBIDC120
UsedGCUSEDL10
NotesGCNOTESM100
Name IDGCIDC90
Expiration DateGCEXPIRED80

GROUPING ​

LabelField NameTypeLengthDecimals
Course CodeGRCRSEC120
Grouping CodeGRCODEC60

HOLIDAYS ​

LabelField NameTypeLengthDecimals
DateDATED80
DescriptionDESCRIPTC300
Local HolidayLOC_HOLC400
ThroughDATE2D80
Start HourHOURN20
Start MinutesMINUTEN20

INSTRUCT ​

Label UDFs on the UDF screen.

LabelField NameTypeLengthDecimals
ACEweb Edit LevelINLEVELN10
Active FlagINPRTLBLL10
Add DateINADDATED80
Address Line 1INADDR1C500
Address Line 2INADDR2C500
Available Friday FlagINAVLFRIL10
Available Monday FlagINAVLMONL10
Available Saturday FlagINAVLSATL10
Available Sunday FlagINAVLSUNL10
Available Thursday FlagINAVLTHUL10
Available Tuesday FlagINAVLTUEL10
Available Wednesday FlagINAVLWEDL10
BioINBIOM100
Call Back DateINCALLBACKD80
Cell PhoneINCELLPHC150
CityINCITYC170
Code 1INCODE1C120
CommentsINCOMMM100
CountryINCNTRYC200
Day PhoneINDPHONEC150
Email AddressINEMAILC600
Employment StatusINUDFN1N72
Evaluation NotesINEVALNOTEM100
Faculty System IDINSTIDC120
Fax PhoneINFPHONEC150
Firm IDINFMIDC120
FirmINFIRMC750
First NameINNAME1C150
Give out Day Phone FlagINGIVEDPHOL10
Give out Email FlagINGIVEEML10
Give out Home Phone FlagINGIVEHPHOL10
Give out Cell Phone FlagINGIVECELLL10
Home PhoneINHPHONEC140
HTMLINHTMLM100
ID #INIDC90
ID/FEININSSNC110
Last NameINNAME3C300
Middle NameINNAME2C120
Occupation CodeINOCCC60
Organization CodeINORGC60
Pager NumberINPAGERC150
Payment NotesINPAYNOTEM100
Prefer M of CINPMOCC10
Print Label FlagINLABELL10
ProvinceINPROVINCEC200
Reference DocumentINREFERENC1000
ResumeINRESUMEC1000
SalutationINSALUTC40
Schedule ExceptionsINSCHEDULEC700
SkillsINSKILLC1000
Source CodeINSOURCEC60
Staff ContactINHANDLERC150
StateINSTATEC20
SuffixINSUFFC100
TitleINTITLEC500
Update DateINUPDATED80
UserINUSERC80
User Defined Character 1 (Pay Type)INUDFC1C200
User Defined Character 2INUDFC2C200
User Defined Character 3INUDFC3C200
User Defined Character 4INUDFC4C600
User Defined Date 1INUDFD1D80
User Defined Date 2INUDFD2D80
User Defined Date 3INUDFD3D80
User Defined Date 4INUDFD4D80
User Defined Logical 1INUDFL1L10
User Defined Logical 2INUDFL2L10
User Defined Logical 3INUDFL3L10
User Defined Logical 4INUDFL4L10
User Defined Numeric 2INUDFN2N72
User Defined Numeric 3INUDFN3N72
User Defined Numeric 4INUDFN4N72
View Student Email (on ACEweb)?INSHOWEML10
Who Should Call BackINWHOCALLC80
ZipINZIPC100

LEDGDESC ​

LabelField NameTypeLengthDecimals
Cost Center CodeLDCODEC120
Cost Center DescriptionLDDESCC550

LEDGENTR ​

LabelField NameTypeLengthDecimals
Account CodeLEACCTNUMC300
AmountLEAMTN92
Budget Expense TypeLETYPEC10
Budget Record IDLEBUOIDC100
Cost Center CodeLECODEC120
Date of ExpenseLEDATED80
Date PostedLEPOSTDATED80
DescriptionLEDESCC1250
Expense ClassificationLECLASSC60
Expense or Income FlagLEEXP_INCL10
Group IDLEGROUPIDC120
Item Received FlagLERCVDL10
Major Expense CategoryLECATC20
Other DetailLEDETAILC200
Paid FlagLEPAIDL10
PO NumberLEPONUMC100
Projected or Actual FlagLEPROJL10
QuantityLEQTYN50
Receipt #LERECNUMC120
UserLEUSERC80
Vendor IDLEVENIDC120
Vendor NameLEVENDNMC750

LINKINST ​

LabelField NameTypeLengthDecimals
Account CodeLIACCOUNTC300
CommentsLICOMMC600
Course CodeLICRSEC120
Date PaidLIDATEPAIDD80
Evaluation Criteria 1LIEV1N30
Evaluation Criteria 2LIEV2N30
Evaluation Criteria 3LIEV3N30
Evaluation Criteria 4LIEV4N30
Evaluation Criteria 5LIEV5N30
Evaluation Criteria 6LIEV6N30
Evaluation Criteria 7LIEV6N30
Expense ClassificationLICLASSC60
Faculty member Flag (No Longer Used)LIFACULTYL10
Group IDLIGROUPIDC120
Hours TaughtLIHOURSN62
Instructor IDLIINSTIDC120
Miscellaneous Pay DescriptionLIMISCDESCC300
Amount (Miscellaneous)LIMISCPAYN62
Pay NotesLIPAYNOTEC2500
Pay DateLIPAYDATED80
Pay RateLIPAYRATEN72
Pay TypeLIPAYTYPEC10
Per Stu DedLIPYDEDUCTN82
Percent of ClassLIPERCENTN62
Presentation DateLIPRESDATED80
Presentation TimeLIPRESTIMEC850
Presentation TitleLIPRESTITLC950
Presentation TypeLIPRESTYPEC170
Presentation VenueLIPRESVENUC400
Ref (%age)LIPAYREFN70
SessionsLISESSN30
UserLIUSERC80

LOCATION ​

LabelField NameTypeLengthDecimals
ActiveLOCACTIVEL10
Additional (ACEweb) InformationLOCHTMLM100
Address Line 1LOCADDR1C360
Address Line 2LOCADDR2C300
Building/RoomLOCLOCATC550
CampusLOCCAMPUSC300
Character 1LOCUDF1C500
Character 2LOCUDF2C900
CityLOCCITYC200
ContactLOCCONTACTC500
CountyLOCCOUNTYC250
Display on WebLOCWEBDISPL10
Email AddressLOCEMAILC750
Location/Room ID #LOCIDC120
Location Assignment MessageLOCMESSM100
Location InformationLOCINFOM100
Location MaxLOCMAXN50
Location Assignment MessageLOCMESSM100
Location NotesLOCNOTEM100
Location PhoneLOCPHONEC150
Print Information FlagLOCPRTINL10
Room Record Internal IDLOCRMIDC140
StateLOCSTATEC150
Zip CodeLOCZIPC100

NAMECODE ​

LabelField NameTypeLengthDecimals
IDNCIDC90
Interest CodeNCCODEC100
IdentifierNCIDENTC10
Add DateNCADDATED80
CourseNCCRSEC120

NAMEDOCS ​

LabelField NameTypeLengthDecimals
IDNAIDC90
DocumentsNADOCC1000
CommentsNACOMMC750
Date/TimeNATIMED80
CourseNACRSEC120
ValidNAVALIDL10

NAMES ​

LabelField NameTypeLengthDecimals
ACEweb NoteNMWEBNOTEC700
ACEweb PasswordNMPASSWDC320
ActiveNMDEACTIVEL10
Add DateNMADDATED80
Address Line 1NMADDR1C500
Address Line 2NMADDR2C500
Allowed to Proxy Register Firm on AWNMFMREGl10
AW Bill AmountNMBILLOLN50
Badge/NicknameNMBADGEC200
Bar Code ChecksumNMCHECKSUMC30
Birth dateNMBIRTHD80
Block in ACEwebNMWEBSTOPL10
Call Back DateNMCALLBACKD80
Carrier Route CodeNMCARRTC40
CASS Error CodeNMCASSERRC20
Cell PhoneNMCELLPHC120
CityNMCITYC200
CommentsNMCOMMM100
Contact HistoryNMHISTM100
CountryNMCNTRYC200
CountyNMCOUNTYC150
Created ByNMCREATORC80
Day PhoneNMDPHONEC200
Default Credit TypesNMDEFCRC300
DisabilityNMDISABLEC10
Don’t Mail FlagNMNOMAILL10
Don’t Email FlagNMELISTL10
Dwelling TypeNMHMOWNC20
Educational LevelNMEDLEVELC20
Email AddressNMEMAILC750
Ethnic OriginNMETHNICC20
Family TypeNMFAMTYPEC60
Fax PhoneNMFPHONEC150
Fee CategoryNMFEECATC300
Firm IDNMFMIDC120
Firm NameNMFIRMC750
Firm Reg Level (ACEweb Use)NMREGLVLN10
First NameNMNAME1C300
GroupingNMGROUPIDC90
Home PhoneNMHPHONEC150
Household IncomeNMINCC30
Ignore this name in Mass Combine NamesNMSKIPDUPL10
LanguageNMLANGC20
Last Activity DateNMLASTACTD80
Last NameNMNAME3C450
Line of TravelNMLINOTRVC50
Link FileNMLINKFILEC1000
Mail StopNMMAILSTC100
Marital StatusNMMARSTATC10
Member NumberNMMEMBNUMC140
Middle InitialNMNAME2C120
Miscellaneous Code 1NMCODE1C120
Miscellaneous Code 2NMCODE2C120
Miscellaneous Code 3NMMISCC60
Number of Courses TakenNMNUMTAKN30
Occupational CodeNMOCCC60
Opt InNMSMSOPTL10
Organization CodeNMORGC60
Pager NumberNMPAGERC120
Preferred AddressNMPREFERC10
Preferred Method of ContactNMPMOCC10
Print Label FlagNMPRTLBLL10
Print Label InformationNMLABINFOC180
ProvinceNMPROVINCEC200
Renewed MemberNMRENEWMEML10
Report FlagNMRPTFLAGL10
SalutationNMSALUTC100
Sex (Gender)NMSEXC10
Source CodeNMSOURCEC80
Special NeedsNMSPECM100
IDNMIDC90
SSO IDNMSSOIDM100
StateNMSTATEC20
SuffixNMSUFFC210
TitleNMTITLEC500
Update DateNMUPDATED80
Update TimeNMUPTMC100
Updated ByNMUSERC80
Who should Call BackNMWHOCALLC80
ZipNMZIPC100
Additional Character Field (label specified by organization)NMCHAR1C500

NAMEUDFS ​

Label UDFs on the UDF screen.

LabelField NameTypeLengthDecimals
IDNUIDC90
User Defined Character 1NUDFC1C200
User Defined Character 2NUDFC2C200
User Defined Character 3NUDFC3C500
User Defined Character 4NUDFC4C500
User Defined Character 5NUDFC5C700
User Defined Date 1NUDFD1D80
User Defined Date 2NUDFD2D80
User Defined Date 3NUDFD3D80
User Defined Date 4NUDFD4D80
User Defined Date 5NUDFD5D80
User Defined Logical 1NUDFL1L10
User Defined Logical 2NUDFL2L10
User Defined Logical 3NUDFL3L10
User Defined Logical 4NUDFL4L10
User Defined Logical 5NUDFL5L10
User Defined Numeric 1NUDFN1N82
User Defined Numeric 2NUDFN2N72
User Defined Numeric 3NUDFN3N72
User Defined Numeric 4NUDFN4N72
User Defined Numeric 5NUDFN5N72

ORGANIZATION DEFAULTS ​

LabelField NameTypeLengthDecimals
Address Line 1XC_ADDR1C450
Address Line 2XC_ADDR2C450
CityXC_CITYC250
Fax PhoneXC_FPHONEC180
Global Receipt MessageXC_RCPTMESC5000
Organization DepartmentXC_DEPTTITC550
Organization TitleXC_ORGTITLC600
PhoneXC_PHONEC180
StateXC_STATEC20
URLXC_URLC600
Zip CodeXC_ZIPC100
ACEweb URLXS_AWURLC2500

PAY ​

Label UDFs on the UDF screen.

LabelField NameTypeLengthDecimals
Account CodePYACCOUNTC300
Add TimePYADDTMC100
Address Line 1PYADDR1C500
Address Line 2PYADDR2C500
AmountPYAMTN82
Auth #/Addl InfoPYAUTHNUMC300
CityPYCITYC250
Contact PersonPYCONTC750
Course CodePYCRSEC120
Created ByPYCREATORC80
Credit Card Expiration DatePYEXPRDATEC100
Transaction #PYTRANUMC200
Credit Card, Check, or PO #PYNUMBERC200
DatePYDATED80
Deposit NumberPYACCTFORC120
EmailPYEMAILC750
Escrow ExpirationPYESCEXPD80
Gift Card #PYGIFTC80
Group IDPYPAYIDC120
Pay NotesPYLINKC1250
NamePYNAMEC500
NotePYNOTEC1000
Original ID/CoursePYORIGINALC220
Paid By Taxpayer FlagPYTAXCRL10
Paid To Invoice (Invoice Number)PYINVNUMC80
Payment IDPYSUBIDC120
ACEweb Session IDPYSESSIONC150
Transaction IDPYTRANSIDC450
Phone NumberPYPHONEC200
ProvincePYPROVINCEC200
QuantifierPYQUANTC40
Receipt NumberPYRECNUMC80
IDPYIDC90
StatePYSTATEC20
TypePYTYPEC10
Update DatePYUPDATED80
Update TimePYUPTMC100
Updated ByPYUSERC80
ZipPYZIPC100
User Defined Character 1PYUDFC1C200
User Defined Character 2PYUDFC2C200
User Defined Date 1PYUDFD1D80

REGFEES ​

LabelField NameTypeLengthDecimals
AmountRFFEEN82
Course CodeRFCRSEC120
Date AddedRFDATED80
Fee DescriptionRFDESCC300
Group IDRFGROUPIDC120
Inventory NumberRFINVNOC80
QuantityRFQUANTN40
IDRFIDC90

REGISTER ​

LabelField NameTypeLengthDecimals
Add DateRGADDATED80
Add TimeRGADDTIMEC100
Adjustment Amount (No Longer Used)RGADJFEEN82
Adjustment Description (No Longer Used)RGADJDESCC300
Amount (Main)RGCRSEFEEN82
Approved ByRGAPPROVC90
Bill/Pay Only Record FlagRGBILLL10
Canceled FlagRGCANCELL10
Certificate Printed DateRGPTCERTD80
CEUSRGCEUSN63
Completed CourseRGCOMPLETED80
Completion Deadline DateRGEXPDATED80
Confirmation DateRGCNFIRMD80
Course CodeRGCRSEC120
Created ByRGCREATORC80
CreditsRGCREDITN31
Fee Description (Main)RGFEEDESCC500
Get Web CertificateRGWEBCERTN10
GradeRGGRADEC30
Group FlagRGGROUPL10
Group IDRGGROUPIDC120
HoursRGHOURSN72
Hybrid StatusRGHYBRIDC10
IDRGIDC90
IdentifierRGIDENTC200
Max UseRGCLASMAXN30
Miscellaneous CodeRGMISCC60
Number of SeatsRGNUMBN40
PartnerRGPARTNERC90
Publish (on ACEweb)?RGPUBLISHL10
Receipt Sent QuantifierRGQUANTC40
Registered ByRGPROXYIDC90
Registration CodeRGCODEC60
Registration NoteRGREGNOTEC2500
StatusRGSTATUSC150
Total Paid (No Longer Used) FlagRGTOTALPDL10
Tracking CodeRGTRACKC80
Update DateRGUPDATED80
Update TimeRGUPDTTMC100
Updated ByRGUSERC80
Waitlist FlagRGWAITLISTL10
Who Paid for RegistrationRGWHOPAYC10

REGUDFS ​

Label UDFs on the UDF screen.

LabelField NameTypeLengthDecimals
Course CodeRUCRSEC120
IDRUIDC90
User Defined Character 1RUDFC1C200
User Defined Character 2RUDFC2C200
User Defined Character 3RUDFC3C200
User Defined Character 4RUDFC4C500
User Defined Date 1RUDFD1D80
User Defined Date 2RUDFD2D80
User Defined Date 3RUDFD3D80
User Defined Date 4RUDFD4D80
User Defined Logical 1RUDFL1L10
User Defined Logical 2RUDFL2L10
User Defined Logical 3RUDFL3L10
User Defined Logical 4RUDFL4L10
User Defined Numeric 1RUDFN1N72
User Defined Numeric 2RUDFN2N72
User Defined Numeric 3RUDFN3N72
User Defined Numeric 4RUDFN4N72

ROOMSPLIT ​

LabelField NameTypeLengthDecimals
ParentRSPARENTC120
ChildRSCHILDC120

STATES ​

LabelField NameTypeLengthDecimals
AbbreviationABBREVC20
Full nameFULLNAMEC200

TESTING ​

LabelField NameTypeLengthDecimals
Add DateTEADDATED80
CodeTECODEC150
CreditsTECREDITSN142
DateTEDATED80
Date2TEDATE2D80
Hide from WebTEHIDEWEBL10
IDTEIDC90
InstitutionTEINSTITUC400
NotesTENOTESC750
ScoreTESCOREC120
TitleTETITLEC750
TypeTETYPEC80
Updated ByTEUSERC80

USER DEFINED LABELS ​

TabPreferenceLabel NameData Field Name
CourseCochar1xs_coordlabcocoord
CourseCoordinatorxs_cochar1cochar1
Course1 (Instructor Evaluation Fields)xs_lievl1liev1
Course2 (Instructor Evaluation Fields)xs_lievl2liev2
Course3 (Instructor Evaluation Fields)xs_lievl3liev3
Course4 (Instructor Evaluation Fields)xs_lievl4liev4
Course5 (Instructor Evaluation Fields)xs_lievl5liev5
Course6 (Instructor Evaluation Fields)xs_lievl6liev6
Course7 (Instructor Evaluation Fields)xs_lievl7liev7
FacultyCode Labelxs_incode1incode1
FacultyReferen Labelxs_referinreferen
FacultyResume Labelxs_resumeinresume
FirmChar 1xs_fmchar1labfmchar1
FirmChar 2xs_fmchar2labfmchar2
FirmFirm Repxs_replabfmrep
FirmLog 1xs_fmlog1labfmlog1
FirmLog 2xs_fmlog2labfmlog2
FirmSICxs_siclabfmsic
NamesBadge Namexs_badgenmbadge
NamesDisabilityxs_disabilnmdisable
NamesEducation Levelxs_edlevelnmedlevel
NamesEthnic Originxs_ethlabnmethnic
NamesFamily Typexs_famtypenmfamtype
NamesHomeownerxs_homeownnmhmown
NamesHousehold Incomexs_housincnminc
NamesLanguagexs_langlabnmlang
NamesMarital Statusxs_marstatnmmarstat
NamesMember Numberxs_memlabnmmembnum
NamesMiscellaneous Codexs_nmmisclabnmmisc
NamesName Char 1xs_char1labnmchar1
NamesNMCODE1xs_nmcode1nmcode1
NamesNMCODE2xs_nmcode2nmcode2
NamesOccupationxs_occnmocc
NamesOrganizationxs_orgnmorg
NamesPager Phonexs_pagernmpager
Pay(7)xs_paytyp7Payment Type drop down list
Pay(A)xs_paytypaPayment Type drop down list
Pay(B)xs_paytypbPayment Type drop down list
Pay(C)xs_paytypcPayment Type drop down list
Pay(D)xs_paytypdPayment Type drop down list
Pay(E)xs_paytypePayment Type drop down list
Pay(F)xs_paytypfPayment Type drop down list
Pay(G)xs_paytypgPayment Type drop down list
Pay(H)xs_paytyphPayment Type drop down list
RegisterReg Codexs_crgcodergcode
RegisterUse rgptcert (Date Field)xs_certlabrgptcert
RegisterUse rgconfirm (Date Field)xs_conflabrgcnfirm
RegisterUse rgmiscxs_misclabrgmisc

USER PROFILE ​

LabelField NameTypeLengthDecimals
Full Namem.fullnameC300
User Namem.usermastC80
Email Addressm.usremailC400
Phone Numberm.usrphoneC150
ACEweb Skin Numberxl_awskinN10
Email SignatureemailsigM100
HTML Email SignatureemsightmlM100

WKSHPIND ​

LabelField NameTypeLengthDecimals
CEUSWICEUSN63
Course CodeWICRSEC120
Date Lesson ReceivedWIRCVDATED80
Date Lesson ReturnedWIRTNDATED80
HoursWIHOURN52
Lesson Faculty IDWIINSTRC120
Lesson GradeWIGRADEC70
Lesson FlagWILESSONL10
QuantifierWIQUANTC40
IDWIIDC90
Test Request DateWITESTREQD80
Workshop CodeWICODEC80

WKSHPMST ​

LabelField NameTypeLengthDecimals
AmountWMFEEAMTN72
CEUSWMCEUSN63
Course CodeWMCRSEC120
DateWMDATED80
Do Not Display on ACEwebWMWEBHIDEL10
Enrollment CountWMENROLLN50
Fee DescriptionWMFEEDESCC300
HoursWMHOURN52
LeaderWMLEADERC500
LocationWMLOCC200
Maximum SizeWMMAXN40
NoteWMNOTEC1200
Option 1WMOPT1C150
Option 2WMOPT2C150
TimesWMTIMEC200
TitleWMTITLEC950
Workshop CodeWMCODEC80
Workshop Description CodeWMCATCODEC100

ZIP ​

LabelField NameTypeLengthDecimals
Area CodeZIPAREAC30
CityZIPCITYC200
CountryZIPCNTRYC200
CountyZIPCOUNTYC150
RegionZIPREGIONC30
StateZIPSTATEC20
ZipZIPZIPC100

Student Manager Tables ​

All the fields in Student Manager are contained in tables. In most of the tables, the first two letters of the field denote the table in which they are stored.

For example, all fields which start with 'Nm' are from the Names table. The Names table stores all the personal information about the individuals participating in your programs (e.g. name, address, occupation code, etc.).

Here’s a quick guide to the Table Naming protocols within Student Manager:

  • AT = Attendance Tracker
  • BU = Budget Builder
  • CA = Catalog (e.g. cacode: catalog code)
  • CO = Course (e.g. cocrse: course code)
  • CR = CRM
  • FE = Course Fees (e.g. fedesc: fee desc.)
  • FAI = Individual Financial Aid (e.g. faid, faiexpect)
  • FAM = Master Financial Aid (e.g. famid, famcrse)
  • FM = Firm (e.g. fmfirm: firm title)
  • IN = Instructor (e.g. inname3: inst. last name)
  • LOC = Location (e.g. locinfo: location info)
  • LE = Pocket Ledger (e.g. leclass:  expense class)
  • LI = Instructor Pay (e.g. lipayrate: pay rate)
  • NM = Name (e.g. nmname1: first name)
  • PY = Pay (e.g. pydate: payment date)
  • RF = Reg. Additional Charges (e.g. rffee: fee amount)
  • RG = Register (e.g. rgaddate: reg add date)
  • TE = Credentials (e.g. teid, tetitle)
  • WI = Individual's workshops/lessons (e.g. wigrade: grade)
  • WM = Master Workshop/Lessons (e.g. wmtitle: workshop/lesson title)

UDF Tables ​

User-defined fields consist of:

  • the first letter of the table (e.g. N=Name, C=Course, R=Register, P=Pay, etc.)
  • the letters 'UDF'
  • letter denoting the type of field (c=character, l=logical, n=number, d=date)
  • the number of the field

For example, Nudfc1 is Name character field #1.

Table/Field Structure ​

View the Student Manager tables/fields in list format. Or view field names by screen in the Screen Layout section.

Report Controls ​

Student Manager's report writer provides you with several tools to help simplify your report modification.

Report Designer Toolbar ​

Access the following report tools with these icons:

Report Designer Toolbar

  • Data Grouping: open the Data Grouping window to add/edit Group Bands.
  • Data Environment:  view the fields available in the report cursor.
  • Page Setup: opens Page Setup window.
  • Report Controls:  opens the Report Control Toolbar (see below).
  • Color Palette:  opens the Color Toolbar.
  • Layout:  opens the Layout Toolbar.
  • Font Properties: opens Font Properties window.

Command Bar Menu Items ​

Access the following report tools from the Report Designer menu:

Report Designer Menu

  • File – Close Report, Page Setup; and Print Preview.
  • Edit – Cut, Copy, Paste, Select All, etc.
  • View – No tools are listed on the View menu.
  • Format - Alignment and Sizing options; Element Grouping and Order, Formatting options for text, lines, and boxes (e.g. color, font, line size, fill color and type).
  • Tools – No tools are listed on the Tools menu.
  • Report - Banding; Variables, Data Grouping; Set Default Font for Report.
  • Window – Lists current report window.
  • Help – Access Report Help.

Report Control Tool Bar ​

Icons to add and modify report elements:

Report Controls Toolbar

  • Pointer tool:  Select report elements to modify or move.
  • Text Tool:  Create text entries up to 256 characters in length.
  • Expression Box Tool:  Draw expression boxes in which to place data.
  • Line Tool:  Draw vertical and horizontal lines.
  • Square Box Tool:  Draw rectangular boxes.
  • Round Rectangle Tool:  Draw round-edged boxes.
  • Picture Tool:  Add graphics to the report.
  • Button Lock Tool:  Keep the current tool selected for multiple additions.

Adding Report Elements ​

Add data fields, text, lines, boxes, and graphics to your report template.

Add Field from Cursor ​

You can add fields from the Report Cursor:

  1. Click the Data Environment button on the Report Designer Toolbar.

Data Environment

  1. Scroll through the list of available fields to find the field you want.
  2. 'Pick up' the field and drag it to the report (i.e. put the mouse over the field name [e.g. rgaddate], click and hold down the mouse button, then move the mouse to where you want to put the field in the report).

Adding Field

  1. 'Drop' the field where you want it to be placed (i.e. let go of the mouse where you want the field to be). The field and label will be placed on the report.

Field and Label Added

Add Field in Expression Box ​

You can add a field directly into an expression box:

  1. Click the ab tool on the Report Controls Toolbar.
  2. Click where you want to place the expression and draw a box.

Add Box

  1. When you release the mouse button, the Report Expression window will open.

Box Report Expression window

  1. Type the field name into the Expression field.

Enter Expression

  1. Click the OK button to close the Report Expression window and return to the report template. Your field will be added to the template. Note:  when you add a field with an expression box, no label is created.

Expression Added

Add Multiple Elements to Expression Box ​

You can add more than one field to an expression box*. To do so, you must enter your field names separated by one of the following concatenators:

Comma (,):  places a space in between the fields, i.e. Sharon Brookshire

Comma Separated Fields

Semi-colon (😉:  places a carriage return between the fields, i.e.:

President

ACEware Systems, Inc.

Semi-colon Separated Fields

Plus sign (+): add fields (and/or text elements as in the following example) together without any spaces or returns, i.e. Manhattan, KS

+ Separated Fields

*You fields must be of the same type. Fox example, you can’t combine a character field and a date field. If they are not the same type, you must use a report function to turn the date field into a character expression to include it in the same expression with a character field.

Add Field with Report Function ​

If the field you want to include in your report is not in the report cursor, you can usually access it with an add type Report Function. For example, this expression uses the ADDNAME() function to add the nmcode1 field to the report when it's not in your cursor.

Add Function

Add Text Entries ​

You can add text entries (e.g. report title, field label, etc.) to your report. Each text can hold 256 characters (including spaces and carriage returns).

  1. Click the A tool on the Report Controls Toolbar.
  2. Click where you want to place the text. You'll see a blinking cursor where you clicked.

Add Text Entry

  1. Begin typing your text.

Type in TExt

Edit Text Entries ​

To edit a text entry:

  1. Click the A tool on the Report Controls Toolbar.
  2. Click into the text entry you want to edit.

Edit Text Entry

  1. Make the changes.

Add Lines ​

To add a line to the report template:

  1. Click the Line Tool on the Report Controls Toolbar.
  2. Click and drag the line--either vertically or horizontally--to the length you want.

Draw Line

  1. Release the mouse. The line is placed on the report template.

Line Formatting ​

  • To change the thickness of the line, select Format > Pen, then select a size option.
  • To change the color of the line, select Format > Foreground Color, then select the color (or use the Color Palette Tool Bar to change the color).

Add Boxes ​

Add squared or rounded boxes to your report with the Rectangle tools. Before you add a rectangle, you must determine the type of rectangle you want to add (i.e. squared or rounded). Next you must decide the fill and border type. The defaults are black border and no fill color.

To add a rectangle:

  1. Click the Rectangle tool or the Rounded Rectangle tool on the Report Controls Toolbar.
  2. Draw a box on the report template.

Add Box

  1. Release the mouse. The box is added to the template.

Box Formatting ​

You can change the format of the box

  • To change the thickness of the line, select Format > Pen then select a size option.
  • To change the fill type, select Format > Fill then select the fill type.
  • To change the fill color, select Format > Background Color then select the color (or use the Color Palette Tool Bar to change the fill color).
  • To change the border color, select Format > Foreground Color then select the color (or use the Color Palette Tool Bar to change the border color).

If you selected the Rounded Rectangle, you may also select the rounding style. To do so, draw the rectangle, then double-click it to open the Round Rectangle window. Then select the Style.

Add Round Box

Add Images ​

Place a link to images in reports (e.g. organization's logo). The Report Designer recognizes the following graphic types: bmp, gif, jpg, png, and tiff.

IMPORTANT NOTES

  • The graphics you use in your reports must be in a public location that other users can access. We suggest you place the graphic in your Student Manager folder, or create an Images folder within your Student Manager folder and place the graphic in it.
  • Some PDF readers (e.g. Adobe Reader) will not properly render images that have transparent backgrounds. This is not a Student Manager bug, but an issue with how the PDF reader renders your image. If you experience this on PDFs created in Student Manager, you will need to use an image that has a background color.

To add an image

  1. Click the Picture Tool on the Report Controls Toolbar.
  2. Click where you want to place the graphic and draw a box.
  3. When you release the mouse button, the Report Picture window opens.

Add Image

  1. Click the ... button to the right of the File field). This opens the Open window for you to find and select your graphic file.

We suggest you place graphics used in Student Manager reports in an Image subfolder of your Student Manager directory. This makes them available for anyone who needs to run the report. If you select a graphic that is stored on your computer, only you will be able to run the report (i.e. the path to the graphic will not be correct for anyone else, so they will get an error when trying to run the report).

  1. Select the graphic, then click the OK button.
  2. This will return you to the Report Picture Window. You can now determine picture/frame resizing and placement options.
  • Clip Picture – If the picture is bigger than the frame you created, shows a section of the original picture in the frame, retaining the picture's original dimensions. The picture is anchored at the top and at the left of the frame. You cannot see the lower right portion of the picture that extends beyond the frame.
  • Scale picture, retain shape - Displays the whole picture, filling as much of the frame as possible while retaining the relative proportions of the picture. This will protect your picture from vertical or horizontal distortion.
  • Scale picture, fill the frame - Display the whole picture, filling the frame completely. If necessary, the picture will be distorted vertically or horizontally to fit the frame.

Formatting Elements ​

Once you’ve added fields to your report, you may need to apply special formatting. For instance, you may want a dollar sign in front of a money field and commas in the appropriate places. To apply formatting to a field:

  1. Double click the appropriate field to open the Report Expression window.
  2. Click the Ellipsis button to the right of the Format Field to open the Format window.

Format Field

This window allows you to set the appropriate formatting options. When setting formatting options, you use the 9s as placeholders for the field characters. For example, the following displays the Registration Fee field with the dollar sign in front of the amount. The 9s entered are place holders, telling the system how many digits of the amount to display. In this case, it displays 4- digits of the dollar amount and two digits of the cents. It will also include the thousand comma if the amount is 1,000 or greater.

Numeric Placeholders

*Note: in currency fields, you must always put in one more place holder for the $ sign. For instance in the above example, there are 5 digits for the dollar amount but only 4 digits of the dollar amount will show for this field because the 5th digit is the place holder for the $ sign.

Character Options ​

Character Format Options

Example:

(999) 999-9999 X9999

Applies the standard phone format to a phone field, e.g.:

(785) 537-2937 X1234

Note:  when applying formats to character fields, you MUST also enable the Ignore Input Mask option.

Number Options ​

Number Format Options

Example:

999,999.99

Displays 6 digits of the amount and 2 decimal places with a comma in the 1,000 place.

Note:  if you want the dollar sign to be displayed, enable the Currency option (remember you must put in one more placeholder for the dollar sign).

Date Options ​

Date Format Options

For the most part, Report Functions are used to format date fields instead of the Date Format options. However, if you want to display the date in British format (i.e. dd/mm/yyyy), you may set that option on this window.

Default Font-New Elements ​

You may change the report's default font for all NEW elements added to the report (it will not change the font on existing report elements). To set the default report font:

  1. Select Report > Default Font.
  2. Select the Default Font for the report.
  3. Select any appropriate Font Style, Size, and Effect options.
  4. Click the OK button.

The default font is now set for all new report elements.

Font Properties-Existing Elements ​

To change the font properties of a text entry or field/expression box:

  1. Click on the text/expression box to highlight it (highlighted elements have small black handles, called Adjustment Handles, around them).

Highlight Text/Expression Box

  1. Select Format > Font to open the Font Properties window.

Font Properties

  1. Select the appropriate font properties (e.g. style, size, etc.).
  2. Click the OK button to save your font changes and return to the report template. Your changes will be applied to the element(s) selected.

Font Changed

Resizing Expression Boxes ​

You can make an expression box wider so that the contents fit on one line (unless you're working with a Memo field which has more than 1 line of data. For these fields, you will want to enable field stretching--see below). To resize an expression box:

  1. Click on the expression box to highlight it. This displays the Adjustment Handles.

Adjustment Handles

  1. Grab the appropriate Adjustment Handle and drag it to expand or retract the field.

Grab Adjustment Handle

Stretch with Overflow ​

You may choose to let the contents of a field wrap to the next line if the expression box is not wide enough to display the entire field contents.

  1. Double click the expression box to open the Report Expression window.

Stretch with Overflow

  1. Select the Stretch with overflow option.
  2. Click the OK button to close the window and return to the report template.

Object Positioning ​

If you are using variable length fields with the Stretch with Overflow option, you may need to set the position of other elements in the report band with the Field/Object Position option.

For example, you enabled stretching on the course title field. You've also placed the course begin date field directly under the course title field. With no position option set on the course begin date field, if the course title wraps to the next line it will print over the course begin date.

Print Over Fields Underneath

To keep this from occurring, you must set the appropriate position option for other objects under the variable length fields. To set the position:

  1. Double click the object to open the Properties window.

Float Option

  1. Select one of the following options:
  • Float – maintains the position of the object relative to the other fields (information moves down according to length of field information above it). This is the best option to use if you have several variable length fields in the report band.>
  • Fix relative to bottom of band – maintains the position of the object relative to the bottom of the band (information will always display at the bottom of the band). This is the best option to use if you only have one variable length field in the report band.>
  • Fix relative to top of band – maintains the position of the object relative to the top of the band (information will always display at the top of the band). This is the default option and is best to use when none of the fields in your report band are of variable length.
  1. Click the OK button to close the window and return to the report template.

Page Setup ​

You can set the number of columns and page orientation in the Page Setup.

Setting Columns ​

To set the number of columns on a report:

  1. Select File > Page Setup or click the Page Setup icon on the Report Designer Toolbar to open the Report Page Setup window.

Report Page Setup

  1. Enter the number of columns you want on the report in the Number field.
  2. Set the width of each column in the Width field.
  3. Set the spacing between columns in the Spacing field.
  4. Click the Down/Up Print Order button. Note: the Across Print Order option will not display properly so we don't recommend its use.

Print Order

  1. Click the OK button to save your settings and return to the Report Designer screen.

Page Orientation/Paper Size ​

To change the page orientation for a report:

  1. On the Report Page Setup window, Click the Page Setup button.
  2. Select the Page Orientation and Paper Size options.

page Orientation

  1. Click the OK button to save your settings and close the Print Setup window.
  2. Click the OK button on the Page Setup window to close the window and return to the Report Designer screen.

Saving Changes to the Report Template ​

Once you have made all the modifications to the report template, you're ready to save your changes. To save your changes:

  1. Select File > Close, OR use the shortcut key: CTRL+F4.
  2. Click Yes on the Save Changes dialog box.
  3. The Saving Modifications window will open next:
  • If you modified a default report, you have the following options:
  1. Saving your changed report as the default report. To do so click the Save as Default button. Next, you'll be given the option to replace the original default report or save the old report first. Select your desired option.
  2. Creating an additional report. To do so, enter a title in the Report Title field, then click Done.
  • If you modified an additional report, the report will already be titled. You have the following options:
  1. Save the changes to the report by clicking the Done button.
  2. Create a new additional report. To do so, change the title report, then click the Done button (this will save the report as a new additional report with the title you enter--it will not make changes to the additional report you modified).
  3. Save the report as your default report by clicking the Save as Default button (see above).

Note

  • When modifying or creating reports, write a short description about the changes in the Report Notes field. Writing notes reminds you what a report does (and lets others know too).

Advanced ​

Report Banding ​

Report bands have two purposes:

  • Some bands differentiate areas of the page layout (e.g  Title, Page Header, Summary, etc.).
  • Other bands are created to display information for a group of records (e.g. rgcrse, nmid).

Report Bands

The following lists types of bands and their uses:

  • Title - information that appears at the beginning of the report (e.g. title, introduction, cover page).
  • *Page Header - information that is printed at the top of each page in the report (e.g. date, report title, logo).
  • Group Header - information that is printed at the beginning of each data group (e.g. course number and title, individual's name and address).
  • *Detail - data and text printed once for each record generated by the query (e.g. individuals registered in class, all individual's optional fees).
  • Group Footer - information printed at the end of each data group (e.g. total enrolled in course, total amount due for each individual).
  • *Page Footer - information printed at the bottom of each page in the report (e.g. special notes or instructions, signature lines).
  • Summary - information printed at the end of the report (e.g. summaries, conclusions, final totals).

*Default bands which are part of every report and cannot be removed.

Add Group Bands ​

To add a Group Band to a report:

  1. Click the Data Grouping icon on the Report Designer toolbar. This opens the Data Grouping window.

Data Grouping

  1. Click into the Group box and enter the field/expression on which to group (e.g. rgcrse, nmname3+nmname1+nmid, etc.).

Add Group Band

  1. Select the appropriate Group properties (e.g. start each group on a new page, reprint group header on each page, etc.).
  2. Click the OK button to save the Group band and close the Data Grouping window. The group header and footer will be added to the report template.

Group Band Added

  1. You can now resize (if necessary) and add elements to the band.

Resize Report Bands ​

Report elements are placed into the white space above the particular report band. You may need to adjust the amount of white space to place all the desired elements into it. To adjust a report band:

  • 'Pick up' the band with your mouse and drag it where you want it.

Resize Group Band

  • Double-click the blue triangle to the left of the Band name to open the band's properties window.

Blue Triangle

Enter the size (in inches) in the Height field.

Enter Height for Group Band

Add Title/Summary Bands ​

The Title and Summary Bands are optional bands that can be added to your report. To add the Title/Summary bands:

  1. Select Report > Title/Summary.
  2. Check the band you want to add to the report.

Add Title or Summary Band

  1. Select the paging option (i.e. if you want the title or summary band information to be displayed on it's own page, select New Page).

Complex Expressions ​

Sometimes you will need to use more complex expressions to achieve the desired results. For instance, you may need to add a field to your report and format it. This can be accomplished in one report expression by combining report functions.

When writing complex expressions, remember these rules:

  1. Complex expressions can be up to 255 characters in length (including spaces).
  2. Every function MUST have an opening and a closing parenthesis.
  3. Text elements must be enclosed in quotations ("") in report expressions.
  4. Fields in your expression must be the same type, or they must be converted to the same type (e.g. number fields must be converted to text).

Examples ​

The following is an example of one function nested in another. It uses the ADDCRSE() function to add the Course End Date field to the report, then uses the NICEDATE() function to format the date range into character format.

NICEDATE(cobegdate,ADDCRSE(cocrse,”coenddate”))

This is an example of several functions nested together in an IIF() statement. If the last name field is empty in a registration (if you enrolled the firm instead of an individual for billing purposes), it adds the Firm name field to the report and display it, otherwise it display the registrant’s name formatted with the NAMER() function (allows you several name format options).

IIF(EMPTY(nmname3),ADDNAME(rgid,"nmfirm"),NAMER(nmid,2))

This is an example of combining text elements and fields to create a paragraph in a confirmation letter. It uses the STR function to convert the number fields to text (i.e. due and paid) and the LTRIM function to trim extra spaces from the left of the number fields. Then the text and fields are combined using the plus sign concantenator to form the paragraph (see Adding Report Elements topic for more information about adding multiplle elements to an expression box).

"The total cost for this course is "+transform(due,'$$$,$$$.99')+". We show that to date you have paid a total of "+transform(paid,'$$$,$$$.99')+". This leaves you a balance due of "+transform(due-paid,'$$$,$$$.99')

Comparison Operators ​

The following Comparison Operators can be used in complex report expressions:

Numeric Operators ​

= Equal to specified expression (e.g. rgcrsefee=125.00 returns a registration if the registration fee is equal to 125.00).

= > Equal to or Greater than specified expression (e.g. rgcrsefee => 125.00 returns a registration if the registration fee is greater than or equal to 125.00).

> Greater than specified expression (e.g. rgcrsefee > 125.00 returns a registration if the registration fee is greater than 125.00).

< = Lesser than or Equal to specified expression (e.g. rgcrsefee <= 125.00 returns a registration if the registration fee is lesser than or equal to 125.00).

< Lesser than specified expression (e.g. rgcrsefee < 125.00 returns a registration if the registration fee is lesser than 125.00).

<> Not equal to specified expression (e.g. rgcrsefee <> 125.00 returns a registration if the registration fee is not equal to 125.00).

Arithmetic Operators ​

+ Addition (e.g. due+10 adds 10 to amount due)

- Subtraction (e.g. due-paid subtracts paid from due)

* Multiplication (e.g. due*.10 multiplies due by .10)

/ Division (e.g. due/10 divides due by 10)

Character Operators ​

= Begins with specified expression (e.g. nmfirm="ACEware" returns names if the Firm field begins with ACEware).

$ Contained within specified expression (e.g. "aceware.com" $ nmemail returns names if aceware.com is in the email address field).

== Exactly matches specified expression (e.g. nmfirm="ACEware Systems, Inc." returns names if the firm field exactly matches ACEware Systems, Inc.).

<> Not equal to specified expression (e.g. pytype <> '8' return a payment if the payment type is not 8 [Void]).

Notes

  • Character strings must be enclosed in quotation marks.
  • Character string comparisons are case-sensitive. If you want to return records no matter the case, you can use the UPPER() report function to upper-case the field contents for the comparison, e.g.

upper(nmfirm)="ACEWARE" returns names if the firm field begins with ACEWARE, no matter how it's actually entered in the field (ACEware, Aceware, aceware).

Logical Operators ​

! Not equal to the specified expression (e.g. !rgcancel returns a registration if it is not canceled).

Note:  this operator can also be used with certain report functions. For instance, the EMPTY() function returns a value if the specified field is empty. !EMPTY() will return a value if the specified field is not empty.

Field Calculations ​

Field Calculations can be set on the Field Calculations window. You may also reset the calculation on any group band created in the report, at the end of each page, or at the end of the report. For example, if you have a field which is summing the total amount of optional fees per individual, you would reset every time the ID field changes (sums optional fees for individual, then sets it to zero and resumes for next individual).

To set a field calculation:

  1. Double click the field to open the Report Expression window.
  2. Click the Calculate button to open the Calculation window.

Calculate Field

  1. Select the appropriate field calculation options:
  • Nothing - No calculations are made on this variable.
  • Count - Counts the number of times a variable is printed per group, page, column, or report (depending on your selection in the Reset box). The calculation is based on the number of times the variable occurs, not on the variable's value.
  • Sum - Sums the variable values for a group, page, column, or report (depending on your selection in the Reset box).
  • Average - Computes the arithmetic mean (average) of the variable values within a group, page, column, or report (depending on your selection in the Reset box).
  • Lowest - Displays the lowest value that occurred in that variable for a group, page, column, or report (depending on your selection in the Reset box). Places in the variable the value of the first record in the group. When a lower value is encountered, the variable's value changes accordingly.
  • Highest - Displays the highest value that occurred in that variable for a group, page, column, or report (depending on your selection in the Reset box). Places in the variable the value of the first record in the group. When a higher value is encountered, the variable's value changes accordingly.
  • Std. Deviation - Returns the square root of the variance for the variable values within a group, page, column, or report (depending on your selection in the Reset box).
  • Variance - Measures the degree to which individual field values vary from the average of all values in the group, page, column, or report (depending on your Reset selection).
  1. Select the Reset option (point at which the variable is reset to its initial value, e.g. when the course number changes, at the end of the report, etc.).
  2. Click the OK button to close the Calculations window.
  3. Click the OK button on the Report Expression window to close the window and return to the report template.

Notes

  • The most common settings are the ‘Count’ and ‘Sum’ options. The other choices are unreliable at best. Even the count and sum can be tricky if improperly used.
  • Calculations work best on reports where there is only one line of information in the report cursor per group (e.g. CEU Reporting, Mailing Labels, Deadbeat Reporting).
  • Calculations can also be performed with report variables.

Report Variables ​

Variables are used to compare and manipulate data for display in a report. Variables are not saved to the database--their values are stored in the computer's memory while the report is running. After you exit the report, the variables are erased from memory.

You can use variables to:

  • Generate record counts in a report (e.g. how many individuals took courses during a given semester).
  • Generate numbered lists (e.g. 1. First person taking course, 2. Second person, etc.).
  • Calculate values based on report data (e.g. add the payment amount to the total paid IF the pay type is Cash).
  • Create shorthand representations of long expressions (e.g. variable Due represents the function gtdue(rgcrse,rgid) and variable Paid represents gtpaid(rgcrse,rgid)).
  • Calculate values then use those values to calculate subsequent values (e.g. Due-Paid).

To create a variable:

  1. Select Report > Variables to open the Variables window. On this window, you can add new variables, change or delete existing variables or change the order in which the variables are evaluated in a report.

Report Variables

The Variable Definition dialog offers these options:

  1. Variables: Name of the variable.
  2. Value to store: Field/Expression which should be stored/calculated in this variable.
  3. Initial value: Initial value of the variable BEFORE any calculations are performed
  4. Release after report: Clears the report variable from memory after the report is printed. If not checked, the variable remains in memory until you exit Student Manager.
  5. Reset at: Specifies the point at which the variable is reset to its initial value. End of Report is the default. Other options include End of Page, End of Column and groups you have created in the report.
  6. Calculate:  Specify a calculation that the variable performs. The variable begins calculating with its initial value, and continues until it is reset.

Notes

  • Report variables are evaluated in the order that they appear in the list and can affect the value of expressions that use them. For example, if variable 1 is used to define the value of variable 2, variable 1 must appear before variable 2.
  • If you use a variable in calculations, be sure that you initialize the variable with a non-zero value to avoid a division-by-zero error. If you don't specify a value, Visual FoxPro assigns a default value of 0.
  • If you reorder the groups in your report, your report variables might not be resetting on the correct field. For example, if your report has two groups, the first grouping by country and the second grouping by date, and you switch the order of the groups, the variables still reset according to the original positions of the groups.

Print Whens ​

Determine when an object prints by setting a Print When. To set a Print When:

  1. Double click the report object to open the Properties window.
  2. Click the Print When button.

Print When window

  1. Select the appropriate options:
  • Print Repeated Values – ‘Yes’ allows the value to print repeatedly; ‘No’ prints the value only once per group.
  • Also Print - 99.9% of the time you will leave these as they are.
  • Remove Line if Blank - if you have fields on one line and all the fields have no values, the entire line will be removed--space and all.
  • Print only when Expression is True – enter a condition the field must meet to be printed (e.g. only print if the field is not empty. You may use report functions in your condition.

Add Non-Printing Notes ​

You can also create non-printing notes on reports that are displayed in modify mode but don't print on the report (e.g. editing instructions). To do so:

  1. Create the desired note with the A text tool on the Report Controls Toolbar.
  2. Double-click the text entry to open the Properties window.
  3. Click the Print When button.
  4. In the 'Print only when expression is true' expression box, enter .f. (false).

Non-Printing Note

Example of non-printing Note that shows in modify mode:

Non-Printing Note Viewed in Modify Screen

But does not show when report is printed:

Non-Printing Note Doesn't show when viewed/printed

What are Report Functions? ​

Functions are mini-programs that can access information not available in the report cursor, format information in a specific manner, or perform calculations on report data.

A function consists of a name followed by a set of parenthesis. Within the parenthesis are function parameters—these are pieces of data that the function needs to process/return information. Some functions require one parameter only, others require several.

Take a look at these three simple functions to see examples of how a function should be written.

  • ADDCRSE - returns a field from the Course table. You must pass it the course code field and the name of the field you want to return in quotes.

ADDCRSE Report Expression

Example:  ADDCRSE(cocrse,"codept") returns the course department.

  • NICEDATE – returns the date in text format. You must pass it the date field. You can also pass it a second date and it will give you the date range in text format.

NICEDATE Report Expression

xample: NICEDATE(cobegdate) returns course begin date, e.g. December 1, 2002.

  • GTDUE – returns total amount due for a registration. You must pass it the course code field and the name ID field.

GTDUE Report Expression

Example:  GTDUE(rgcrse,rgid) returns the total amount due for an individual in a specific course, e.g. 250.00.

Parameters: Name ID/Course Code ​

Many functions require the individual's ID and/or the Course Code. These fields exist in several databases and are named according to their respective database. The following lists the Name ID and Course Code fields from the various tables:

Name ID

TableField
NAMESnmid
REGISTERrgid
PAYpyid
WKSHPIND (individual workshop table)wiid

Course Code

TableField
COURSEcocrse
REGISTERrgcrse
PAYpycrse
WKSHPMST (master workshop table)wmcrse
LEDGER (Pocket Ledger)lecode

The report area determines which of the Name ID and Course Code fields are available in the cursor. For example, COCRSE is the available course code field in the Reports > Courses report area. But in the Reports > Registrations report area, RGCRSE is the available course code field.

In your functions, you may use whichever field is available in the report cursor. To see the list of available fields in your report cursor, click the Data Environment button on the Report Designer Toolbar. Then you can scroll down the list of available fields to see which one is available.

Report Functions by Category ​

The following list all available report functions by category, and a brief description.

Add Field (35) ​

ADDAPAY - Returns field from Pay table for a specific payment.

ADDCODE - Returns field from the Choices table.

ADDCOUNL - Returns a specific field from the Course Unlimited User Defined Field table.

ADDCRDAT - Returns Beginning - Ending date of a course in different formats.

ADDCRSE - Returns specified field from the Course table.

ADDCUDFS - Returns specified field from the Course User Defined Fields table.

ADDFEE - Returns Main and Other Fees set up in the Course Fees tab.

ADDFEE2 - Returns the descriptions and/or amounts of Optional charges for specific registrations.

ADDFINAID - Returns specified field from the master Financial Aid table.

ADDFIRM - Returns specified field from the Firms Table (based on the Name ID).

ADDFIRM2 - Returns specified field from the Firms Table based on the Instructor Firm ID.

ADDGIFT - Returns specified field from the GiftCard table.

ADDGRPAY - Returns payments for registration group with payment totals per receipt number.

ADDINT - Returns a Yes/No depending on whether the individual has the specified Interest Code; OR specified field from the Interest Code table.

ADDLABEL - Returns the text label of a specific user defined field.

ADDLOC - Returns course location and location information.

ADDLOC2 - Returns field from location table based on room ID code.

ADDNAME - Returns a specific field from the Names Table.

ADDNMUNL - Returns a specific field from the Names Unlimited User Defined Field table.

ADDNUDFS - Returns a specific field from the Name user defined fields table.

ADDOMNI - Returns any field from any table in the system (key value must be in cursor).

ADDOPT - Returns list of Additional/Optional fees for a single registration.

ADDPAY - Returns payment information for a particular registration.

ADDREG - Returns the value of a field from Register table.

ADDRGUNL - Returns a specific field from the Register Unlimited User Defined Field table.

ADDRUDFS - Returns a specific field from the Registration User Defined Field table.

ADDTCH - Returns specified field from instructor record.

ADDTIME - Returns time course is held.

ADDUDFS - Used in a Justdoit() to add Unlimited UDFs from the selected UDF table to the report cursor for exporting purposes.

ADDWKCODE - Returns workshop codes in which individual is registered for specific course.

ADDWORK - Returns the value of a field in the Workshop Master table.

ADDZIP - Returns specified field from Zip Code database.

CREDEXP - Used in a JUSTDOIT to add Credential records to the report cursor.

FINDINST - Returns specified instructor information for specific course.

GETMEMO - Returns course description or letter body from specified Catalog Builder record.

GRABREG - Returns specified field if student has taken a course which meets stated condition.

SHOWCLAS - Returns quick summary of courses taken for a single individual with the ability to specify courses by date or by course number.

Attendance Tracking (4) ​

CRSATTHRSSUM - Sums Attendance Tracking hours for specified course.

HRSONADATE - Returns the number of hours the course meets on a specific date.

HRSTODATE - Returns the number of hours the course has been held to date.

INDVATTHRSSUM - Sums Attendance Tracking hours for specified registration.

Budget (2) ​

BUDG_EXP - Returns sum of budgeted expenses for specific course.

BUDGPICT - Returns budget data into report.

Codes (11) ​

ADDCODE - Returns specified field from the Choices table.

ADDINT - Returns a Yes/No depending on whether the individual has the specified Interest Code; OR specified field from the Interest Code table.

BIGSTATE - Returns the full state name when passed the state field or state abbreviation.

CODERPT - Returns list of codes based on the value of a demographic field (e.g. zip code, city, etc.).

COUNTCOD - Returns the number of interest codes attached to an individual's Name record.

FINDGRP - "Query" by grouping code from most any registrant report area.

FINDINT - "Query" by interest code from most any registrant report area.

NCRPT - Returns summary information (listing of all codes) for a specified code field from the Names or Register tables for all registrants in a particular course.

QUIKCODE - Returns Description (or chosen field) of the selected code.

SHOGCODE - Returns grouping codes assigned to a course.

SHORTSTATE - Returns the state abbreviation when passed the state name.

SHOWCODE - Returns list of interest codes assigned to an individual.

Counting (26) ​

AGE - Returns the number of years between two dates.

CNTCURFIELD - Used in a JUSTDOIT to count occurrence of a condition (i.e. rgstatus="NOSHOW") in the cursor (and write it to the cursor).

CNTCURS - Counts occurrence of a condition in the cursor (e.g. pytype="3").

COPAYDTL - Returns number of payments per pay type with extended totals per category.

COUNTCOD - Returns the number of interest codes attached to an individual's Name record.

COUNTCX - Returns the number of canceled registrations in a course(s).

COUNTIT - Returns the number of records that meet your specified condition. Used to get a total count from an otherwise unrelated data table.

COUNTNAME - Returns the number of names in each course that match the stated condition.

COUNTNAMEUDFS - Returns the number of registrants in each course that match the stated condition, based on Name UDFs.

COUNTREG - Returns the number of registrations in each course that match the given condition.

COUNTTCH - Returns number of instructors assigned to a course.

COUNTMWK - Returns the number of Master Workshop records set up for the course.

CTNAMEREG - Returns the number of courses taken that meet custom criteria from the REGISTER table and/or COURSE table.

CTWORK - Returns number of workshop in which individual is enrolled for specific course.

GETSQLCOUNT - Returns the number of records that meet the specified criteria.

GRADREPT - Returns count of courses, or sum of hours/ceus for courses taken by a student.

HOWMANY - Returns how many unique values of a specific field are represented in report (e.g. nmcity).

HRSONADATE - Returns the number of hours the course meets on a specific date.

HRSTODATE - Returns the number of hours the course has been held to date.

MATCHREF - Returns number of records in any table that match the specified condition based on a field in the cursor.

NUMSESS - Returns the number of times a class meets per week.

NUMTAUGHT - Returns the total number of course taught by an instructor.

NUMWEEKS - Returns the number of weeks between the first and last date.

RGFEEDIST - Returns fee description, amount, number of people registered with that fee and the amount that fee has generated.

RGHASPAY - Returns number of payment records associated with specific registration.

SHOWPDSTAT - Returns a count of paid or Unpaid registrants from that particular course.

Courses (25) ​

ADDCRSE - Returns specified field from the Course table.

ADDCUDFS - Returns specified field from the Course User Defined Fields table.

ADDCOUNL - Returns a specific field from the Course Unlimited User Defined Field table.

BESTENRL - Returns entry in Group Count field on Master Course record if a number has been entered, otherwise returns the number enrolled in course.

COUNTCX - Returns the number of canceled registrations in a course(s).

COUNTNAME - Returns the number of names in each course that match the stated condition.

COUNTREG - Returns the number of registrations in each course that match the given condition.

FINDINST - Returns specified instructor information for specific course.

GETCEU - Returns the sum of CEUs earned by all registrants in a course.

GETHOUR - Returns the sum of hours generated by registrants in a particular course.

GTCOBAL - Returns the balance due for a particular course.

GTCODUE - Returns revenue generated by a particular course.

GTCODUE3 - Returns total due for a course with multiple options.

GTCODUE4 - Returns income due for specific registrations.

GTCOINVBAL - Returns balance due on invoices assigned to a particular course.

GTCOPAID - Returns total paid for a course.

GTLEDG - Returns expenses for courses.

INVSS - Create queries to search courses for specific characters in specific locations.

LISTSTUD - Returns list of individuals enrolled in course.

QUICKINST - Returns information for first instructor assigned to course.

SHOWEXP - Returns total expenses for a course.

STAMPCRS - Stamps a value in a specified field in the course database for all courses in report.

STAMPCUDF - Stamps a value in a specified field in the course user defined for all names in the report.

STAMPGRP - Stamps a grouping code to all courses in the report. Can also be used to remove a grouping code from course records.

SUMREG - Sum any numeric field from the Registration table for each course in the report.

Course Packaging (3) ​

CPCREATE - For use with Course Packaging Module - enrolls individual in Child courses.

PACKAGES - For use with Course Packaging Module - displays information about child courses in the Course package (as set on the Parent Course).

TOTPACK - Returns total of specified field for all child registrations in a person's course package.

Credentials (6) ​

CREDEXP - Used in a JUSTDOIT to add Credential records to the report cursor.

FINDCRED - "Query" by a person's Credential Code criteria from any report area that has a reference to Student ID #.

HASCRED - Returns Y if a student has any or a specific credential record (parameter 2).

GETTEST - Returns Credential records.

SHOWTEST - Returns Credential records.

STAMPCRED - Stamps a Credential record for all names in the report.

CRM (2) ​

CRMRPT - Returns summary information for all or selected records from the CRM table for students in particular course.

LISTCRM - Returns all or specified log records from the CRM table.

Date/Time (30) ​

ACEDAY - Returns the Monday of the week of the specified date.

ADDCRDAT - Returns Beginning - Ending date of a course in different formats.

ADDTIME - Returns time course is held.

CDOW - Returns the character day of week for a given date.

CERTDATE - Returns date in formal date format (i.e., 10th day of January, 2015).

CIVTIME - Returns time in civilian format for fields that store time in military format.

CMONTH - Returns the name of the month from the specified date expression.

CTOD - Converts a character date expression to a date expression.

DATE - Returns System Date.

DATELIST - Returns listing of all meeting dates and times for a course.

DATETH - Returns formal format of day with "th", "nd", or "rd".

DOW - Returns the Numeric value (1-7) of the day of week for a given date.

DTOC - Converts a date expression to a character expression.

GETCIV - Returns Civilian time using individual time fields (costhr,costmin,coendhr,coendmin).

HOLIDAY - Returns True if date falls on holiday (i.e. dates entered into Holiday Calendar).

HRSONADATE - Returns the number of hours the course meets on a specific date.

HRSTODATE - Returns the number of hours the course has been held to date.

JUMPMON - Returns date that is the number of months after the month of the date passed.

LOADDATE - Returns specific session dates for use in Attendance Rosters.

MEETDATES - Returns the month and dates of a course.

MONTH - Returns the numeric month for a given date expression.

NICEDATE - Returns formatted dates.

NICETIME - Returns the time only from the course time field.

NUMSESS - Returns the number of times a class meets per week.

PADCDOW - Returns the day of the week padded on the right side to the specified amount.

SHOHDATE - Returns list of holidays (as defined in Holiday Calendar) within a range of dates.

SHOWDOW - Returns the days of the week a class meets (the record is saved as "_X_XX_X" and is translated to: M W H S).

TIME - Returns System (current) Time.

TRIMDATE - Returns date field in different character expression formats.

YEAR - Returns the year from the specified date expression.

Email (4) ​

DOEMAIL - Opens the Mass Email Wizard to send an email to everyone in the report.

MERGMAIL - Opens the Mass Merge Email Wizard to send an email to everyone in the report using the selected email template.

SHOUPCLS - Returns a list of upcoming courses. This function was designed for use by MERGMAIL to email list to individuals.

SHOUPCLSREC - For Email Receipts: returns a list of upcoming courses, excluding the course(s) in which student is enrolled.

Export Data (9) ​

CAT2XML - Used in a JUSTAFTER to export Catalog data into an XML file.

COPY2XLS - Used in a JUSTAFTER to export fields from a report into an Excel file.

DBXTRACT - Export records associated with courses in cursor to an external location.

DEADDUMP Used in a JUSTDOIT to export a specified set of fields to a file.

FIRMEXP - Export a set of firms from FIRM table in the specified format.

MEMOEXP - Exports all fields in a report cursor, including memo field contents, into a text file. Note: will not preserve line breaks in memo fields.

NAMEEXP - Export a set of names from the Names table to an external file in the specified format.

PREFEXP - Export a set of names with their preferred address from the Names table in the specified format a PREFERRED set of field names from the Names Table.

SHORTCAT - Used in a JUSTDOIT to select a limited set of data fields (excluding fields which may contain HTML) to put into a Catalog Export Report so that the MEMOEXP function can be used.

Extending Queries (12) ​

FINDGRP - "Query" by grouping code from most any registrant report area.

FINDINT - "Query" by interest code from most any registrant report area.

GRADCRED - Returns individuals who have completed a specific # of credits/hours.

GRADCRED2 - Returns individuals who have completed a specific # of credits/hours.

GRADSPEC - Returns individuals who have taken required courses.

GRADSPEC2 - Returns individuals who have taken required courses.

GRPSTUD - Returns list of individuals in a registration group.

INVSS - Create queries to search courses for specific characters in specific locations.

RANDPICK - Returns a pseudo random (the same every time ran) number of names/records from a report.

RANDPICK2 - Returns a truly random (different every time) number of names/records from a report.

TEACHERWAS - This is a Wizard, called by a JUSTDOIT that reports student names who attended class(es) taught by a specific instructor(s).

ZIPRADIUS - Used in JUSTDOITs to only return people within a radius of a specified zip code.

Fees (12) ​

ADDFEE - Returns specified field from Fees tables based on course code.

ADDFEE2 - Returns the descriptions and/or amounts of Optional charges for specific registrations.

ADDOPT - Returns list of Additional/Optional fees for a single registration.

BASEFEE - Returns primary fee for course (first Course Fee entered in Course Master Record).

FEEDETL - Returns information about specific additional/optional fee for a registration.

FEETOTS - Returns number enrolled and amount charged per Course Fee category.

GETFEE - Returns the dollar amount for a specific main registration fee set up in the Master Course record (Course > Fees).

GTFEESUM - Returns sum of Additional/Optional Fees for specific course.

HASOPT - Returns true/false based on whether registration has optional fees assessed.

RGFEEDIST - Returns fee description, amount, number of people registered with that fee and the amount that fee has generated.

SHOWFEES - Returns all fees defined for a particular course.

SHOWOPTS - Returns all Optional fees for course, counts for each fee, and total fees collected.

Financial Aid (6) ​

ADDFINAID - Returns specified field from the master Financial Aid table.

AVAILFINAID - Calculates the total amount of individual's unused Financial Aid, with the option to select/restrict award type.

FASHOWDRAW - Returns the amount of a draw for a Financial Aid award.

GETCRSEAID - Calculates the amount registrants in the course were awarded between two dates and by type.

GETFINAID - Calculates the amount individual was awarded between two dates and by type.

SHOWFINAID - Calculates the amount of financial aid the individual has received.

Formatting (35) ​

These functions are used to format data:

ADDCRDAT - Returns Beginning - Ending date of a course in different formats.

ADDTIME - Returns time course is held.

BIGSTATE - Returns the full state name when passed the state field or state abbreviation.

CERTDATE - Returns date in formal date format (i.e., 10th day of January, 2003).

CIVTIME - Returns time in civilian format for fields that store time in military format.

CSZR - Returns nicely formatted city, state, zip code (i.e. City, ST Zip).

CTOD - Converts a character date expression to a date expression.

DATETH - Returns formal format of day with "th", "nd", or "rd".

DTOC - Converts a date expression to a character expression.

FULLCENT - Rounds fractions of a penny up to next FULL cent.

INTLPHON - Returns formatted phone number for US names and unformatted number for International names.

NAMER - Returns formatted Name.

NAMERXT - Returns formatted Name with extended salutations using ShowSal.

NICEDATE - Returns formatted dates.

NICELOC - Returns course location information.

NICETIME - Translates military time into civilian time.

NUM2FRACTION - Returns a decimal number as a fraction (string format).

NUM2STR - Returns a number as a character string.

NUMNODEC - Returns a numeric field value in character format, without decimal places.

PADR,L,C - Returns the specified expression padded on the right, left, or both sides.

PRETTYNUM - Removes trailing 0 decimals from specified numeric field. For use on Certificate reports.

ROUND - Rounds a numeric expression to the nearest value, depending on the number of specified decimals.

SHORTSTATE - Returns the state abbreviation when passed the state name.

SHOWDOW - Returns the days of the week a class meets (the record is saved as "_X_XX_X" and is translated to: M W H S).

SHOWPHON - Returns formatted phone number.

SHOWSAL - Expands abbreviated salutations stored in the NMSALUT field.

SHOWSSN - Returns formatted ID #.

SHOWTF - Returns the value of a logical field as Yes/No or True/False.

STR - Converts numeric value to a character expression for creating long character strings or character comparisons.

STRIPHTML - Removes HTML coding from a field.

TNAMER - Returns formatted Instructor Name.

TRANSFORM - Converts date and numeric data to character strings.

TRIM - Trims spaces off the end of a character expression.

TRIMDATE - Returns date field in different character expression formats.

UPPER - Returns the specified character type field in uppercase.

VAL - Converts character expression which contains a number to its numeric value so it can be used in calculations.

Income/Expenses (31) ​

These functions return due/paid/balance/expense amounts:

ADDGRPAY - Returns payments for registration group with payment totals per receipt number.

CRSEINC - Returns income for a course.

DEADBEAT - Returns balance due for individual for all classes taken.

GRPGTBAL - Returns total balance due for all registrations in a given group.

GRPGTDUE - Returns total due for all registrations in a given group.

GRPGTPAID - Returns total paid for all registrations in a given group.

GTACCTPD - Returns total paid for an account number.

GTADD - Returns total dollar amount of all optional fees for a single registration.

GTBAL - Returns the balance due for a particular registration.

GTCOBAL - Returns the balance due for a particular course.

GTCODUE - Returns revenue generated by a particular course.

GTCODUE3 - Returns total due for a course with multiple options.

GTCODUE4 - Returns income due for specific registrations.

GTCOINVBAL - Returns balance due on invoices assigned to a particular course.

GTCOPAID - Returns total paid for a course.

GTDUE - Returns total amount due for a particular registration.

GTFEESUM - Returns sum of Additional/Optional Fees for specific course.

GTINVBAL - Returns total amount due for specific invoice.

GTINVDUE - Returns total amount due for specific invoice.

GTINVPAID - Returns total amount paid for a specific invoice.

GTINVSTAT - Returns the total amount due, paid, or balance due for specified invoice.

GTLEDG - Returns expenses for courses.

GTPAID - Returns total amount paid for a particular registration.

INVDETL - Returns the details of all invoices for a specified individual.

PAY1099 - Returns the sum of payments to an instructor.

RGINVBAL - Returns the total balance due for a given registration for a specific invoice number.

RGINVPD - Returns the total paid for a given registration for a specific invoice number.

SHOWEXP - Returns total expenses for a course.

SHOWPAID - Returns the amount paid to courses in report.

TKCOST - Returns costs associated with a particular tracking code.

TKINCOME - Returns income generated for a particular tracking code.

Instructors (12) ​

ADDTCH - Returns specified field from instructor record (can only be used in Faculty reporting area).

CLSTEACH - Returns field from the Instructor/Linkinst table or the total amount of payments for instructors for a particular course.

COUNTTCH - Returns number of instructors assigned to a course.

FINDINST - Returns specified instructor information for specific course.

INSTCONF - Returns a list of courses with instructor time conflicts.

NUMTAUGHT - Returns the total number of course taught by an instructor.

PAY1099 - Returns the sum of payments to an instructor.

PAYDESC - Returns instructor pay type and pay rate in Faculty Contract Reports.

PAYTOT - Returns faculty pay for an instructor's specific teaching assignment.

QUICKINST - Returns information for first instructor assigned to course.

STAMPTCH - Stamps a value in a specified field in the Faculty table for all instructors in the report.

TEACHERWAS - This is a Wizard, called by a JUSTDOIT that reports student names who attended class(es) taught by a specific instructor(s).

TNAMER - Returns formatted Instructor Name.

Invoices (10) ​

GTCOINVBAL - Returns balance due on invoices assigned to a particular course.

GTINVBAL - Returns total amount due for specific invoice.

GTINVDUE - Returns total amount due for specific invoice.

GTINVPAID - Returns total amount paid for a specific invoice.

GTINVSTAT - Returns the total amount due, paid, or balance due for specified invoice.

INVDETL - Returns the details of all invoices for a specified individual.

INVSUM - Returns the details for invoices for a particular person.

PYWASINV - Returns True if the payment was applied to an invoice.

RGINVBAL - Returns the total balance due for a given registration for a specific invoice number.

RGINVPD - Returns the total paid for a given registration for a specific invoice number.

Listing (23) ​

ADDFEE - Returns Registration Fees and/or Additional/Optional Charges for a specific course.

ADDGRPAY - Returns payments for a group of registrations with payment totals per receipt number.

ADDOPT - Returns list of Additional/Optional fees for a single registration.

CODERPT - Returns list of codes based on the value of a demographic field (Mini –Stats).

CRMRPT - Returns summary information for records from the CRM log file for a specific student.

CUSTWKCD - Returns list of workshops from all courses in which single registrant is enrolled.

DATELIST - Returns listing of all meeting dates and times for a course.

GRPSTUD - Returns list of individuals in a registration group.

LISTCRM - Returns all or specified log records from the CRM table.

LISTSTUD - Returns list of individuals enrolled in course.

LISTWORK - Returns specified workshop information from individual's registration.

NAMEGRP - Returns the list of names in a name group.

NCRPT - Returns summary information for a specified code field from the Names or Register tables for all registrants in a particular course.

PACKAGES - Displays information about child courses in the Course package.

SHOHDATE - Returns list of holidays (as defined in Holiday Calendar) within a range of dates.

SHOUPCLS - Returns a list of upcoming courses.

SHOUPCLSREC - Returns list of upcoming courses, excluding the one(s) in which student is enrolled.

SHOWCODE - Returns list of interest codes assigned to an individual.

SHOWDUPE - Reports duplicate records (Pick a table, pick a field.. Show the dups).

SHOWMEMB - Returns Memberships assigned to an individual.

SHOWWKMS - Returns a listing of Master Workshops set up for course.

SHOWWORK - Returns workshops taken by particular registrant, with options to select specific fields.

TEACHERWAS - Enter instructor name(s), and return the students who took classes from that instructor.

Locations (3) ​

ADDLOC - Returns the specified field from the Location table based on course code.

ADDLOC2 - Returns specified field from Location table based on room ID code.

NICELOC - Returns course location information.

Names (33) ​

ADDFIRM - Returns specified field from the Firms Table (based on the Name ID).

ADDFIRM2 - Returns specified field from the Firms Table based on the Instructor Firm ID.

ADDINT - Returns a Yes/No depending on whether the individual has the specified Interest Code; OR specified field from the Interest Code table.

ADDNAME - Returns specified field from the Names Table.

ADDNMUNL - Returns a specific field from the Names Unlimited User Defined Field table.

ADDNUDFS - Returns specified field from the Name User Defined Fields table.

AGECL - Returns the person's Age Group.

BIGSTATE - Returns the full state name when passed the state field or state abbreviation.

COUNTCOD - Returns the number of interest codes attached to an individual's Name record.

COUNTNAME - Returns the number of names in each course that match the stated condition.

CREDEXP - Used in a JUSTDOIT to add Credential records to the report cursor.

GETTEST - Returns Credential records.

LASTCLAS - Returns date or detail about the last course in which individual has enrolled.

MAILXPAND - Create multiple address labels for a specific firm with specified position titles.

NAMER - Returns formatted Name.

NAMERXT - Returns formatted Name with extended salutations using ShowSal.

NAMEGRP - Returns the list of names in a name group.

NOSTATE - Returns states not represented based on firms in the report.

PREFADDR - Returns Preferred Mail Address if using the Preferred Address field (nmprefer).

RANDPICK - Returns a pseudo random (the same every time ran) number of names/records from a report.

RANDPICK2 - Returns a truly random (different every time) number of names/records from a report.

RGHASPAY - Returns number of payment records associated with specific registration.

SHORTSTATE - Returns the state abbreviation when passed the state name.

SHOWPDSTAT - Returns a count of paid or Unpaid registrants from that particular course.

SEEFIRM - Returns the Firm Name--IF--nmprefer does not equal "H".

SEETITLE - Returns the Title--IF--nmprefer does not equal "H".

SHOWDOCS - Returns Additional Documents information for specified student.

SHOWMEMB - Returns Memberships assigned to an individual.

SHOWSAL - Expands abbreviated salutations stored in the NMSALUT field.

SHOWSSN - Returns formatted ID #.

SHOWTEST - Returns Credential records.

STAMPINT - Stamps an interest code to all names in a report. Can also be used to remove an interest code from name records.

STAMPNAME - Stamps a value in a specified field in the Names table for all names in a report.

STAMPNUDF - Stamps a value in a specified name User Defined Field (UDF) for all names in the report.

Payments (28) ​

ADDAPAY - Returns specified field from Pay table for a specific payment.

ADDGRPAY - Returns payments for registration group with payment totals per receipt number.

ADDPAY - Returns specified field from Payment table based on a particular registration.

COPAYDTL - Returns number of payments per pay type with extended totals per category.

FASHOWDRAW - Returns the amount of a draw for a Financial Aid award.

GETCBUCK - Returns sum of all payments for all registrations for a single individual.

GETCRSEAID - Calculates the amount registrants in the course were awarded between two dates and by type.

GETFINAID - Calculates the amount individual was awarded between two dates and by type.

GRPGTPAID - Returns total paid for all registrations in a given group.

GTACCTPD - Returns total paid for an account number.

GTCOPAID - Returns total paid for a course.

GTINVPAID - Returns total amount paid for a specific invoice.

GTPAID - Returns total amount paid for a particular registration.

LASTPAY - Returns last payment made to a registration, so a receipt can be printed for that payment only.

NETPAY - Returns net amount of payment for a receipt #.

ORGPAY - Returns information from the original payment in refund reporting.

OTHPAYER - Returns third party payer information (if any) for a particular payment.

PAYCOMB - Returns all payment records associated with Pocket Ledger records.

PAYTYPE - Returns the character description of payment type.

PYWASINV - Returns True if the payment was applied to an invoice.

RCPTINFO - Returns payor information for particular payment unless pay type is credit card, then returns credit card number and expiration date.

RCTTPAY - Returns payment information for payment group.

RGHASPAY - Returns number of payment records associated with specific registration.

RGINVPD - Returns the total paid for a given registration for a specific invoice number.

SHOWPAID - Returns the amount paid to courses in report.

SHOWPDSTAT - Returns a count of paid or Unpaid registrants from that particular course.

WHOPAY - Returns Payor Name/Billing Detail on Receipts and Invoices.

WHORECT - Returns name and address for a specific receipt number--OR--sum of all payments for a specific receipt.

Pocket Ledger (3) ​

GTLEDG - Returns expenses for courses.

PAYCOMB - Returns all payment records associated with Pocket Ledger records.

SHOWEXP - Returns total expenses for a course.

Registrations (27) ​

ADDREG - Returns specified field from Register table.

ADDRGUNL - Returns a specific field from the Register Unlimited User Defined Field table.

ADDRUDFS - Returns specified field from the Registration User Defined Field table.

CLSHIST - Used in a JUSTDOIT to show the registration history (adds the registrations to the cursor) of all students in the transcript report.

CONFCERT - Stamps a date into Registration Cert Date field for all registrants in report.

CONFIRM - Stamps a date into the Registration Confirm field for all registrants in report.

COUNTREG - Returns the number of registrations in each course that match the given condition.

FILBLANK - Used in JUSTDOITs to add 5 blank lines at the end of a roster report (for "walk-in" registrations).

GRABREG - Returns specified field if student has taken a course which meets stated condition.

GRADCRED - Returns individuals who have completed a specific # of credits/hours.

GRADCRED2 - Returns individuals who have completed a specific # of credits/hours.

GRADSPEC - Returns individuals who have taken required courses.

GRADSPEC2 - Returns individuals who have taken required courses.

GRPSTUD - Returns list of individuals in a registration group.

GTADD - Returns total dollar amount of all optional fees for a single registration.

GTBAL - Returns the balance due for a particular registration.

GTDUE - Returns total amount due for a particular registration.

GTPAID - Returns total amount paid for a particular registration.

HASCLASS - Returns True if a student has taken a course which meets stated condition.

HASCOURSE - Returns either number of courses or a logical (.t. or Yes) which meet the criteria.

QTYPTCAL - When using Credit Hours; returns Quality Points for individual (no points given for 'F' or 'I' ).

RGINVBAL - Returns the total balance due for a given registration for a specific invoice number.

RGINVPD - Returns the total paid for a given registration for a specific invoice number.

ROSTXPAND - Adds a record to the report cursor for each seat on a registration. This function is meant to be used in Name tags and Rosters.

SHOWCLAS - Returns quick summary of courses taken for a single individual with the ability to specify courses by date or by course number.

STAMPRUDF - Stamps a value in a specified registration User Defined Field (UDF) for all registrants in the report.

SUMREG - Sum any numeric field from the Registration table for each course in the report.

Room Use (2) ​

CHKRM - Returns Room Conflicts for specified course.

FILLCAL - Create a room use calendar for courses.

Special Use (26) ​

AT - Searches character/memo fields for the specified text string.

BETWEEN - Determines whether the value of an expression lies between the values of two other expressions of the same data type.

CHR - Returns the character value of ASCII character number.

DECRYP - Un-encrypts NMCODE2 and/or INSSN in reports.

DOCHART - Opens the Chart Wizard to create a chart from the report data.

EMPTY - Returns logical .T. if expression is empty, .F. if expression is not empty.

FILLBLANK - Used in JUSTDOITs to add 5 blank lines at the end of a roster report (for "walk-in" registrations).

GETDATA - Opens a message box in which you can enter a temporary message to be used in a report.

GETMEMO - Returns course description or letter body from specified Catalog Builder record.

IIF - Returns values depending on the condition given.

JUSTAFTER - Run a special function or program at the conclusion of the report.

JUSTDOIT - Passes a SQL statements to reports which runs prior to report generation.

LEN - Returns the length (number of characters) in a particular character string (field or text).

MAILXPAND - Create multiple address labels for a specific firm with specified position titles.

MAPPING - Used in a JUSTAFTER to display addresses on an interactive map in the Internet Explorer web browser.

MASSSMS - Opens the Mass SMS window to send an SMS to everyone in the report using the selected SMS template.

PREFADDR - Returns Preferred Mail Address if using the Preferred Address field (nmprefer).

RIGHT - Returns the specified number of rightmost characters from a character string.

SHOWDUPE - Reports duplicate records.

STRIPHTML - Removes HTML coding from a field.

STRTRAN - Replaces each occurrence of the specified character string with another character string.

SUBSTR - Returns a portion of a character string.

SWAPVAL - Replace a field in any table with a specified value, or another field's value, for all records in a report cursor.

WHAZZIS - Used in a report header to display the query value used to generate the report.

WHOSTHIS - Return information from the Security table for the User who created or last modified record.

ZIPRADIUS - Used in JUSTDOITs to only return people within a radius of a specified zip code.

Stamp Data (15) ​

These functions stamp a value in a specified field:

CONFCERT - Stamps a date into Registration Cert Date field for all registrants in report.

CONFIRM - Stamps a date into the Registration Confirm field for all registrants in report.

SAVE2CAT - Saves a text message to a catalog record.

STAMPCRED - Stamps a Credential record for all names in the report.

STAMPCRS - Stamps a value in a specified field in the course database for all courses in report.

STAMPCUDF - Stamps a value in a specified field in the course user defined for all names in the report.

STAMPGRP - Stamps a grouping code to all courses in the report. Can also be used to remove a grouping code from course records.

STAMPINT - Stamps an interest code to all names in a report. Can also be used to remove an interest code from name records.

STAMPNAME - Stamps a value in a specified field in the Names table for all names in a report.

STAMPNUDF - Stamps a value in a specified name User Defined Field (UDF) for all names in the report.

STAMPRUDF - Stamps a value in a specified registration User Defined Field (UDF) for all registrants in the report.

STAMPUNL - Stamps a value in a specified Unlimited UDF field in the specified UUDF table.

STAMPTCH - Stamps a value in a specified field in the Faculty table for all instructors in the report.

STAMPWORK - Stamps a value in a specified field in the individual workshop record for all workshops in the report.

SWAPVAL - Replace a field in any table with a specified value, or another field's value, for all records in a report cursor.

Summing (10) ​

CURSINC - Returns the grand total of a field in the cursor at the beginning of the report.

CURSSUM - Returns sum of any numeric field in the cursor.

GETCBUCK - Returns sum of all payments for all registrations for a single individual.

GETCEU - Returns the sum of CEUs earned by all registrants in a course.

GETHOUR - Returns the sum of hours generated by registrants in a particular course.

NETPAY - Returns net amount of payments for a receipt #.

PAY1099 - Returns the sum of payments to an instructor.

SUMREG - Sum any numeric field from the Registration table for each course in the report.

SUMWHAT - Returns the sum of a numeric variable from an external file.

SUMWORK - Sum CEUs or hours from individual workshop records.

UDFs (12) ​

Regular UDFs (8) ​

ADDCUDFS - Returns specified field from the Course User Defined Fields table.

ADDLABEL - Returns the text label of a specific user defined field.

ADDNUDFS - Returns a specific field from the Name user defined fields table.

ADDRUDFS - Returns a specific field from the Registration User Defined Field table.

COUNTNAMEUDFS - Returns the number of registrants in each course that match the stated condition, based on Name UDFs.

STAMPCUDF - Stamps a value in a specified field in the course user defined for all names in the report.

STAMPNUDF - Stamps a value in a specified name User Defined Field (UDF) for all names in the report.

STAMPRUDF - Stamps a value in a specified registration User Defined Field (UDF) for all registrants in the report.

Unlimited UDFs (4) ​

ADDCOUNL - Returns a specific field from the Course Unlimited User Defined Field table.

ADDNMUNL - Returns a specific field from the Names Unlimited User Defined Field table.

ADDRGUNL - Returns a specific field from the Register Unlimited User Defined Field table.

ADDUDFS - Used in a Justdoit() to add Unlimited UDFs from the selected UDF table to the report cursor for exporting purposes.

STAMPUNL - Stamps a value in a specified Unlimited UDF field in the specified UUDF table.

Workshops (14) ​

ADDWKCODE - Returns workshop codes in which individual is registered for specific course.

ADDWORK - Returns specified field from the Workshop Master table.

COUNTMWK - Returns the number of Master Workshop records set up for the course.

CTWORK - Returns number of workshop in which individual is enrolled for specific course.

CURSWORK - Returns selected information about workshops included in the query.

CUSTWKCD - Returns workshops from multiple courses in which single registrant is enrolled.

LISTWORK - Returns specified workshop information from individual's registration.

QUIKWORK - Returns information about workshops in which an individual is registered.

SELEWORK - Returns workshop information in student schedules for courses with workshops.

SELEWORK2 - Returns workshop information in student schedules for courses with workshops with the option to return a fixed length field.

SHOWWKMS - Returns a listing of Master Workshops set up for course.

SHOWWORK - Returns workshops taken by particular registrant, with or without instructor name and options to select specific fields.

STAMPWORK - Stamps a value in a specified field in the individual workshop record for all workshops in the report.

SUMWORK - Sum CEUs or hours from individual workshop records.

JUSTDOIT ​

A JUSTDOIT is a specialized report function that uses SQL (Structured Query Language) to request and manipulate information from the data tables.

With a JUSTDOIT, you can change the sort order of data in a report, filter out unwanted data, or execute specialized report functions. The JUSTDOIT executes the SQL commands BEFORE the report runs (before the data is displayed).

The JUSTDOIT application in Student Manager uses the SQL SELECT command and its elements to manipulate the data. The following table provides an explanation of each element of the SELECT command:

ElementDescription
" ", ' ', [ ]Delimiters used to enclose the Select statement and other elements in the JUSTDOIT.
SelectTells the system to select specific data from the cursor. Immediately followed by a statement telling the system what data to select.
- (asterisk)Tells the system to select ALL data from the table that follows the FROM statement (see below).
0 as markerCreates a new field in the cursor and enters a zero (0) for every record in the cursor. This forces the JUSTDOIT to run only once for a given report cursor (helps avoid circular logic problems).
AsCreate a new field in the cursor with either an explicit value or a value from a function.
From (cursor?)Tells the system where to get the data that we are manipulating with the JUSTDOIT.  In most cases it will be from Cursor5 (default cursor created when the report opens).
WhereStates a conditional clause that data must meet to be included in the report (e.g. where due-paid > 0.00).
Group byGroups data in the cursor by the field you specify, then removes all but one record for each group.
Order byChanges the sort order of data in the cursor. NOTE: conflicting report banding will cause unexpected results.
Into cursor(cursor?)Tells the system to place the data back into the cursor once it has finished executing all the select statements, making it available for the Report Print Preview.

The JUSTDOIT expression box may be placed anywhere on the report template but we recommend placing it in the header band of the report for purpose of quick identification. It's a non-printing element and will not display on the report itself.

Examples ​

  • Change the Sort Order of Report with "Order By" Statement

justdoit('select *,0 as marker from (cursor5) order by nmname3,nmname1 into cursor(cursor5)')

  • Eliminating Duplicate records with the "Group By" Statement

JUSTDOIT('select *,0 as marker from (cursor5) group by nmid,nmname3 into cursor(cursor5)')

  • Filter the report with "Where" Statement

JUSTDOIT('select *,0 as marker from (cursor5) where due-paid>0.00 into cursor(cursor5)')

  • Add a field to the Cursor and then Sort by it

JUSTDOIT('select *,addcrse(cocrse,"cobegdate") as date, 0 as marker from (cursor5) order by date into cursor(cursor5)')

Errors ​

  • A common problem in JUSDOITs is mismatched delimiters  Errors occur when you don't use matching ones, or when you try to use the same pair more than once.

BAD:  Mismatched Quotes are used to enclose the Select statement (double quote at the beginning and single quote at the end).

JUSTDOIT("select *,0 as marker from (cursor5) where nmzip ='55401' into cursor (cursor5)')

BAD:  Same Quotes are used for the Select statement and the value in the Where statement.

JUSTDOIT("select *,0 as marker from (cursor5) where nmzip ="55401" into cursor (cursor5)")

Note:  occasionally you may need to use a third set of delimiters in a JUSTDOIT. In these cases, you may use the square Brackets [].

  • Another common problem is leaving out the 0 as Marker statement. Without the statement, the JUSTDOIT may execute a random number of times or become stuck in an infinite loop. No real damage done, but your report results will be unexpected and inconsistent.
  • You cannot add a field to the cursor then attempt to do a comparison on the field contents in a Where statement. To accomplish this, you will need to add two JUSTDOITs to the report (see next section):

Multiple JUSTDOITs ​

You may occasionally find that you need to use more than one JUSTDOIT to accomplish your goal. For instance, if you want to add a field to the cursor then filter records based on the field contents.

To accomplish this, you will need to add two JUSTDOITs to the report. In the first one you add the field to the cursor. In the second one, you use the Where statement to filter the records:

justdoit('select *,addname(nmid,"nmocc") as Occupation from (cursor5) into cursor(cursor5)')

justdoit('select *,0 as marker from (cursor5) where Occupation="MED" into cursor (cursor5)')

Notes

When using more than one JUSTDOIT in a report, you only put the 0 as Marker statement in the last JUSTDOIT. If you place it in both JUSTDOITs, the second one will be ignored (it will not be executed).

Also, the JUSTDOITs must be added to the report in the correct order. For instance, if you add the Where Statement JUSTDOIT first and the Add Field one second, the system will execute the Where statement first because that was the one that was added to the report first, and you will receive an error because the field you are using in the Where statement doesn't exist yet.

Recycle Query Mode ​

If you are using the Recycle Query option and you ran a report with a JUSTDOIT in it, the JUSTDOIT changed the cursor and the changes will be applied to all subsequent reports you run in the area until you exit the Recycle Query mode.

JUSTAFTER ​

A JUSTAFTER is a specialized report function that allows you to stamp a value in a field, extract fields to an external file, or execute specialized report functions AFTER the report runs.

Like the JUSTDOIT, the JUSTAFTER is a non-printing element that we recommend placing in the header band.

Examples ​

  • Stamp the system date into Confirm field on the Registration screen. Use it to log the date confirmation letters were sent to registrants.

JUSTAFTER('=CONFIRM()')

  • Export name and address information to a file on your hard drive (dBASE III format). This is most commonly used to create a mailing address file for Mailing Houses.

JUSTAFTER('=NAMEEXP ("c:\myfile.dbf")')

  • Start the Mass Email Wizard after the report runs. This is most commonly used to email everyone in a report (e.g. receipts, confirmation, second notices, etc.).

JUSTAFTER('=DOEMAIL()')

Pager
Next pageWelcome

Can't find a topic? Email us and we'll help you find what you need.

Copyright © 1988-2026 from ACEware Systems, Inc.