

ACEweb Mode Setup
ACEweb must be installed before you complete these steps.
Set Application Pool Identity
After setting the ACEweb permissions, you must set the West Wind WebConnection Application Pool to use the appropriate ACEweb User Account:
- Open IIS, expand the Computer list in the Connections pane then select Application Pools.
- Right-click on the West Wind WebConnection application pool and choose Advanced Settings.
- Scroll to the Process Model section and click the ... next to the Identity value:
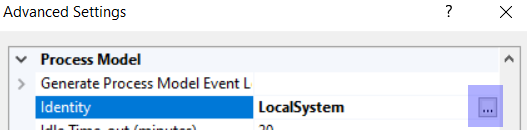
- Set the appropriate identity:
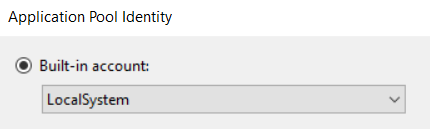
- If Student Manager and ACEweb reside on the same server, you can allow the Application Pool to run under the LocalSystem Account. To set it to the LocalSystem identity, select the Built-in account: option and choose LocalSystem from the list.
- If Student Manager and ACEweb reside on different servers--OR--if you are running the SQL version, you must set it to the ACEweb User Account. To set the account, select the Custom account option then click the Set button. Enter the credentials for the ACEweb User Account then click the OK button.
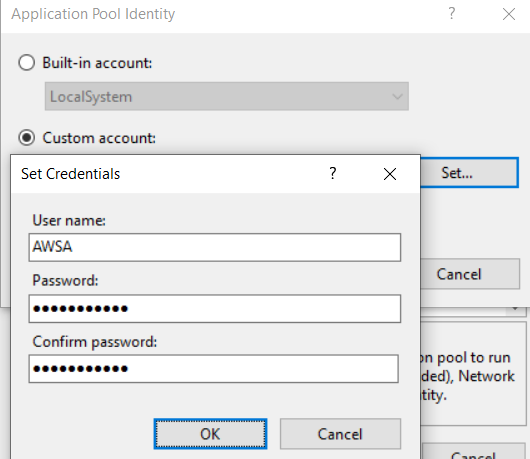
- Click OK on the Application Pool Identity window, then OK on the Advanced Settings window. The Identity should now be set to the account you entered.
Switch to COM Mode
You should now be ready to switch to COM mode:
- Open your browser and go to the admin.aspx page.
- Click the Show and Manage ISAPI Settings link to open the Show and Manage ISAPI Settings page.
- Click the COM Mode link (Messaging Mechanism entry in the right column).
- Click the Load Server link. The server will load and you should see the server information appear in the COM Servers list.
- If you have not already shut down the ACEweb application file, shut it down now.
- Test your ACEweb site by bringing up a Course Listing page (preferably from a browser on another computer). If you successfully open the Course Listing page, log off the server and try it again.
Set Number of ACEweb COM Servers
In Test mode, you can run 1 COM server process. But in production, you will want to increase the number of COM server processing running.
The general rule is you can run 2 COM servers per CPU core. E.g. if the server has a dual-core, you can run 4 COM servers.
The maximum number of COM servers you can run is 8.
To enable additional COM servers:
- Open your browser and go to the admin.aspx page.
- Click the Edit Configuration Files link.
- In the DLL File INI Settings - c:\inetpub\wwwroot\wconnect\wc.INI: window, scroll down to find the [Automation Servers] section.
- This section will have several Server values.
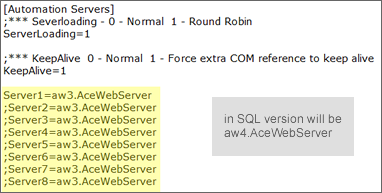
- The first server will be enabled by default. To enabled additional COM servers, remove the semi-colon [;] preceding the Server value:

- Click the Update DLL INI File button to save your changes.
- The DLL INI File updated page opens next. Click the reload link to load the changes.
- The Web Connection DLL Status page will open next. Click the Load Servers link to load your additional COM servers.
ACEweb DCOM Settings
Some servers require adjustments to the ACEweb COM server. To edit the COM server settings:
- Open Component Services:
- 32-bit Servers: click the Windows Start button and select Control Panel > Administrative Tools > Component Services.
- 64-bit Servers: run the 32-bit version of Component Services. To do so, open the Command Prompt window and enter the following line:
C:\WINDOWS\SysWOW64\mmc comexp.msc /32
- Expand Component Services > Computers > My Computer > DCOM Config.
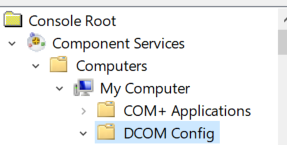
- Find the COM server (VFP version is aw3.AceWebServer; SQL version is aw4.AceWebserver). Right-click it and select Properties.
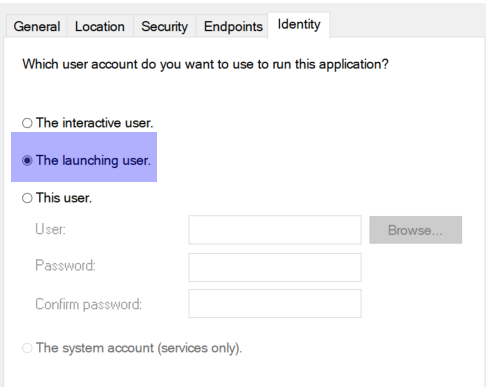
- Select the Identity tab.
- Click on the The launching user option, the click the OK button to set the Identity.
Reset IIS
After editing the DCOM server setting you must reset IIS for them to take effect.
Set DCOM Permissions
You may need to also add the ACEweb User Account to the Launch and Activation Permissions, and Access Permissions on the COM server. Those are set on the COM Server Security tab.
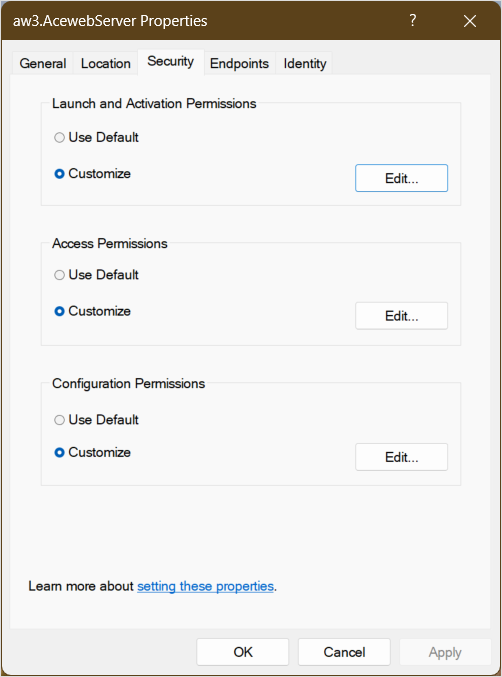
Choose the Customize option in both sections, then click the Edit button and enable Local Launch (Launch and Activation Permissions), Location Activation (Launch and Activation Permissions), and Local Access (Access Permissions).
No ACEweb COM Server Listed
Sometimes, when the COM servers are created, they are not listed as aw3.AceWebServer (VFP) or aw4.AceWebServer (SQL). Instead they are listed by the ACEweb GUID number.
If you don't find the ACEweb COM server listed in DCOM Config, you will need to look it up by GUID number. You can find the GUID number in the VBR file in your ACEweb program folder (i.e. inetpub/aceweb, aw3.vbr if running VFP version, aw4.vbr if running the SQL version).
The VBR file can be opened in any text editor. The GUID is listed in the HKEY_CLASSES_ROOT\aw_X_.AcewebServer\CLSID item (where X is 3 or 4 depending on the version you are running).
Running in File Mode
Most ACEweb installs should run in COM mode. However, a very few servers can only run in File Mode. Contact your ACEware technician for more information on running in File Mode.