

Archiving Data
Archiving is a procedure that removes outdated data from the live data system and places it in a separate set of data tables within the Student Manager directory. You can view archived data and run some reports that include archived data.
ACEware Systems recommends archiving data if:
- You have over 100,000 registrations in your database.
- You have slow performance and wish to increase speed.
- You have outdated courses and wish to remove them from the live data.
IMPORTANT
- Archived data cannot be edited, so you should NOT archive courses until you have finished working with them (e.g. you are no longer editing course data, registrations, or payments).
- Only Course, Registration, and Pay records are archived. Name, Firm, Faculty Manager, and Location records are not archived.
- We strongly recommend making a backup before running the Archiving tool.
Archive Data
- Get everyone else out of Student Manager.
- Make a back up of your Student Manager data.
- Select Module > Courses > Mass Change/Update/Delete/Archive.
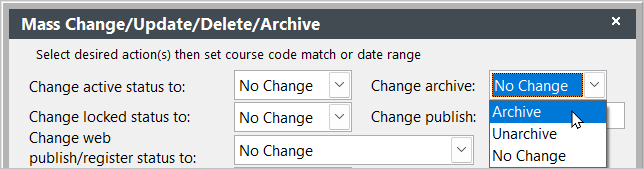
- Select Archive from the Change Archive drop down list:
- Enter the Archive criteria, e.g. archive all courses starting with 23.
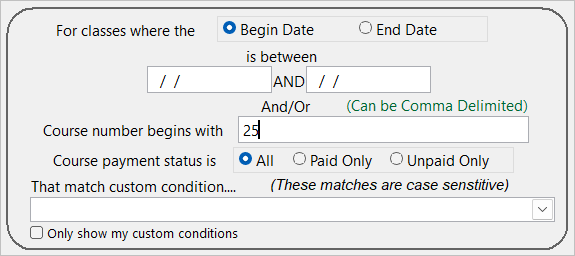
- Choose a Payment Status:
- All - all courses whether paid or not.
- Paid Only - do not include courses with balances or credits.
- Unpaid Only - do not include courses that have been fully paid.
- Click the Preview button to see courses that will be archived. Note: if the Preview button is not live, tab out of the Criteria fields.
- If desired, uncheck boxes next to courses you do NOT want to archive. Click the Done button to close the Data Preview window and continue.
- Click the OK button to archive the courses.
- Run the Reindex routine to index all the tables.
What Happens Next?
Student Manager will create a separate set of tables within your directory, all starting with 'a' (e.g. acourse, aregiste, apay, etc.), and move the data you chose to archive to those tables.
View Archive Data
To view archived course data:
- Select then select the System tab. Check the Switch to Archive box then click the OK button.
- Select . Check the Switch to Archive box then click the OK button.
You will be switched to the archive data. The words 'Archive Live' will also appear at the top of the Student Manager screen:

Once you are done viewing your archived data, go back and uncheck the Switch to Archive box to switch back to the live data.
IMPORTANT
Courses are locked in the Archive data so you cannot edit course, registration, or payment records.
Course Explorer Switch to Archive
You can also view archived records from the Course Explorer by clicking the Switch to Archive link.
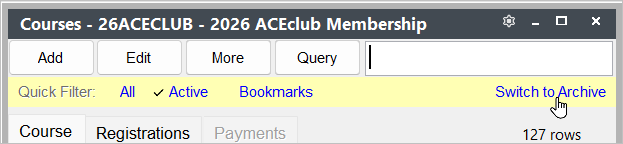
The system will display archived courses until you close the Course screen.
Registration Explorer Switch to Archive
You can also view archived registrations/payments from the Registration Explorer by clicking the the Switch to Archive link.
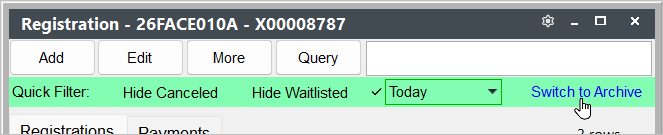
Once clicked, you can select a year from archived registrations:
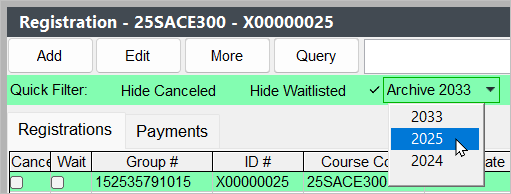
The system will remember your archive selection until you switch back to the live data:

Routines that Access Archived Data
The following routines will access archived data without the need to switch to the archive:
- Courses Taken view on Name Records
- Name Quick Reports
- Courses Taught on Instructor Records
- Printing Transcripts
- Printing Certificates from
Unarchive Data
- Get everyone else out of Student Manager.
- Make a back up of your Student Manager data.
- Select .
- Select Unarchive from the Change Archive drop down list.
- Enter the Unarchive criteria, e.g. unarchive all courses starting with 25.
- Click the Preview button to see courses that will be unarchived. Note: if the Preview button is not live, tab out of the Criteria fields.
- If desired, uncheck boxes next to courses you do NOT want to unarchive. Click the Done button to close the Data Preview window and continue.
- Click the OK button to unarchive the courses.
The selected courses will be moved back into the live data tables.