

Query List Manager
The Query List Manager has several features to help you manage your queries.
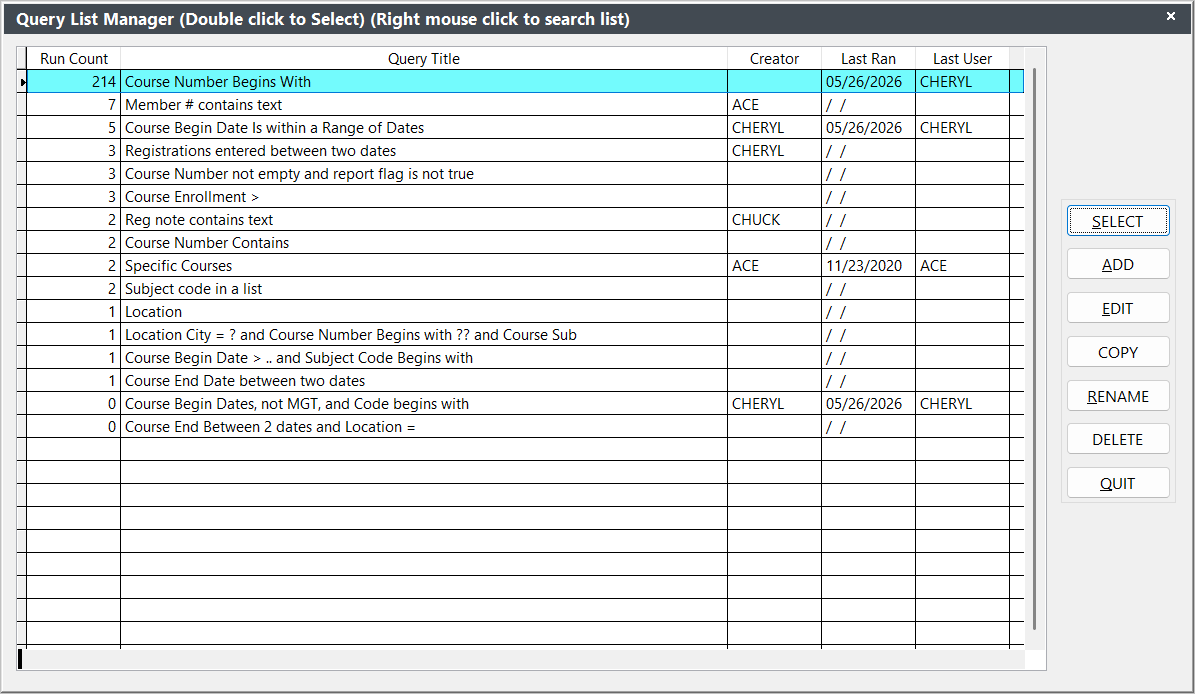
- Run Count - the number to the left of the Query Title indicates the number of times the particular query has been run. This helps you determine which queries in a given area are useful and which can be deleted.
- Query Title - tells the user what the query does. This should be as descriptive as possible so that all users know what information the query will request from the data tables.
- Creator - the user who created the query.
- Last Ran - date the query was last ran.
- Last User - user name of person who last ran the query.
- Query Highlight - when a query in the list is highlighted (clicked on once), a message appears in the upper right of the Student Manager screen telling the user what query elements are in the query.
Search Queries
You can search query titles and fields by right-clicking on the query window and selecting the appropriate option:
- Title - search query titles, e.g. search for all queries which have "Course" in the title.
- Field - search query fields, e.g. search for all queries which reference the cocrse field (course code field from the Course table).
Sort Queries
By default, queries are sorted by the Run Count.
- To sort queries by Query Title, click on the Query Title Column Header. This will sort your queries in A-Z order.
- To sort queries in Z-A order, click the Query Title Column Header again.
- To sort queries by Run Count again, click the Run Count Column Header.
Character Type Queries
Queries that have Character type elements (e.g. Course Number begins, Subject Code is, etc.) offer users the ability to select a query item from the list of available field values. For instance, a Course Number Begins query allows you to select the course number from a list of all course records in your system.
The query item is selected by clicking the ... button to the right of the Query field. This opens the list of available values for the query element:
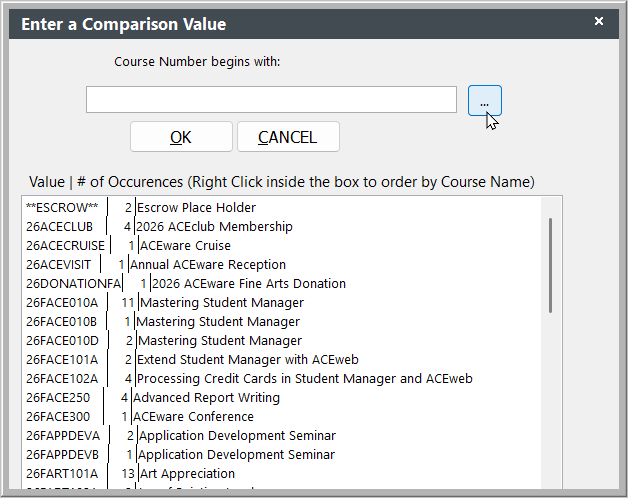
The list shows the number of Occurrences for the particular value (e.g. how many are enrolled in the course, how many names have the particular subject code assigned, etc.).
Double-click a value in the list to select it and add it to the Query field.
Copy Query
If you need a query that is similar to one already created, you can copy the existing query then edit it to include/remove query elements.
- Highlight the query you want to copy in the Query List Manager.
- Click the Copy button.
- Enter a title for the new query then click the OK button.
The new query is added to the Query List Manager window and you can now edit it.
Rename Query
Query Names should be as descriptive as possible so that all users know what information the query will request from the data tables. If you edit a query, then you may also need to rename it.
To rename a query:
- Highlight the query in the Query List Manager window.
- Click the Rename button.
- Make the appropriate changes to the name.
- Click the OK button to save the new name and return to the Query List Manager.
Delete Query
To delete a query:
- Highlight the query you want to delete.
- Click the Delete button.
- Confirm the delete procedure by clicking Yes on the Confirmation dialog box.
You can also use the Delete Queries tool to clean up queries.