

 ADMINISTRATOR GUIDE
To print this guide, choose the Print option in your browser.
Guide Sections
- Setting Up Student Manager
- User Records
- Student Manager Codes
- User Defined Fields
- Optional Modules
- Student Manager Tools
Terms of Use
By accessing, reading, or using this guide, you agree to be bound by the terms and conditions outlined in this agreement.
This guide is provided solely for the internal training and professional development of authorized employees, students, or participants. You may view and print individual pages for personal, non-commercial use related exclusively to your training.
All content within this guide, including text, graphics, logos, layouts, and software, is the exclusive property of ACEware Systems, Inc. and is protected by applicable copyright and intellectual property laws.
You may not, without the prior written consent of ACEware Systems, Inc.:
- Distribute, sell, lease, or license this material to any third party.
- Modify, translate, or create derivative works based on this content.
- Upload the guide to any public server, network, or file-sharing website.
 800-925-2493 ● info@aceware.com ● support@aceware.com
Website: www.aceware.com ● Help Center: help.aceware.com
Setting Up Student Manager
Key issues to address that will greatly facilitate the implementation of Student Manager:
User Records - create security records for each user who needs access to Student Manager.
User Access Levels - determine what access users will have. For instance, you may have users who will add and edit records but won’t have rights to delete r cords; others may only need to view Name record information, etc.
Data Collection – determine the fields in Student Manager that will be enabled/disabled depending upon your data collection needs. For instance, if you don’t assign coordinators to a course, you won’t need to enable the Course Coordinator field for your users. In addition, Student Manager provides you with user defined fields in the main modules which can be used to collect data specific to your organization (e.g. name of spouse, membership expiration date, etc.). These fields must be enabled and labeled before you can use them.
Module Behavior - determine the behavior of Student Manager modules. For example, you may enable the pop up list feature in validated fields, choose to record the firm address instead of the individual’s home address, or assign invoice numbers when billing records are created.
Defining Codes – Student Manager ships with a 'starter set' of codes for most of the main code areas (i.e. Occupation, Organization, Fee descriptions, Account codes, etc.). You may need to edit code lists to suit your own needs.
Email Set Up - some set up is required to interface with your SMTP email server to send emails from Student Manager.
Credit Card Interface Set Up - some set up is required to interface with your chosen Payment Service.
Web Interface Set Up - some set up is required for the ACEweb Web Interface, including setting your logo, color scheme, and preferences. Your assigned ACEware Technician will help you with these tasks.
User Records
Topics covered in this section:
- Creating User Records
- Adding Users
- User Access Levels
- User Groups
- Setting Default Preferences
- Report Favorites
- Student Manager Preferences
Student Manager User Records
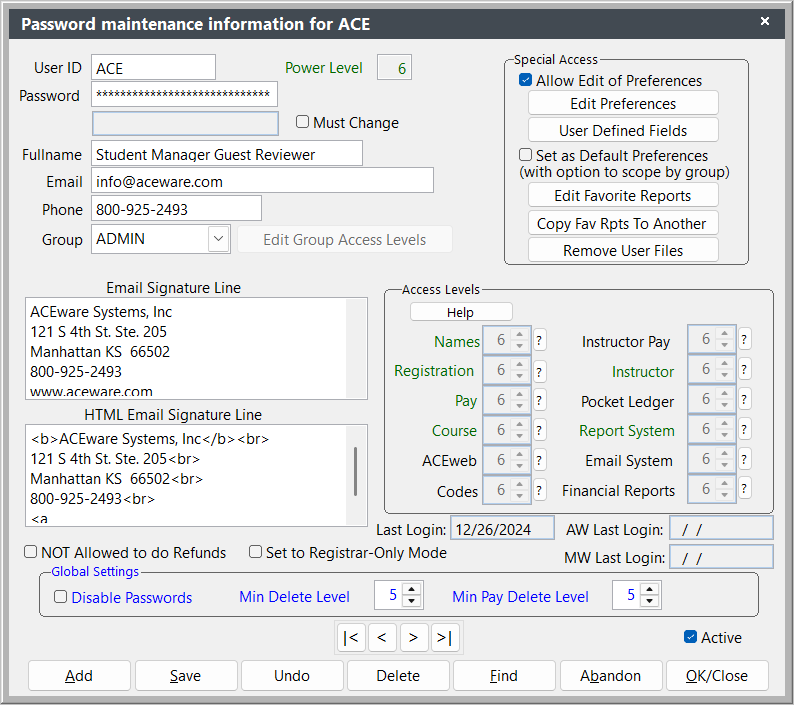
Set up Student Manager users and manage their security preferences from .
Password Maintenance Access
is only enabled for Student Manager administrators.
User Record Explorer
Student Manager 9.0.264 and later uses the new Explorer window for viewing user records. Additional options for the highlighted user can be accessed from the More button (e.g. access the user's favorite reports, edit their preferences, edit UDFs, etc.).
User Password
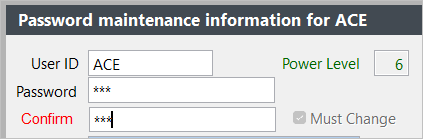
You must enter the password twice when creating a new user or resetting an existing user's password:
Access Levels
Set up users' Access Levels for the various modules.
Login Dates
Last Login - last time the user logged into Student Manager.
AW Last Login - last time the user logged into an ACEweb Adminstrative routine (if allowed).
MW Last Login - last time the user logged into the Manager Web interface.
Global Settings
- Disable Passwords - only enable for systems who have 1 user only.
WARNING
🚫 This setting MUST NOT be enabled if you have more than 1 Student Manager User.
Min Delete Level - the minimum Access level users must have in a module to delete records.
Min Pay Delete Level - the minimum Access level users must have in Pay to delete payments.
Other Settings
Edit Preferences - click this button to edit the user's preferences. Note, changes will not take effect until the user logs in the next time.
User Defined Fields - click this button to edit the user's UDF preferences. Note, changes will not take effect until the user logs in the next time.
Remove User Files - click this button to delete a user's files. Used in case of corruption of the user files (they will be recreated when the user logs in the next time).
Copy Fav Rpts To Another - click this button to copy the user's Favorite Reports to another user.
Set as Default Preferences - check this box to apply this User's preferences to other users. You can choose to apply the preferences to all users or only users in the user's group.
Active - the Active box must be checked for users to be able to log into Student Manager and ACEweb Administrative routines.
NOT Allowed to do Refunds - if checked, the user cannot run the Refund Wizard.
Set to Registrar-Only Mode - if checked, the user will be in Registrar-only mode when entering registrations.
Add a Student Manager User Record
Create new User records from Password Maintenance.
- Select .
- Click the Add button on the Explorer window.
- Enter a User ID.
User ID Restrictions
- The user name can be up to 8 characters in length.
- The user name can only contain letters and numbers.
- The user name cannot contain punctuation marks or symbols.
- Enter a Password.
Password Restrictions
- The password can be up to 29 characters long.
- The password can consist of upper case letters (e.g. ABC), lower case letters (e.g. abc), numbers (e.g. 123), and symbols (e.g. #$@%).
- Your Student Manager administrator can enable other password restrictions.
- Confirm the password the press the TAB key.
Password Verification
After entering it in the first password field, press the TAB key or click the Password Verification field to enter the password again in the Confirm field.
- Check the Must Change field IF you want the user to change the password the first time they log in.
- Enter the user’s full name, email address, and phone number.
- Select the appropriate User Group from the Group drop down list.
- Enter the user's email email signatures (the user can edit this information at a later time through ).
- If you don't want users to be able to edit their preferences, uncheck the Allow Edit of Preferences box on their user record.
- Click the Save button.
Setting Student Manager User Passwords
When creating a new user record, you must enter the password twice for verification purposes.
After entering the password in the 1st Password field, press the TAB key to move to the 2nd Password Verification field.
Must Change Password
You can set a temporary password for the user and check the Must Change box to have the user set their own password when they log in next.
Password Restrictions
Student Manager User passwords can:
- be up to 29 characters long.
- consist of upper case letters (e.g. ABC), lower case letters (e.g. abc), numbers (e.g. 123), and symbols (e.g. #$@%).
Your can also enable other password restrictions. The requirements that can be set include:
- Passwords must be at least 8 characters long.
- Passwords must contain at least 1 of each: upper case letter, lower case letter, number, and symbol (e.g. Myp@ssw0rd).
- Passwords must be changed every 90 days.
Pease contact your ACEware technician for assistance with implementing these restrictions.
Access Levels
The following is a list of actions a user can perform at each Access Level.
All Modules
These apply to Student Manager Modules: Names, Course, Instructor, Pay, Pocket Ledger, and Registration.
| Level | Description |
|---|---|
| 0 | No Access. Menu items and icons are not available to user |
| 1 | View Records Only. |
| 2 | Add Records Only. |
| 3 | Add/Edit Records. |
| 4 | Add/Edit Code Lists |
| 5 | Delete Records* |
*Minimum delete level can be changed by Student Manager Administrator.
Power Level
The user's Power Level is the lowest of Course, Names, Pay, Registration, Instructor, Pocket Ledger, and Report System.
These procedures require the stated Power Level:
| Level | Description |
|---|---|
| 3 | Backup Data (Tools > Backup) Import/Export Reports (Must also be a level 3 in Report System) |
| 4 | Update Counts (Tools > Update Counts) |
| 5 | Pack/Reindex (Tools > Database Admin > Pack/Reindex) Edit UDF Labels |
| 6 | Add/Edit User Records Edit Field Labels (Edit > Preferences) Run Data Cleanup Tools |
Names
These settings apply to the Names module, and some apply to the Firm module.
| Level | Description |
|---|---|
| 2 | Send Quick Email to Individual (MUST also have level 2 access in E-mail) |
| 3 | Add/Edit Zip Code records |
| 4 | Print Waitlist Reports from Course Quick Reports See unencrypted SSN in nmcode2 field |
| 5 | Change Firm ID field on Firm records (e.g. when combining Firms) |
| 6 | Encrypt SSNs in NMCODE2 Mass Delete/Purge Names Mass assign address/phone to all Firm Employees (when changing it on Firm record) |
Registration
| Level | Description |
|---|---|
| 3 | Assess Fee Adjustments Transfer Registration Run Invoice Reports (MUST also have level 6 access in Financial Reports) |
| 4 | Overbook Course |
| 5 | Add Fee Adjustment Description on the fly Override Membership Requirements Assign Proxy to Registration |
| 6 | Add Memberships on the fly Edit Registration Fee Amount |
Pay
| Level | Description |
|---|---|
| 3 | Assign Invoice Numbers when running Invoices Enter custom Receipt Number when adding payments |
| 4 | Edit Payment Type |
| 5 | Set Up Payment Plan |
| 6 | Edit Deposit Numbers Edit Receipt Numbers Edit Payment Date Access Credit Card Management Tools Void Invoice/Receipt |
Course
| Level | Description |
|---|---|
| 2 | Clone Single Course (from course record) |
| 3 | Add Location Records Clone Location Records Duplicate (Clone) a Course |
| 4 | Cancel Course (from course record) Lock Course (from course record) Cancel Course (with Option to Refund) Clone Room |
| 5 | Mass Change/Update/Delete/Archive |
| 6 | Mass Clone (Same Dates) Mass Registration Transfer (crs -> crs) Mass Delete |
ACEweb
Determines staff access to Staff Web Access and ACEweb Administration procedures. See the ACEweb Access Levels topic for more information.
Codes
| Level | Description |
|---|---|
| 3 | Access Course Proposals (Module > Catalog > Course Proposals) (MUST also be a level 4 in Course) |
Instructor Pay
| Level | Description |
|---|---|
| 3 | See Instructor Pay column in Courses Taught list |
Instructor
| Level | Description |
|---|---|
| 4 | View/Edit Instructor Evaluation Fields (on Course Instructor tab) View unencrypted ID (Faculty Preference) |
| 5 | Edit the Faculty System ID (Combining Instructors) |
Pocket Ledger
| Level | Description |
|---|---|
| There are no access levels that affect Pocket Ledger |
Report System
| Level | Description |
|---|---|
| 1 | Access Demographic, Course, Faculty, and Registration Reports |
| 2 | Access Workshop Reports |
| 3 | Access Codes and Statistics Reports |
| 4 | Modify Reports Add/Edit Queries |
| 5 | Edit Default Report Activate/Deactivate Report Add Missing Item when adding/editing queries Delete Additional Report Delete Queries |
| 6 | Move/Rename Report |
Email System
| Level | Description |
|---|---|
| 2 | Send Quick Email to Individual (Names) Send Quick Email to Instructor |
| 3 | Email Registration Confirmations |
| 4 | Send Quick Email to Course Send Quick Email to Canceled Students Send Quick Email to Waitlisted Students Email Roster to Instructor Email Certificates Individually Email Invoices Individually Email Course Reminders |
| 5 | Send Mass Emails |
Financial Reports
| Level | Description |
|---|---|
| 3 | Access Budget Quick Reports |
| 4 | Access Pocket Ledger Reports |
| 5 | Access Accounting > Enrollment & Income, Income Detail, and Deadbeat reports |
| 6 | Access Accounting > Cashbox, Daily Income reports Access Invoice Reports |
User Groups
Assigning a user to a group allows you to mass assign a specific set of access levels and preferences for all members of a group. Student Manager ships with 3 default groups:
- ADMIN - assigns level 6 access in all areas and allows users to edit preferences.
- REPORTS – assigns level 3 in reports and level 1 in all other areas.
- REGISTER – assigns level 5 in reports and level 4 in all other areas.
Adding New User Group
You can create new user groups in which to place a user:
- Enter the new Group name in the Group field.
- Press the TAB key.
- You'll be asked if you want to create a new group. Click the Yes button.
- Click the Edit Group Access Levels button to edit the access levels for the new group.
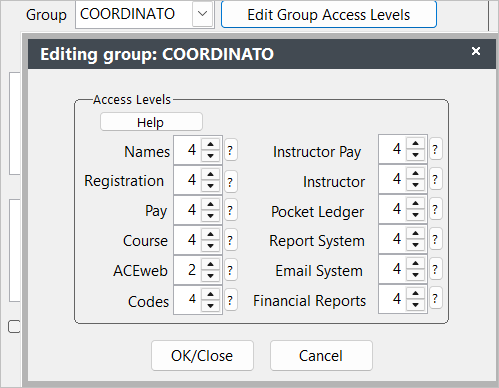
- Click the OK/Close button to save your access changes.
Editing Group Access Levels
To edit access levels for an existing group:
- Find and open a user in the group.
- Click the Edit Group Access Levels button.
- Edit the access levels.
- Click the OK/Close button.
- Save the changes to user record.
Everyone in the group will now have the edited access levels.
XCUSTOM Group
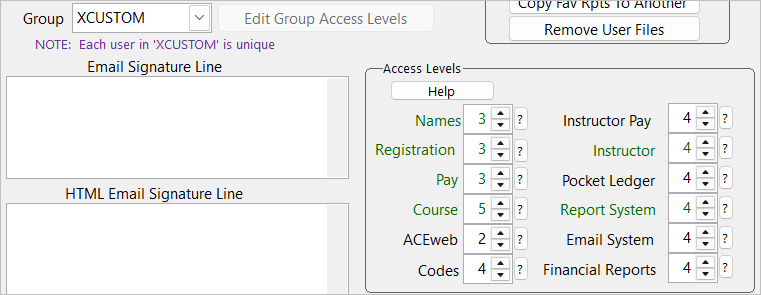
Users who need individualized access levels must be assigned to the XCUSTOM group.
- If you don't already have an XCUSTOM group, create it (see above).
- Assign the group to the user.
- You can then edit the user's Access Levels.
Setting Default Preferences
You can assign a specific user's preference set to other users in the user group or All users in your system.
- Open he user record which has the set of preferences you want to assign to others.
- Check the Set as Default Preferences box.
- Click the Save button.
- You’ll be warned that you’re about to change others' settings. Click Yes to continue.
- On the Scope for Default Preferences window, click the appropriate button:
- NO - assign preferences to members of the user group.
- YES - assign preferences to all users in the system.
- Click the Save button to assign the preferences to the users you specified.
The new preferences will be applied to the Student Manager user(s) the next time they log into Student Manager.
Report Favorites
Student Manager users can identify up to 10 reports as personal favorites so they can be easily found and run. Student Manager administrators can also identify up to 10 Global Favorites available to all users.
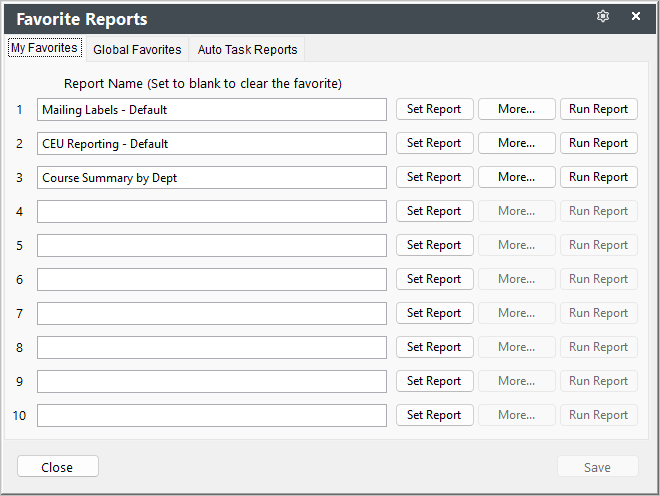
Favorite Reports tabs:
- My Favorites - user reports--each user can set their own favorite reports.
- Global Favorites - reports available to all users. Student Manager administrators set these report favorites.
- Auto Task Reports - status of any report favorites set up as Auto Tasks.
Open Favorite Reports
Access the Favorite Reports screen:
- Click the icon on the Quick Launch toolbar.
- Select or
- Use the CTRL+F1 keyboard shortcut
Favorite Reports Tab Preselected (Step 2 of Instructions)
- When selecting an item from the Reports menu, the correct tab will be preselected for you when the screen opens.
- If you right-click the icon and choose My Favorites or Global Favorites, the correct tab will be preselected for you when the screen opens.
Set Favorite Report
- Open the Favorite Reports screen.
- Select the appropriate tab: My Favorites or Global Favorites.
- Click the Set Report button.
Global Favorites
Only Student Manager administrators can set Global Favorites. The Set Report button is not available for other users.
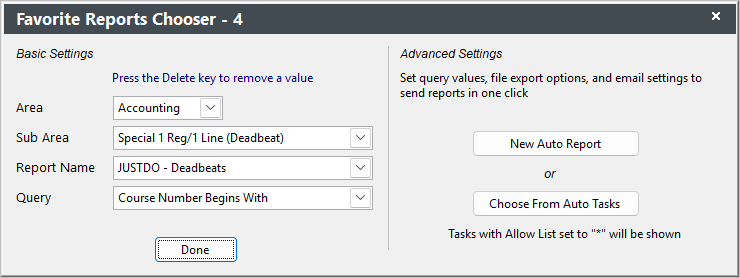
- On the Favorite Report Chooser window, select the report area, sub area, name and query. In this example, we are choosing the JUSTDO - Deadbeats report with a Course Number Begins with query:
Notes
- Cashbox, Invoice, and most Statistical reports cannot be set as a favorite report.
- You can set a Statistics > Course Data Summary report as a favorite report.
- Click the Done button.
- The report is added to the list.
- Repeat steps 2-5 to set more report favorites.
- Click the Save button to save your report favorites.
New Auto Report
You can set up a favorite report to create a file and email it when you click the Run Report button.
- Click the New Auto Report button on the Favorite Reports Chooser screen.
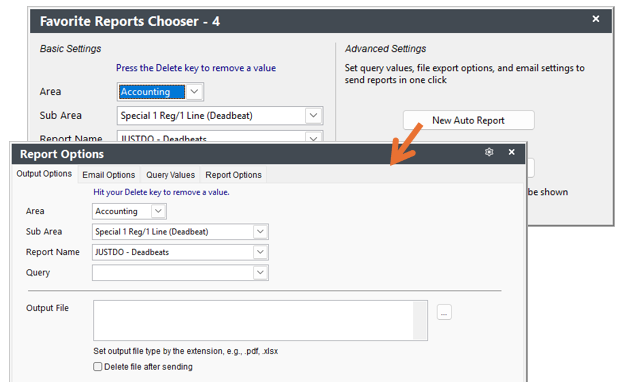
- The Area, Sub Area, and Report Name values are copied over from the Favorite Reports Chooser screen. You will need to choose the Query and enter the query value (e.g. Course Number Begins query and enter 26F).
- Set the Output File value: location and name. You can use template expressions in the path. For example this expression will save a file named yourfile.pdf to c:\acehold[current year][current month] folder:
c:\acehold\##year(date())##\##cmonth(date())##\yourfile.pdf
- Select the Email Options tab and enter the information:
- Select the Sender.
- Enter the email address(es) the email will be sent to in the Sent To field. Multiple email addresses must be separated with a comma.
- Enter the Subject.
- Enter the Message.
Template Expressions
- You can use template expressions in the Subject and Message fields. For example ##date()## will enter the current date in the fields.
- Template expressions must be enclosed in the ## delimiters.
- Click the Ok/Close button to save your changes and return to the Favorite Reports Chooser screen.
Relative Date Queries
You can use relative date queries, if desired. For example, always run the report for the previous month.
- Use a date query, for example a course begin date within a range of dates query.
- When you click the New Auto Report button, enter a basic date range. You will change this later.
- When the Report Options window opens, select the Query Values tab.
- Select the appropriate option:
- Make dates relative to day of running - will create a expression that sets the dates relative to the day you set up the report. The system will ask you to set both dates:
When you click Yes on both date questions, it will reset the query's Where clause:
- Edit Manually - allows you to manually edit the Where clause. This is useful if you want to reset the dbDate() values. Or if you want to use a function such as FirstofMonth() or FirstofQuarter().

Examples
- This Where clause uses the FirstofMonth() function to always run the report for courses beginning in the previous month:
( COURSE.COBEGDATE >= ##dbDate(firstofmonth(-1))## .AND. COURSE.COBEGDATE <= ##dbDate(firstofmonth(0)-1)## )
- This Where clause uses the FirstofQuarter() function to always run the report for courses beginning in the previous quarter (based on calendar year):
( COURSE.COBEGDATE >= ##dbDate(firstofquarter(-3))## .AND. COURSE.COBEGDATE <= ##dbDate(firstofquarter(0)-1)## )
Auto Task
Student Manager administrators can share a user report as an Auto Task so other users can add it to their own My Favorites list.
- Select .
- In the list, highlight the user that made the report.
- Click the More button and select Report Favorites.
- Click the More button on the report you want to share.
- Select Share as Auto Task.
User-Add Auto Task
Once the administrator has shared the report, other users can add it to their My Favorites list.
- Open the Favorite Reports screen.
- Select the My Favorites tab.
- Click the Set Report button on a blank favorite report.
- Click the Choose from Auto Task button.
- Select the auto task to add.
- Click the OK button to add the report.
Run Favorite Report
- Open the Favorite Reports screen.
- Select the appropriate tab: My Favorites or Global Favorites.
- Click the appropriate Run Report button.
- Select any other report options on the Report Options screen (e.g. Include Canceled records, also output as, etc.), then click the OK button.
- Enter the query value(s) then click the OK button.
- The report now runs.
Run Favorite Report from Quick Launch
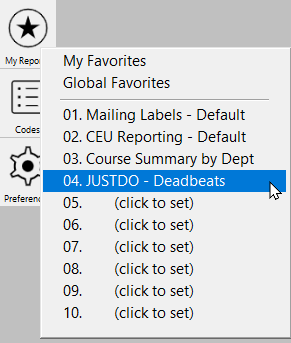
A new feature in version 9.0.264.0 is the ability to right-click the icon and select My Favorites, Global Favorites, or a specific favorite report to run. E.g.
Change Favorite Report
You can make changes to a favorite report. For example, you need to update the query values.
- Open the Favorite Reports screen.
- Select the appropriate tab: My Favorites or Global Favorites.
- Click the appropriate Set Report button.
- Make the appropriate changes (e.g. change the report area, sub area, name and/or query).
- Click the Done button.
- Click the Save button to save your changes.
Delete Favorite Report
- Open the Favorite Reports screen.
- Select the appropriate tab: My Favorites or Global Favorites.
- Click the appropriate Set Report button.
- The Area value should be highlighted for you. Press the DELETE key to clear the value. Clearing the Area value will also clear the other fields.
- Click the Done button.
- Click the Save button on the Favorite Reports screen to save your changes.
Student Manager Preferences
Select Student Manager behavior options and enable/disable fields on the Preferences screen. Access the Preferences screen by:
- Clicking the icon on the Quick Launch
- Selecting
Preferences are categorized onto tabs:
- System Preferences - set preferences for the system such as, preferred browser, macro keys, update and backup reminders.
- Name Behavior Preferences - set preferences for the Names screen such as displaying balance due/credit info, firm name matching, warnings if specific data is not entered.
- Name Fields Preferences - enable/disable fields and customize labels for some Name fields.
- Course Behavior Preferences - set preferences for the Course screen such as enabling room conflict checking, enabling reminder and follow up emails, enabling the auto expire for early bird fees.
- Course Fields Preferences - enable/disable fields and customize labels for some Course fields.
- Registration Behavior Preferences - set preferences for the Registration screen such as validating adjustment fee descriptions, using the Bill/Pay registration type, checking whether student has met prerequisites.
- Registration Fields Preferences - enable/disable fields and customize labels for some Registration fields.
- Organization Defaults - set organization information such as title, department, address, phone, zip code and ID format.
- Pocket Ledger Preferences - enable/disable fields used on the Pocket Ledger screen.
- Firm Preferences - enable/disable fields used on the Firm screen.
- Faculty Preferences - enable/disable fields used on the Faculty screen and set preferences such as enabling instructor schedule checking, enabling posting faculty benefits to Pocket Ledger, setting default instructor pay date.
- Pay Preferences - set preferences for the Payment screen such as validating credit cards, auto enter payment amount, using firm escrow.
- Pay Types - enable/disable the payment types used and customize labels for user-defined pay types.
Enable/Disable Fields
Optional fields for modules appear in the Enable Fields section. If you don't intend to use the field(s), uncheck the box to the left of the field name. Disabling fields you don't use allows you to increase data entry productivity (e.g. data entry personnel won't need to tab through the field(s) in which they don't enter data to get to the ones they do).
Module Behavior Preferences
Many modules have behavior options you can enable or disable. Those are listed in the System Behavior Preferences section.
Color Coded Preferences
Preferences on each tab are color-coded:
- Black - are user specific (they effect the user only).
- Blue - are global (effect every user). You must have level 6 access to edit preferences in blue. Note: these should not be changed without the permission of your Student Manager administrator.
- Purple - user must be a level 6 in the particular area to use the option (e.g. user must be level 6 in Pay to edit receipt numbers).
Access to Preferences
Your Student Manager Administrator can disallow your ability to edit preferences.
If your Preferences Icon on the Main Toolbar or the [Edit Preferences icon on the Quick Launch is grayed out, you don't have rights to edit your preferences. Please see your administrator for more information.
Student Manager Codes
Topics covered in this section:
- Student Manager Codes
- Characters Used in Codes
- Course Coding Scheme
- Workshop Coding Scheme
- Code Editor Screen
- Field Validation
Student Manager Codes
Student Manager uses a Code Validation system to ensure information conforms with rules set up for specific data elements. To make the code validation system work for you:
- Determine which codes you need to meet your reporting needs.
- Enable/disable the appropriate code fields in Preferences.
- Add/edit/delete code values to meet your coding needs.
Access the Codes screen by selecting , or clicking the icon on the Quick Launch toolbar.
The following is a list of Code fields on each of the Student Manager screens. Unless otherwise stated, these codes are added/edited from the Codes screen.
Course Codes
- Course Code - Unique user defined code that identifies the course record.
- Category - Category for course.
- Type - System generated code identifying the type of course. Course behavior is determined by this code entry (e.g. if type is workshop, the workshop screen is accessible).
- Department - Department that offers the course.
- Subject Code - Subject associated with course. The subject code assigned to a course will be added to students' Interest code list when they enroll in the course (unless the code has already been assigned to the individual).
- Catalog Code - Course description. Add/edit catalog codes on Catalog screen.
- Account - Account number assigned to course.
- Coordinator - Coordinator assigned to course.
- Location - Building and/or Room where the course is held. Add/edit location on Location screen.
- Grouping Codes - Group to which course belongs. ACEweb use requires set up.
Fees Tab
- Main Fee Descriptions - Main (Tuition) Fee Descriptions for course. This list is generated from FEES: Course Main Fee Descriptions.
- Other Fee Descriptions - Optional Fee/Coupon Code Descriptions for course. This list is generated from FEES: Course Additional/Optional Fee Descriptions.
- Inventory Items - Inventory items for course.
- Membership Code - if using the Membership feature, the code that identifies the membership.
Instructors Tab
- Pay Type - System generated code to identify what pay type is used to calculate Instructor pay on course.
- Account - Account number assigned to Instructor pay record. This list is generated from COURSE: Account Numbers.
- Exp Class Code - Expense classification type assigned to Instructor Pay record. This list is generated from (Ledger) Expense Classification Codes.
- Type - System generated code identifying type Instructor type (i.e. Instructor, Keynote Speaker, Presenter, etc.).
Name Codes
- ID # - Unique identification code for Name record. This code can be user defined or system generated.
- Salutation - Individual's salutation (e.g. Mr., Ms., etc.). Field Validation for Salutation is optional.
- Firm - Individual's firm or company. Add/edit firms on Firm screen.
- Zip Code - Individual's zip code. Add/edit zip codes on Zip Code screen.
- County - Individual's county. Field Validation for County is optional.
- Mail Preference - System generated code identifying individual's preferred mailing address.
- Fee Category - Main fee type for which individual qualifies (e.g. Senior Citizen discount). This list is generated from (Fee) Registration Fee Descriptions.
- Source - Promotional item which generated Name.
- Occupation - Individual's occupation (Clerical, Administrative, Nurse, Plumber, etc.).
- Organization - Individual’s organization type (Government, School, Retail, Medical, etc).
- Interest - Subjects in which individual is interested (Computers, Management, etc). An unlimited amount of Interest codes can be added to a name record.
- Gender - Individual's gender.
- Call Back Users - Student Manager user who should make call back.
Demographics Tab
- Education level - Individual's education level.
- Disability - Individual's disability (if any).
- Language - Primary language spoken by individual. This field can be relabeled and used to collect user defined demographic data.
- Ethnicity - Individual's ethnic origin. This field can be relabeled and used to collect user defined demographic data.
- Household Income - Individual's household income level.
- Marital Status - Individual's marital status.
- Family Type - Individual's family type.
- Dwelling Type - Individual's dwelling type.
- Misc Code - field that can be labeled and used to collect data specific to your organization. Enable/Label this field in Names Preferences.
Credentials Tab
- Type - Credential type. This list generated from NAMES: Testing & Certification Types.
Registration Codes
- Tracking - Promotional item which generated Registration. This list is generated from NAMES: Source/Tracking Codes.
- Status Codes - Status of registrant (e.g. Participant, Speaker, Panelist, No Show, etc.).
- Reg Codes - User defined code with which you can track registrant data specific to your organization (e.g. T-Shirt size, Hotel code, etc.). Organizations can define the label for this field.
- Misc Code - User defined code with which you can track registrant data specific to your organization (e.g. T-Shirt size, Hotel code, etc.). Organizations can define the label for this field (rgmisc field).
- Who Paid - Internal code identifying who paid for registration.
- Fee - Main fee (i.e. fees set up in course record) to be assessed to registrant.
- Additional Charges - Other fees (i.e. fees set up in course record) that can be assessed to registrant.
- Fee Adjustment Description - Fee adjustments that can be assessed to registrant. Field validation for Fee Adjustment Descriptions is optional. If validated, this list is generated from FEES: Registrations (O-T-F=On the Fly) Adjustment fees and PAY: Refund Notes.
Payment Codes
- Type - System generated code identifying Payment type. Organizations can define the label for additional payment types.
- Payment Identifiers - User defined code with which you can track payment data specific to your organization (e.g. Medicare code, Account number, etc.). This list is generated from PAY: Payment Identifiers. Field validation for Add Info is optional (i.e. Validate Pay Additional ID).
- Refund Wizard Pay Adjustment - Refund note entered as Fee adjustment description when refunding money to a registration.
Attendance Codes
- Attendance Codes - Attendance code (e.g. arrived late, didn't show, etc.), used with the optional Attendance Tracking module.
- Module Codes - Session type (e.g. test, lecture, etc.), used with the optional Attendance Tracking module.
Catalog Codes
- Code - Unique user defined code that identifies the Catalog record (e.g. COMP1001 for Introduction to Computer course description, E_MAIL for Email template, etc.).
- Kind - System generated code used to identify the Catalog record type.
- Subject - Subject associated with Catalog record. This list is generated from COURSE: Subject Codes.
Faculty Manager Codes
- Faculty System ID # - System generated identification number assigned to Faculty record. This code should NOT be edited.
- Zip Code - Faculty member's zip code. Add/edit zip codes on Zip Code screen.
- Source - Promotional item which generated Faculty member. This list is generated from NAMES: Source/Tracking Codes.
- Occupation - Faculty member's occupation (Clerical, Administrative, Nurse, Plumber, etc.). This list is generated from NAMES: Occupation Codes.
- Organization - Faculty member's organization type (Government, School, Retail, Medical, etc). This list is generated from NAMES: Organization Codes.
- Subject - Subjects which instructor can teach. An unlimited amount of interest codes can be added to a faculty record. This list is generated from COURSE: Subject Codes.
- Call Back User - Student Manager user who should make call back.
- Pay Type - System generated code identifying pay types that can be used to calculate Instructor Pay record.
Financial Aid Codes
- Financial Aid Types - type of Financial Aid.
Firm Codes
- Firm ID - System generated identification number assigned to Firm record. This code should NOT be edited.
- Zip Code - Firm's zip code. Add/edit zip codes on Zip Code screen.
- Org Code - Firm's organization type (Government, School, Retail, Medical, etc). This list is generated from NAMES: Organization Codes.
- # of Employees - Firm size code.
- Size (in $000's) - Firm Sales Amount code.
- Firm Type - System generated code identifying Firm type (i.e. firm or vendor).
Location Codes
- City - Location City. Validation can be enabled for this field. Values for the list are entered from in the LOCATION: City list.
- County - Location County. Validation can be enabled for this field. Values for the list are entered from in the LOCATION: County list.
- Room Record Internal ID - System generated identification assigned to Location record. This code should NOT be edited.
- Location/Room ID # - Internal Room ID that is assigned to the room by your organization. The Location/Room ID number can then be used when running statistical reports.
Pocket Ledger Codes
- Expense Classification - Expense classification type assigned to Pocket Ledger record.
- Major Expense Category - Major category for Expense Classification code.
- Account - Account number assigned to Pocket Ledger record. This list is generated from COURSE: Account Numbers.
- Vendor - Vendor who provided item. Vendor records are stored in the Firm table.
Characters Used in Codes
You CAN ONLY USE the following characters in Student Manager code fields:
- Letters
ABCabc - Numbers
123 - Hyphens
- - Undescores
\_ - Periods
.
Unless otherwise specified, you CANNOT USE these characters:
- Spaces in codes
COM 123 - Symbols
,;:?!-/\&#~@$%^+=<>'"|(){}
The above rules ALSO APPLY TO Grouping Code Descriptions and Location/Building Names.
Exceptions
You may use spaces in these Codes:
- Coordinator.
- Department - no code field--enter your department into the Description field.
- Main Fees - no code field--enter your fee name into the Description field.
- Additional/Optional Fees - no description field--enter your fee name into the Code field.
- Registration (OTF) Adjustment Fees - no description field--enter your fee name into the Code field.
- Refund Wizard Fee Names - no description field--enter your fee name into the Code field.
You may use apostrophes ' in theses codes:
- Location/Building names, e.g. Chuck's Cabin.
- Location Campus field.
Code Descriptions
You CAN USE the Description field to more fully describe the specific code:
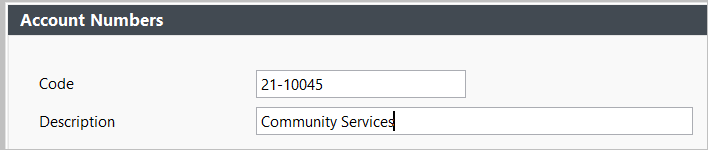
The description shows in the Code list, so the user will be able to tell what a specific code means:

Course Coding Schemes
The Course Code is the unique code that identifies the course record. Your course coding scheme should aid in generating reports and registering students. For those reasons, ACEware strongly suggests generating course codes using the following format:
Course Code Example: 24FYSUP103A
| Year | Semester | Audience (Optional) | Department | Class # | Section |
|---|---|---|---|---|---|
| 26 | F | Y | SUP | 103 | A |
- Year designated by a two character code (i.e. 26-2026, 27-2027)
- Semester designated by a single character code that will make the semesters fall in chronological order within a school year. (i.e. F-Fall, S-Spring, U-Summer, W-Winter).
- Audience (if used by your organization) designated by a single character code (e.g. Y-Youth, A-Adult).
- Department designated by a three character code (i.e. SUP-Supervision, BUS-Business). Note: this code may be four character--if--your organization is not using the audience code.
- Class number designated by a three/four character code (i.e. 103, 3065)
- Section number designated by a single character code (i.e. A, B, C; or 1, 2, 3).
Coding Scheme Rules/Tips
While we feel the ACEware course coding scheme is the most efficient system, organization's can devise their own procedure as long as they follow these rules:
- The maximum size of the course code is 12 characters.
- Each different course record entered must have a unique course code.
- Keep all codes the same length (i.e. use four characters for all department codes). If you number your courses from 1-999, fill in the starting numbers with leading zeros (e.g., 001, 099).
- You CAN ONLY USE certain characters in your course codes.
Workshop Code Scheme
Your workshop coding scheme should aid in generating reports and registering students. For those reasons, ACEware suggests generating workshop codes using the following format:
Workshop Code Example: AA01
| Day | Time Period | Session in Time Period |
|---|---|---|
| A | A | 01 |
- Day (A=Mon, B=Tue, C=Wed, etc.)
- Time Period (A=8am-9am, B=9am-10am, C=10am-11am, etc.)
- Sessions in Time Period (01=session 1 in time period A, 02=session 2 in time period A, etc.)
Sample Workshop Schedule
Sample Schedule
| Day | 8:30-9:30 | 9:45-10:45 | 1100-12:00 |
|---|---|---|---|
| Monday | AA01 (session 1) | AB01 (session 1) | AC01 (session 1) |
| Monday | AA02 (session 2) | AB02 (session 2) | AC02 (session 2) |
| Tuesday | BA01 (session 1) | BB01 (session 1) | BC01 (session 1) |
| Tuesday | BA02 (session 1) | BB02 (session 2) | BC02 (session 2) |
| Wednesday | CA01 (session 2) | CB01 (session 1) | CC01 (session 1) |
| Wednesday | CA02 (session 2) | CB02 (session 2) | CC02 (session 2) |
What does this coding scheme do for you? Your workshops will be sorted first by day, then by time period, then by session. Registration staff can easily tell which sessions are offered in each given time period, and guarantee individuals enroll in only one workshop per session. It also alerts staff to any additional fees--this allows them to notify individuals of those additional fees before enrolling them.
Code Editor Screen
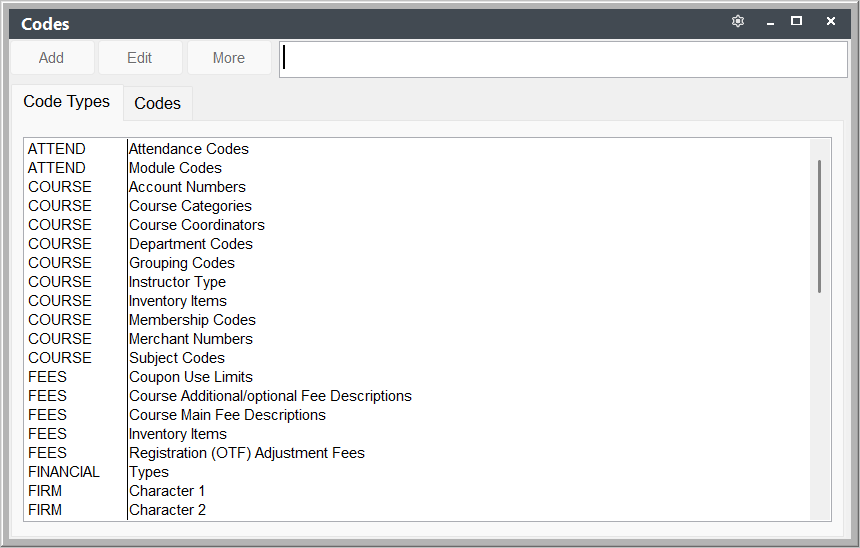
Add/edit/view codes lists for most Student Manager Codes from the Code Editor screen. To access the Codes screen:
- Click the Codes icon on the Quick Launch
- Select .
Viewing Specific Code List
Once you have the Code screen open, select the appropriate code from the Code Type list. For example, to see the values for the Coordinator field, select Course Coordinators.
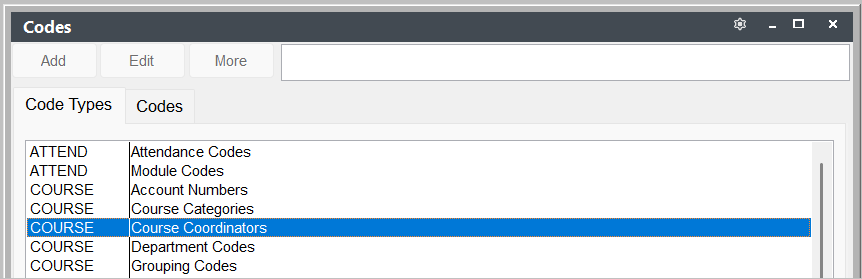
Once you highlight the Code Type, select the Codes tab to see codes for that Code Type.
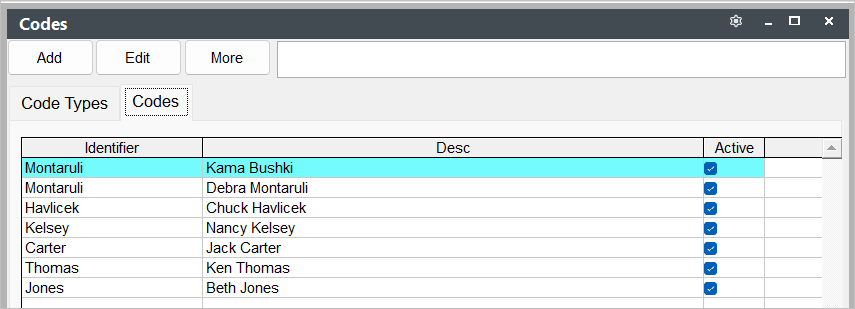
Adding Codes
- Select the Code Type.
- Select the Codes tab.
- Click the Add button.
INFO
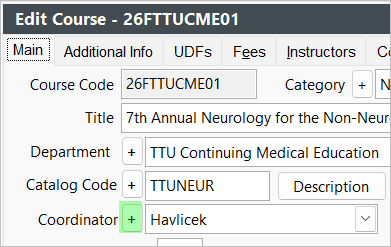
You can also add codes from the module screen with the + button next to the field:
Editing Codes
- Select the Code Type.
- Select the Codes tab.
- Highlight the code you want to edit.
- Click the Edit button.
When editing codes, the system will ask you if you want to update associated records (e.g. if you edit an Coordinator code value, the system will ask you if you want to change the code on all associated Course records). Select the appropriate option.
Activate/Deactivate Codes
Some code areas allow you to activate/deactivate codes.
- Active codes are displayed in the code's drop down list on the associated screens.
- Deactivated code do NOT appear in the drop down list.
Codes that can be activated/deactivated have the Active Code check box on the screen. Check it to activate the code. Un-check it to deactivate a code.
Deactivating old codes that are no longer used allows you to keep the old code around (so that they still show in reports) but 'hide' them in the list so staff will not be able to assign them to new records.
Hiding Codes from ACEweb
You can hide specific code values from ACEweb displays in the following code areas:
- Grouping Codes - specific groups can be hidden from the group displays.
- Interest Codes - specific interest codes can be hidden from the Interest Code lists on personal data pages.
- Tracking Codes - specific tracking codes can be hidden from the How did you hear about us lists.
Deleting Codes
When deleting codes, the system will ask you if you want to also delete the code from all associated records. Select the appropriate option.
Combining Codes
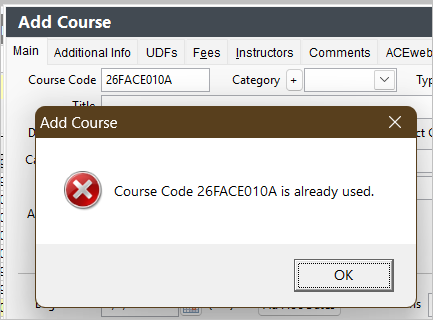
To combine codes, look up the 'BAD' code (i.e. code you want to delete) and enter the 'GOOD' code into the Code field. The system will ask you to if you want to update all associated records (e.g. if you merge two Coordinator codes, the system will ask you if you want to change the code on all associated Course records). Select the appropriate option.
Field Validation
Many of the fields in Student Manager are automatically validated. See Code Validation for how validation works, and the full list of built-in and optional validation rules.
User Defined Fields
Topics covered in this section:
- User Defined Fields
- Enable/Label UDFs
- Validating UDFs
- UDF Display
- UDF Display Coding
- Unlimited UDFs
User Defined Fields
The following modules offer user defined fields that your organization can use to collect data specific to your organization (e.g. name of individual’s spouse, hotel in which registrant is registered, etc.).
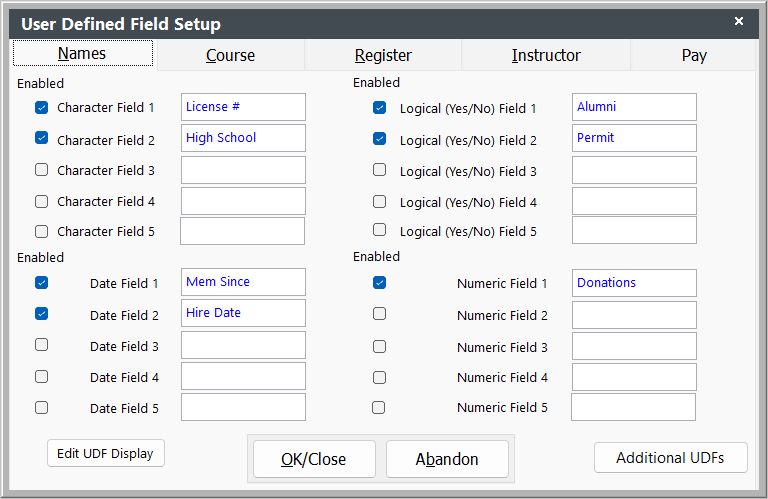
- Names – 5 of each data type (character, date, logical, and numeric)
- Course – 4 of each data type
- Registration – 4 of each data type
- Faculty Manager – 4 of each data type
- Pay - 2 character type and 1 date type
Setting Up UDFs
- Enable UDFs
- UDF Display
- UDF Display Coding
- Validate UDFs
- Course Specific Registration Labels
- Unlimited UDFs
Enabling/Labeling User Defined Fields
Enable and label UDFs from Preferences.
Notes
- UDFs are user specific. Each user must enable the fields they will be using.
- UDF Labels are global--they are labeled the same for every user.
- You can set up data validation in character and number type UDF fields.
- All Faculty and Pay UDFs are enabled--you only have the option of labeling them.
To enable/label UDFs:
- Click the Preferences icon on the Quick Launch or select .
- Select the appropriate tab. For example, to edit Name UDFs, select the Names Fields tab.
- Click the [Module Name] UDFs button. For example, if you selected the Names tab, the button will be named Name UDFs.
- Once the User Defined Field Setup screen opens, you can edit any of the module UDFs.
Validating User Defined Fields
You may set up character and number type User Defined fields for data validation by prefacing the label with a plus sign (+) [e.g. +Attendance].
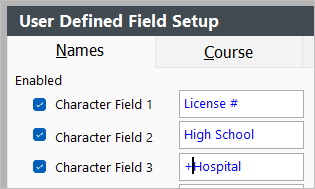
You must also set up the Validation Codes. To do so:
- Open a module record (e.g. if you are setting up a Name UDF for data validation, open a Name record).
- Select the Additional / UDFs tab (or button for registrations).
- The field you set up for data validation will now have a Plus Sign + button to the left of the field. Click it to enter the values for the field.
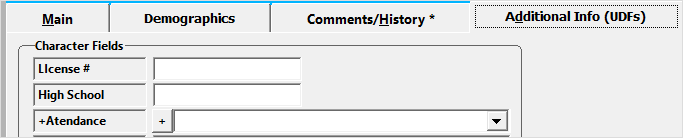
- The User Defined Field Code screen opens for you to create your codes. Enter the Code and description then click the Save button to save the code.
- Click the Add button to add the next code.
- Continue steps 4-5 until you have added all the codes.
- Click the OK/Close button to close the screen and return to the User Defined Fields screen.
The values will now be available for the field.
Displaying UDFs on Module Screens
You can display some UDF values on Names, Course, and Registration screens.
Names UDF Display
In Student Manager 9, name UDFs no longer show on the Names screen. You can add them to the Name Explorer, if desired.
Course UDF Display
You can display a custom message, up to 18 characters in length, on the Course screen with the User Display option. To do so:
- Click the Preferences icon on the Quick Launch or select .
- Select the Course Fields tab.
- Click the Course UDFs button.
- Enter your expression in the User Display field.
Registration UDF Display
You can display a custom message, up to 32 characters in length, on the Register screen with the User Display option. To do so:
- Click the Preferences icon on the Quick Launch or select .
- Select the Register Fields tab.
- Click the Register UDFs button.
- Enter your expression in the User Display field.
UDF Display Coding Rules
The following are Coding items that can be used in UDF Displays.
Note: date, numeric, and logical fields must turned into character values to be included in the display.
Coding Items
- Fields - the name of the field you want to display prefaced by the table name. You can use fields from the listed tables depending on which module:
Module Tables Examples Names Names and Nameudfs names.nmdisable, nameudfs.nudfc1 Course Course and Crseudfs course.coalias, crseudfs.cudfc1 Register Regudfs regudfs.rudfc1
- UDF Labels - you can use the label of the UDF field you want to display. The name of the label must be prefaces by the Labels table name.
Example: labels.udfc1
- Text Strings - use text strings as labels, and identifiers between fields. Text strings MUST be enclosed in quotation marks "".
Examples: "Spouse: ", ": ","="
- + (plus sign) Concatenation Marks - Concatenation mark are used to join the pieces of your UDF display together.
Example: labels.udfc1+"="+nameudfs.nudfc1, "Sponsor:"+crseudfs.cudfc1
- Formatting Functions - use these functions to format your labels and fields.
TRIM() - trims off any spaces at the end of a label or field.
DTOC() or TRIMDATE() - turns date fields into character values. TRIMDATE allows you to specify the date format (e.g. return 2 digit year, mm/dd/yy).
STR() - turns numeric fields into character values.
SHOWTF() - turns logical fields into character values with the ability to return Yes/No or True/False.
ADDNMUNL() - returns the specified Unlimited Name UDF. Note: Unlimited UDFs do not have labels so you will need to use a text string label.
Example Display Strings
These are some sample strings using the above items:
- Character UDF:
trim(labels.udfc1)+"="+trim(nameudfs.nudfc1) - Date UDF:
trim(labels.udfd1)+"="+trimdate(crseudfs.cudfd1,7) - Logical UDF:
trim(labels.udfn1)+"="+showtf(nameudfs.nudfl1) - Numeric UDF:
trim(labels.udfn1)+"="+str(regudfs.rudfn1,8,2) - Unlimited UDF:
"Spouse: ""+trim(addnmunl(names.nmid,"spouse_name") - Two fields on 1 line separated by /:
trim(labels.udfc1)+"="+trim(nameudfs.nudfc1)+"/"+trim(labels.udfl1)+"="+showtf(nameudfs.nudfl1) - Using the IIF() and EMPTY() functions to return 'No Data' if a field has no value:
trim(labels.udfc1)+"="+iif(empty(nameudfs.nudfc1),"No Data",nameudfs.nudfc1)
Unlimited User Defined Fields
Set an unlimited number of user defined fields (UUDFS) for Names, Course, Faculty, and Registrations.
Define Unlimited UDFs
You must define your unlimited UDFs before you can use them. To do so:
- Open the Preferences screen.
- Select the appropriate Preferences tab (e.g. for Names, select the Names Fields tab).
- Click the tab's UDFs button (e.g. Name UDFs,, Course UDFs, Instruct IDFs, or Register UDFs).
- Click the Additional UDFs button on the User Defined Field Setup window.
- This opens the Define Unlimited UDFs window.
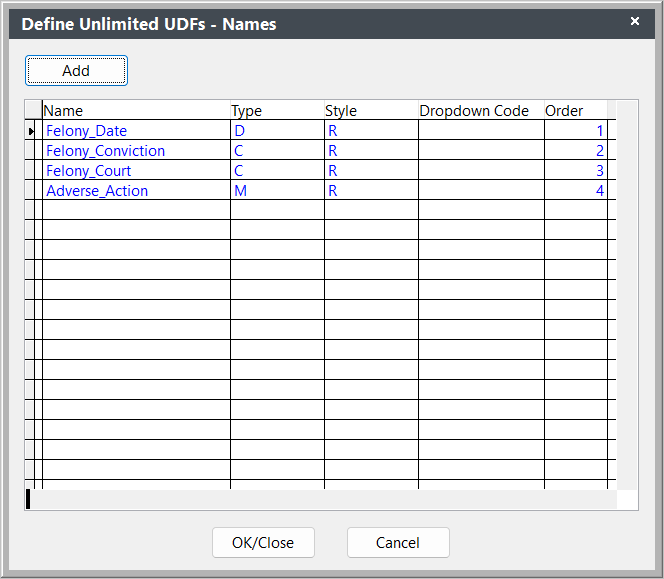
To add a new unlimited UDF, click the Add button.
Enter a name for the UDF. Enter with underscores instead of spaces. Any symbols other than underscore will be removed.
Define the field type:
- Character - can contain any combinations of characters or numbers
- Numeric - can only contain numbers
- Boolean - logical true or false (checkbox)
- Date - date field (mm/dd/yyyy)
- Memo - a virtually unlimited memo type field for storing large amounts of text
Choose the field style:
- Regular - an open text box
- Dropdown - a dropdown list (must define values in the dropdown code column)
- Memo - large text box with scroll bar and expandable view/edit mode
Dropdown Code (used when field style is set to D - Dropdown)
- name your dropdown code. The code must contain the word udf (for example: tshirtudf, udf_pants_color)
- double click the dropdown code after naming it, this will open the add code screen
- create your defined values for your dropdown list by entering their codes and descriptions
Set or change the order (optional).
Click the OK/Close button to save your fields and close the Define Unlimited UDFs screen.
Entering Data in Unlimited UDF
To enter data in the Unlimited UDF field:
- Open] the appropriate Name, Course, Faculty Manager, or Registration record.
- Select the appropriate tab or button.
Tabs
- On names, the button is on the Additional / UDFs tab.
- On courses, the button is on the UDFs tab.
- On a registration record, you must click the Additional / UDFs button.
- Click the Additional UDFs button to open the Additional UDFs window.
- After entering data, click the Save button to save your entries.
Reporting on Unlimited UDFS
You can pull in the values of your unlimited UDFS using these new functions:
Optional Modules
Topics covered in this section:
- Email Module Setup
- Email Templates
- Credit Card Management
- Credit Card Setup
Email Set Up
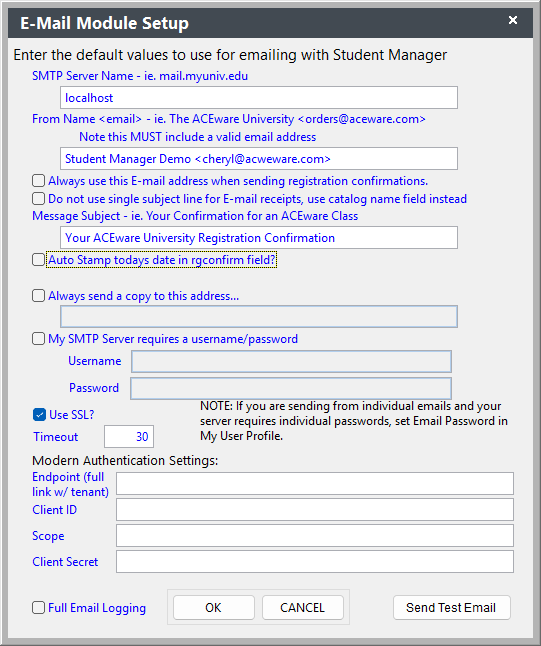
To set up the Email module:
IMPORTANT: you must be a Student Manager administrator to access Email Settings.
- Get everyone else out of Student Manager.
- Select .
Settings
- SMTP Server Name - the name of the SMTP mail server.
If you are using an *external server such as Gmail, you will need to enter a colon then the port number after the smtp server name. E.g. smtp.gmail.com:587. You must also enter information in the External Server settings (see below).
From Name <email> - The default return Sender Name and Email Address to be used if the user does not have his/her email address entered on his/her user record.
Always use this Email address when sending registration confirmations - If you want to use the entered email insteed of using the name/email address of the staff memeber sending the email.
Message Subject - The subject text you want to use for registration confirmation emails sent from Student Manager.
Do not use single subject line for Email receipts, use catalog name field instead - This option will use the name of the email template instead of the Subject entered in the
Auto Stamp today's date in rgconfirm field? - Check if you want to stamp the current date in the Confirmation field on the Registration screen (lower right of screen if enabled) each time a registration confirmation is sent out.
Always send a copy to this address - Check this box then enter an email that is to receive a BCC copy of registration confirmations.
My SMTP Server requires a username/password - If you use an external server such as Gmail, or if your SMTP server requires credentials to authentication, check this box then enter the Username and Password of the external email server account. Also requires the USe SSL option enabled.
Use SSL? - Check this box if you use an external server such as Gmail, or if your SMTP server requires credentials to authentication.
Timeout - used by legacy emailing routines to set how long to wait for a response from the SMTP mail server.
Modern Authentication Settings - If using a Modern Authentication option such as office365, enter the Endpoint, Client ID, Scope, and Client Secret into the appropriate settings.
Full Email Logging - enable more email logging including body contents. This setting should only be enabled when troubleshooting and disabled when troubleshooting is completed.
New Email Templates
You can create new templates or import templates from other sources.
Create New Template
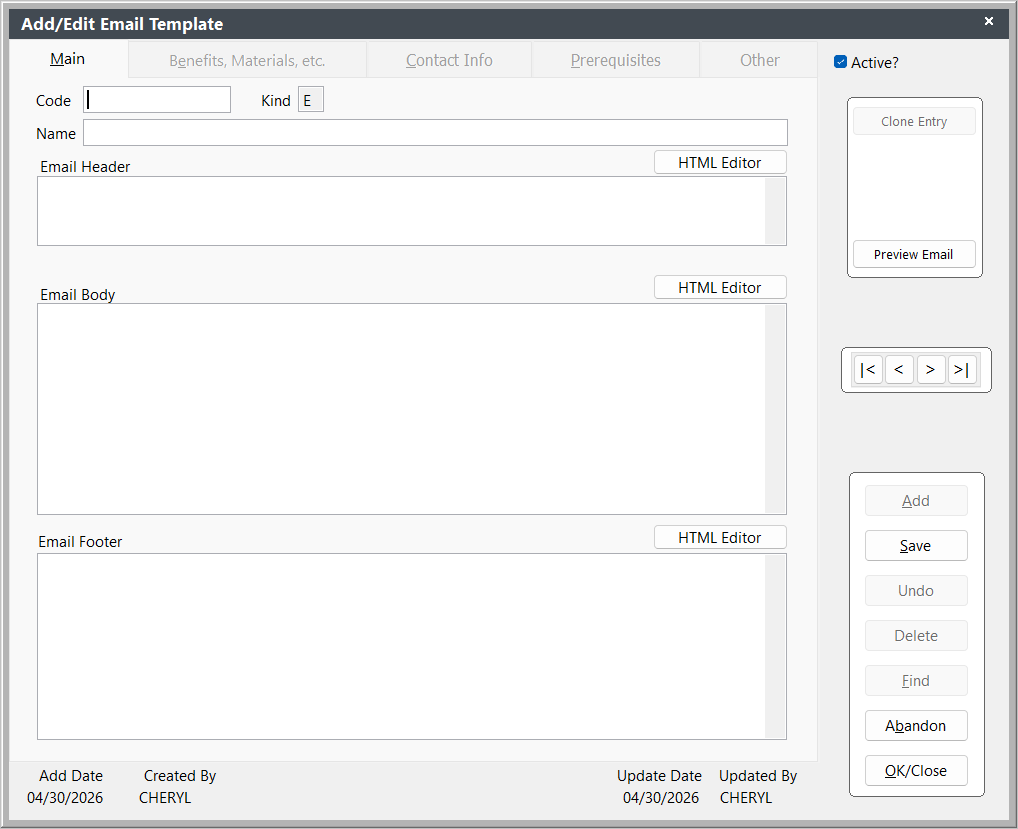
To create a new email template:
- Select .
- If the Add/Edit Email Template screen is open, click the Add button.
When the new record opens, you are ready to code your email template.
Import Template
IMPORTANT: the import file must be in DBF format.
To import email templates:
- Select .
- Navigate to the folder and select the import file.
- Click the Select button.
The records are now imported. Select to view the imported template.
Note
If you are importing a template with the same Code as an existing template, the template will not be imported.
Email Template Sections
Emails are generated from the entries in the 3 Email template fields:
- Email Header - opening message. Placed at the beginning of the email.
- Email Body - expressions that include information from the data tables. Placed between the Header and Footer and repeated for each course in the registration group.
- Email Footer - closing message. Placed at the end of the email.
Template Coding
Follow the correct Email Template Coding rules:
- Email Template Coding (Student Manager 8.0.097 and newer) - this topic covers the new rules for template coding.
- Email Template Coding (Legacy) - this topic covers the legacy template coding rules.
You may also create HTML formatted emails.
Credit Card Management
Student Manager Credit Card Processor Settings
Installation
Obtain the installation files for your Payment Service from your ACEware technician.
- Create a sub-folder called Gatecop in the Student Manager directory (e.g. c:\manager8).
- Place the PayServiceLaunch.htm and the Pay Service htm template (if any, e.g. tlink6.htm) into the Gatecop folder.
- Create a sub-folder called Extend in the Student Manager directory (e.g. c:\manager8).
- Place the gateout.fxp, gateout.ini, and gateout.log files into the Extend folder.
Gateout.INI Settings
BROWSER
Browser path. Chrome, Firefox, and EDGE are listed by default.
Note, if you have set the Preferred Browser in System preferences, Gateout will use the preferred browser setting instead.
MULTICRSE
Custom setting supported by Cashnet, Stripe, and Tlink6. If you are using this custom setting, your ACEware technician will help you enter the appropriate setting parameters.
EXTRAS
Custom setting used in some custom pay services such as Touchnet. If you are using this custom setting, your ACEware technician will help you enter the appropriate setting parameters.
ACEweb Processor Settings
Your ACEware technician will help you enter values in your ACEweb.ini for the Payment Service you use.
You may need to set values in PayService, PCCPath, and PCCMercNum.
Student Manager Processor Settings
- Get everyone else out of Student Manager.
- Select .
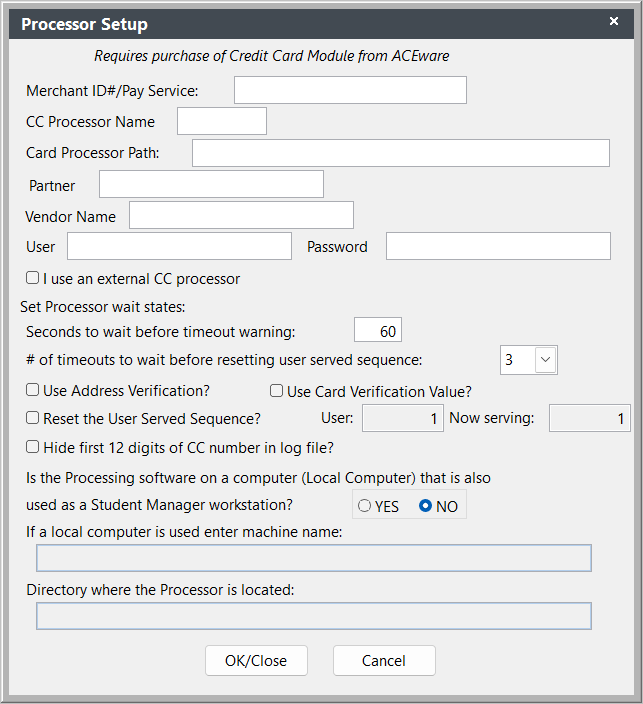
You must be a Student Manager administrator to access Credit Card Processor Settings.
Setting Descriptions
These settings must be enabled/values entered to process credit cards in Student Manager:
Merchant ID#/Pay Service - name of the Payment Service (e.g. TLINK6*, AUTHORIZENET*, PAYFLOWLINK*). If using a regular (non-redirect) payment service, the Merchant # may be entered in this setting.
Card Processor Path - path to the Gatecop directory with the trailing slash at the end (e.g. r:\manager7\gatecop\).
All Student Manager users who will be processing credit cards must be mapped to the Gatecop folder using the same drive letter (e.g. all mapped as r:\manager7\gatecop\).
I Use an External CC Processor - enables the external credit card processor (e.g. Touchnet tLink, Authorize.net, Paypal, etc.).
Seconds to wait before timeout warning? - how many seconds the system should wait before displaying the Timeout warning. For redirect services, we suggest a timeout value of at least 300 seconds (5 minutes).
Partner, Vendor Name, User, and Password - these fields are ONLY used by the PayPal service when issuing refunds.
The remaining settings are currently deprecated.
Enable Processing for Users
You must enable credit card processing for each Student Manager user who will be processing credit cards.
- Select .
- Select the Pay Preferences tab.
- Check the Validate Credit Card box.
- Click the OK/Close button.
Student Manager Tools
Topics covered in this section:
- The Catch-All Cleanup Tool
- Code Areas Cleanup
- Combining Names
- Combining a Series of Names
- Combining Firms
- Combining Faculty
- Combining Locations
- Combining Workshops
- Pack/Reindex (Remove Deleted Records)
- Backing Up Data
- System Information
- Show Logged-On Users
- Event Log
- System Lockout
- Check for Updates
- Additional Maintenance Tools
- Maintenance Schedule
The Catch-All Cleanup Tool
The Catch-All tool cleans up various records including duplicate registrations, name records with duplicate ID values, duplicate UDF records, duplicate workshop records, and duplicate Cost Center code records. It also creates missing UDF records and missing instructor pay records, and creates missing links between course and location.
To run the Catch-All tool:
- Select .
- You will be asked to confirm the cleanup option. Click the Yes button.
- The system will run the cleanup procedures then report how many records were marked for deletion.
- Click OK to close the window.
Data Cleanup - Code Areas
Clean up Student Manager code lists with the Code Area Cleanup tool. This allows you to deactivate, update and merge codes as your program needs change.
Note: when you run a Code Cleanup option, it changes the code in the Code list--AND--all associated records. For example, if you edit an Interest Code, it also changes the code on all Name records that have that Interest Code.
To run the Code Area Cleanup tool, select .
IMPORTANT
Wwe strongly recommend making a backup before running this tool.
Change Code Value
To change the name/description of a code:
- Select the appropriate Code from the Code Area drop down menu (e.g. Account, Coordinator, etc.).
- Click on the appropriate code in the list to populate the Code Value/Description fields.
- Enter the changes in the Code Value/Description fields.
- Click the Replace button to make the change.
Change Code Status
To change the status of a code:
- Select the appropriate Code from the Code Area drop down menu.
- Click on the appropriate code in the list.
- Select the appropriate status option (Active or Not-active).
- Click the Change Status to button.
Merge Codes
To merge multiple codes into one (e.g. EDUCELE and EDUCSEC to EDUC):
- Select the appropriate code from the Code Area drop down menu.
- To select multiple codes, hold down the Ctrl key while clicking the appropriate codes with the mouse button.
- Enter the new code values in the Code Value/Description fields.
- Click the Replace button to make the change.
Delete Codes
To delete a code, select it in the list the click the Delete button. The code is deleted and the code is removed from all associated records.
Combining Name Records
Student Manager has features to help you prevent adding duplicate Name records, such as assigning unique identification numbers to each record and the name matching feature. However, despite your best efforts, you may find that two records exist for the same person. In these cases, you can combine the information and all associated registrations from both records into one.
To combine two records:
- Open the 'good' record (i.e. the record you want to keep) and copy the ID #.
- Open the 'bad' record (i.e. the record you want to delete) and replace the ID # with the ID # of the 'good' record (i.e. the record you want to keep).
- The system asks you to confirm the ID # change. Click the Yes button.
- You're warned that the ID # has been assigned to someone else. Click the Combine Names button.
- The system asks you to confirm the combine records action. Click Continue.
The system now combines the information, moves all associated records to the 'good' record, and deletes the duplicate Name record. It also enters information from the duplicate record into the Contact History field on the Comments/History tab.
Duplicate Registrations
If the individual is enrolled in the same class under both names, the 'bad' registration is deleted, and any payments are moved to the 'good' registration. Any missing Registration and registration UDF values will be copied to the 'good' registration.
Combining a Series of Name Records
To combine a series of Name records, run the Combine Names utility.
Combining a Series of Names
Report and combine a series of Name records.
Report Potential Duplicates
- Select .
- Select the search option (i.e. name, email, user defined).
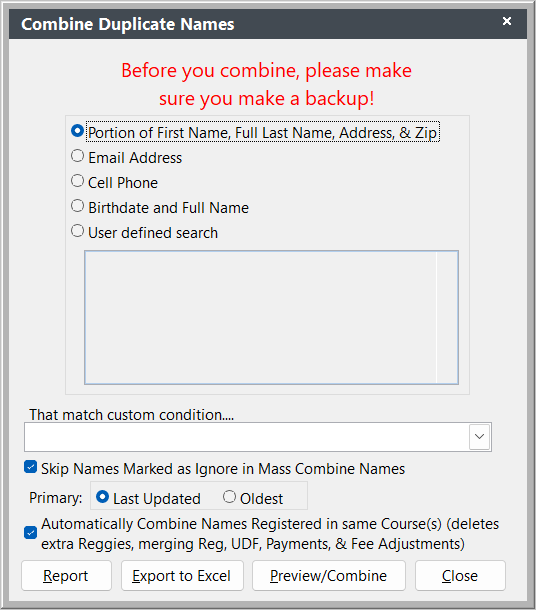
Note: search options 1 and 3 require additional information:
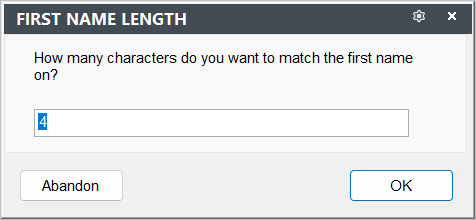
- Portion of First name, Full Last Name, Address, & Zip: enter the number of characters for first matches:
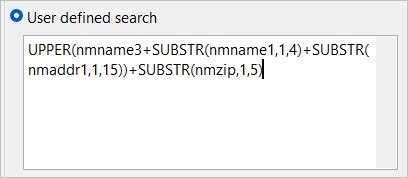
- User Defined Search: enter the custom match condition (this example matches last name, address, and zip code):
- The Skip Names Marked as Ignore in Mass Combine box is checked by default. If you want to include name records that have the Ignore this name in Mass Combine Names box checked on Name Demographics tab, uncheck the box before continuing to step 4.
- Click the Report button.
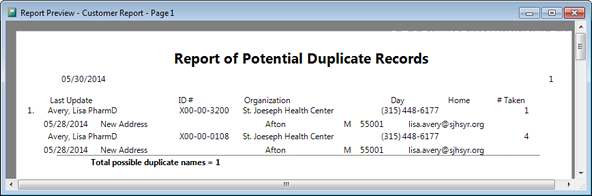
- The report preview opens showing you possible duplicates.
Combine Duplicates
IMPORTANT
We strongly recommend making a backup before running this tool.
- Select .
- Select the search option (i.e. name, email, user defined).
Search options 1 and 3 require additional information:
- Portion of First name, Full Last Name, Address, & Zip: enter the number of characters for first matches
- User Defined Search: enter the custom match condition (this example matches last name, address, and zip code)
- Click the Preview/Combine button.
- Confirm you have made a backup by clicking Yes on the Backup? confirmation box.
- The Potential Duplicates window opens showing you potential duplicates. Uncheck any that you don't want to combine. Then click the Done button.
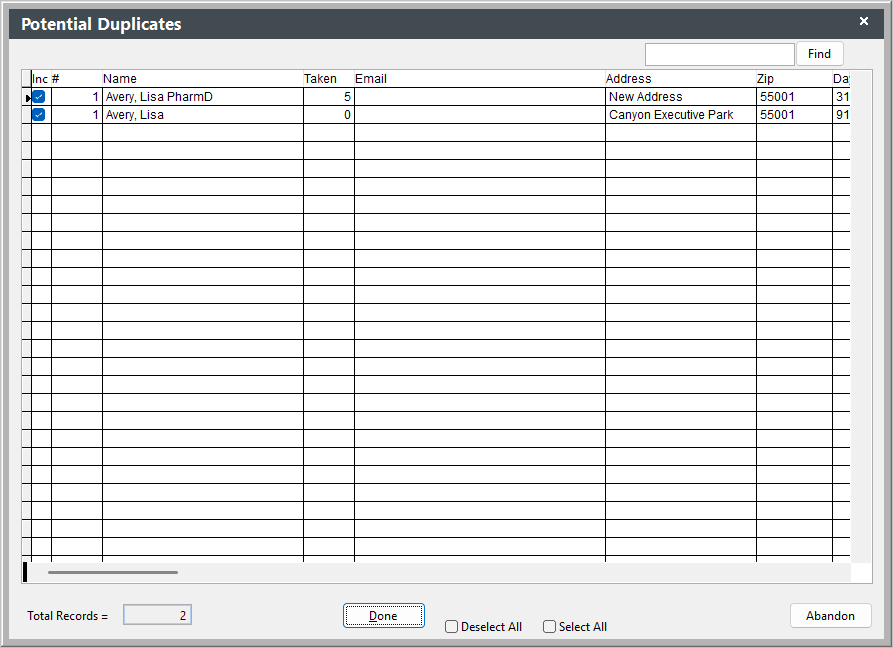
The system will now combine the selected duplicates.
You will be notified if the system can't combine some names because they are enrolled in the same course under the duplicates, and a report will open with those name records that couldn't be combined.
If you unchecked any name records in step 5, you will be asked if you want to mark the names. If you select Yes, the system will check the Ignore this name in Mass Combine Names box on Name Demographics tab on all the records you unselected.
The system will notify you when the procedure is completed. Click the Done button to close the notification window.
Click the Close button to close the Name Combine utility.
Combining Firm Records
Student Manager has features to help you prevent adding duplicate Firm records, such as assigning unique identification numbers to each record and the Firm Name matching feature. However, despite your best efforts you may find that two records exist for the same firm (e.g. one for ACEware Systems and one for ACEware Systems, Inc.). In these cases, you can combine Firm records into one and assign the correct Firm to associated Name records.
To combine two Firm records:
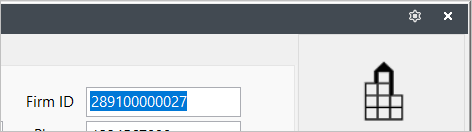
- Open the 'good' record (i.e. the record you want to keep) and copy the Firm ID (upper right of Firm screen above Phone field).
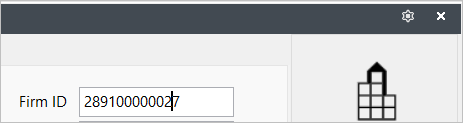
- Open the 'bad' record (i.e. the record you want to delete) and replace the Firm ID with the Firm ID of the 'good' record (i.e. the record you want to keep).
- Click the Save Changes button.
- The system will warn you that your are changing the Firm ID, and that the system will change the firm on all Name records associated with the 'Bad' Firm to the 'Good' firm. Click the Yes button to make the swap.
Data Cleanup Firms
Clean up and combine Firm records with this tool.
To run the tool:
- Select .
- Click the Refresh button to view the list of Firms.
- Enter keywords to select specific records then click the Refresh button to see the filtered list.
- Select the appropriate record in the list to make a change. To select more than one, press and hold the CTRL key while clicking the records.
- Edit the field information then click the Replace button to change the selected record(s).

Combining Records
To combine records (you have two records for the same firm):
- Select the appropriate records (press and hold the CTRL key while clicking the records).
- Click the Replace button. The firms are combined and the Name records associated with the deleted record will be linked to the remaining Firm record.
Combining Faculty Records
Student Manager has features to help you prevent adding duplicate Faculty records, such as assigning unique identification numbers to each record and the Faculty Name matching feature. However, despite your best efforts you may find that two records exist for the same faculty member (e.g. one for Arthur Alexander and one for Art Alexander). In these cases, you can combine the faculty records into one and assign the correct faculty to associated Course records.
To combine two Faculty records:
- Open the 'good' record (i.e. the record you want to keep) and copy the Faculty System ID number (lower left of Faculty screen).

- Open the 'bad' record (i.e. the record you want to delete) and replace the Faculty System ID number with the Faculty System ID number of the 'good' record (i.e. the record you want to keep).
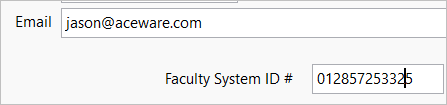
- Click the Save Changes button.
- The system will warn you that your are changing the Faculty System ID, and that the system will change the faculty on all Course records associated with the 'Bad' faculty to the 'Good' faculty. Click the Yes button to make the swap.
Combining Location Records
You may find that you have two records created for the same location (e.g. one entered as Continuing Ed Center and the other entered as Continuing Education Center).
To combine two Location records:
- Open the record you want to combine.
- Click the Combine Location button.
- Confirm that you want to combine this location into another by clicking Yes on the Combine Locations dialog.
- Select the location you want to combine it with, then click OK
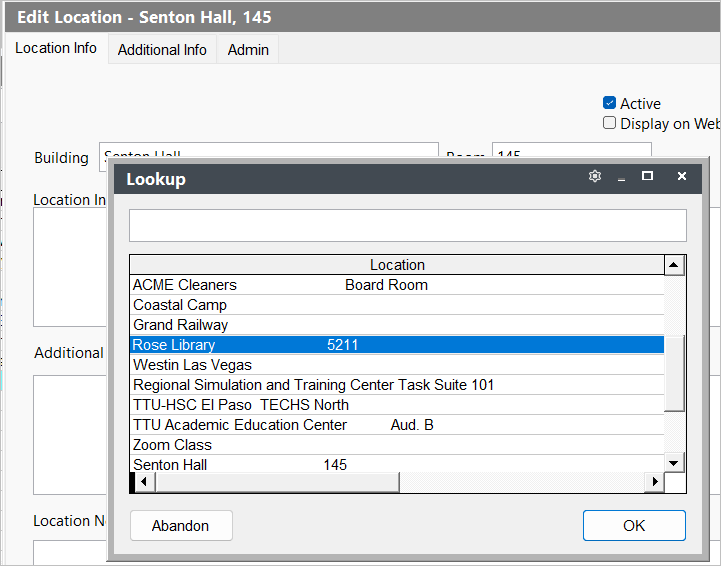
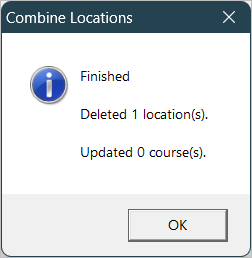
- The system will display the Finished message telling you that the location was deleted and how many courses were updated (if any).
Combining Workshop Records
You can combine duplicate workshop records.
- Open the 'good' record (i.e. the record you want to keep) and copy the Workshop Code.
- Open the 'bad' record (i.e. the record you want to delete) and replace the Workshop Code with the Worshop Code of the 'good' record (i.e. the record you want to keep).
- Click the Save button.
- You'll be warned that you are combining workshop records. Click Yes to combine the records.
Pack/Reindex
At times you may need to rebuild the database indexes to insure optimal performance. VFP users will also want to regularly remove the records that have been marked for deletion.
To run the Pack/Reindex routine:
- Confirm that all other users are logged out of Student Manager.
- Select .
VFP Users
- You'll be asked if you have made a back up recently. If you have a backup, click the Yes button to continue.
- The Pack/Reindex window now opens.
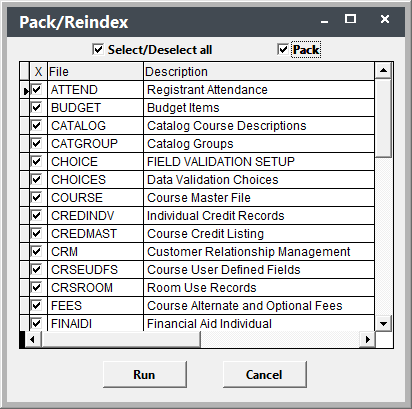
- While you may choose individual databases to reindex/pack, most of the time you’ll want to check Select All Files.
- If you want to remove all the records that have been marked for deletion, check Pack.
- Click the Run button to start the reindexing process.
SQL Users
Note: records are automatically deleted in an SQL database, so you will only use this tool to reindex the SQL tables.
- The Mark Indexes to reindex window opens. The Fragmentation column shows how much fragmentation is in each table. It is strongly recommended that you reindex if there is more 5% fragmentation.
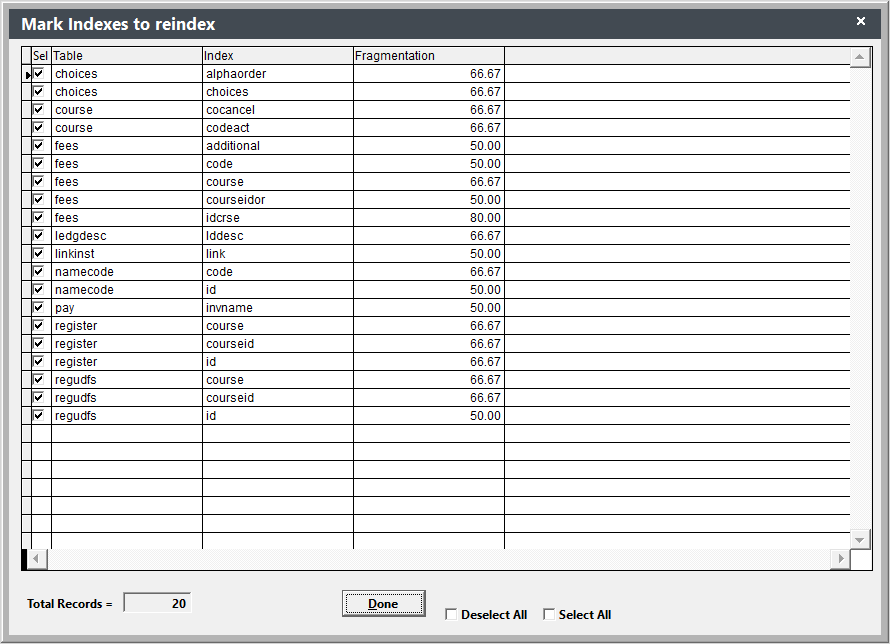
- Click the Done button to reindex the SQL tables.
The length of time it takes to reindex/pack depends upon the number of records in your database, the network speed, and the speed of your machine.
Backing Up Student Manager Data
The loss of important data ranks as the greatest fear of most computer users, and it always seems to happen at the worst possible time. Recovery, if possible at all, can cost you precious time and money.
Backing up your data regularly is vital insurance against such a "data catastrophe". And we've made it easy to back up your Student Manager data. This ensures you will have the data if your computer or server crashes. In these cases, ACEware Systems technicians can restore your system from the backed up data file.
Backup: How Often?
The question to ask yourself is: how much data am I willing to recreate if my system crashes? If you're adding or modifying a great amount of records on a daily basis, then you will want to consider a daily backup. If you work with Student Manager less frequently, then you can consider backing up once or twice a week. Archival Backups
An Archival backup is a backup of the data at the end of the month/term which you keep long term. The reason for this is that sometimes you need to go back into the past to find the status of a record (because it may have been deleted/edited/transferred in the meantime). We encourage you to do monthly archival backups, but you should keep end of term copies for 1-3 years.
VFP Backups
IMPORTANT notes about the Backup procedure:
- The Backup routine will NOT recognize paths with spaces in them, e.g. f:\Student Manager Backup\. Please back up to a folder with no spaces in the name, e.g. f:\ACEback\.
- The Backup routine will NOT recognize UNC paths, e.g. \\servername\backupfolder\. You must be running Student Manager from a mapped drive, e.g. f:\ACEback\, to use the built-in backup routine.
- The Backup routine will ONLY back up Student Manager data and log files. It will NOT backup images or files you have stored in the Student Manager folder (e.g. images you use on reports or files you are attaching to confirmation emails).
- We strongly encourage you to save your backup file to a location that is not on the Student Manager server. Or at the very least, to make a copy of the zip file after it's created and move it to a different server/machine. This ensures you have a backup of your data should the Student Manager server hard drive become corrupted or otherwise destroyed.
To back up Student Manager data files:
- Get everyone else out of Student Manager.
- Close any open Student Manager module screens, i.e. Names, Courses, Reports, etc. You cannot have any of the module screens open (or open but minimized) when running the backup procedure.
- Select to open the Student Manager Data File Backup screen.
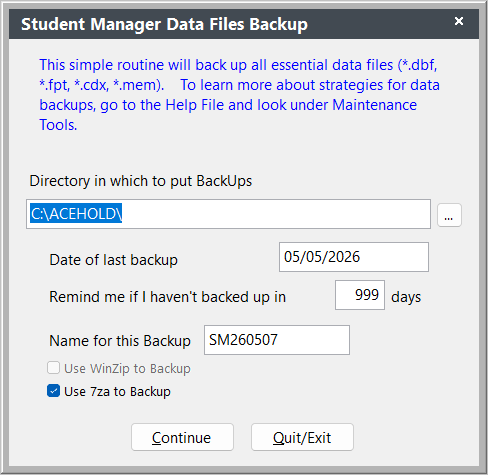
- Enter the directory in which to place the Backup zip file.
- Click the Continue button to start the backup procedure.
- The system will create a zip of your data files *only (i.e. .dbf, .fpt, .cdx, and .mem files) in the location you specified.
- The system will notify you of the backup status. Once you click the OK button on the notification window, the backup procedure window will close.
*The Backup tool will not add images or documents (such as PDFs) to your backup zip. You must discuss backing those up with the IT staff in charge of your server.
SQL Backups
The Student Manager Backup Procedure will only backup resource files (e.g. system files, query files, user files, etc.).
Since your data is in a SQL database, your local SQL Server administrator must perform data backups. Please contact them for more information about their backup procedures for your data.
Backup Program Options
Student Manager can use various tools to make the backup zip file:
- 7za - 7-Zip runs via the Command Prompt to make a .zip file of your data files. 7-Zip is open source software ↗️.
- VFP Compression - this tool will be used if you uncheck the 7za option. Note: it can be extremely slow to run on some servers.
- WinZip - some customers running Student Manager in a networked environment are not allowed to run the Command Prompt routine across the network. If you cannot run 7Za, and the VFP Compression tool is too slown, you can purchase the WinZip utility to make backup zip files. Visit the WinZip ↗️ site for purchasing information. Note: WinZip must be installed on the machine of the staff member who will be running the backup procedure. It is not installed on the Student Manager server.
System Information
To find out the number of records you have in database tables, when the last update occurred in each database, or computer/user information, select . This opens the System Information screen.
You can also see the Optional modules you are using (with the Show Optional Modules button).
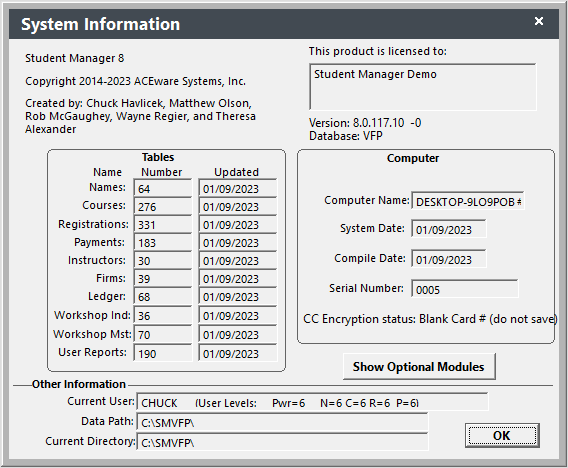
Show Users
Some maintenance routines require all other users to be out of Student Manager. For example, the Backup tool.
To see who else is logged into Student Manager, select , or use the shortcut CTRL+U, to see other users who are logged into Student Manager.

If no other users are logged in:
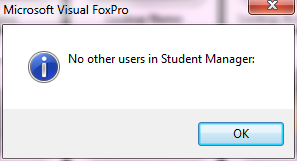
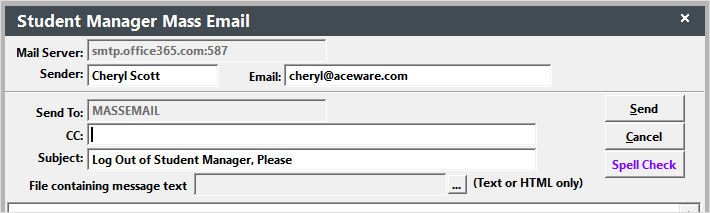
You can send an email to the logged in users from the list by clicking on the email column. Note, you must have access to send Mass emails.
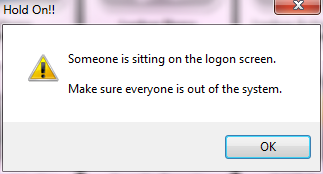
If someone has the Student Manager application open but has not logged in yet, you will see this message after closing the above.
Event Log
The Event Log provides a centralized view of system activity including task execution, errors, email history, and payment transactions. It is a read-only audit trail — events are logged automatically and cannot be modified.
Navigate to to open the Event Log.
Screen Options
The Add button, Edit button, and Search field are disabled on all tabs. The More button is only enabled on the SM Emails tab (to switch to logs for older months).
The Event Log is organized into four tabs:
Events
The main system event log. Displays events such as scheduled task execution, login activity, and system operations.
| Column | Description |
|---|---|
| Date/Time | When the event occurred |
| SM User | The Student Manager user associated with the event |
| Network User | The Windows user and computer name |
| Type | Event classification (e.g., TASK_START, TASK_COMPLETED, TASK_FAILED) |
| Message | Description of the event |
Click any row to open the full event detail, including the additional Info1 and Info2 fields which may contain extended information.
Events are displayed with the most recent entries first.
Event Types
Common event types you may see in the log:
| Type | Description |
|---|---|
| TASK_START | An auto task has begun execution |
| TASK_COMPLETED | An auto task finished successfully |
| TASK_FAILED | An auto task encountered an error |
| TASK_NOT_STARTED | A task could not start (e.g., no user configured for task execution on the computer) |
Errors
Displays application error records from the error log. Includes the error number, line number, and the program where the error occurred. This tab is useful for troubleshooting issues with your ACEware support representative.
SM Emails
Tracks emails sent from within Student Manager, including enrollment confirmations, receipts, and other system-generated messages.
| Column | Description |
|---|---|
| Date/Time | When the email was sent (or attempted) |
| SM User | The Student Manager user who sent the email |
| Status | SENT if delivery succeeded, or the error message if it failed |
| From | The sender's email address |
| To | The recipient's email address |
| Subject | The email's subject line |
By default, the SM Emails tab shows emails sent for the current month. Click More to view email logs from previous months.
Emails that are still queued and haven't been confirmed as sent are highlighted so they stand out. Double-click a row to open the Email Log Details window:
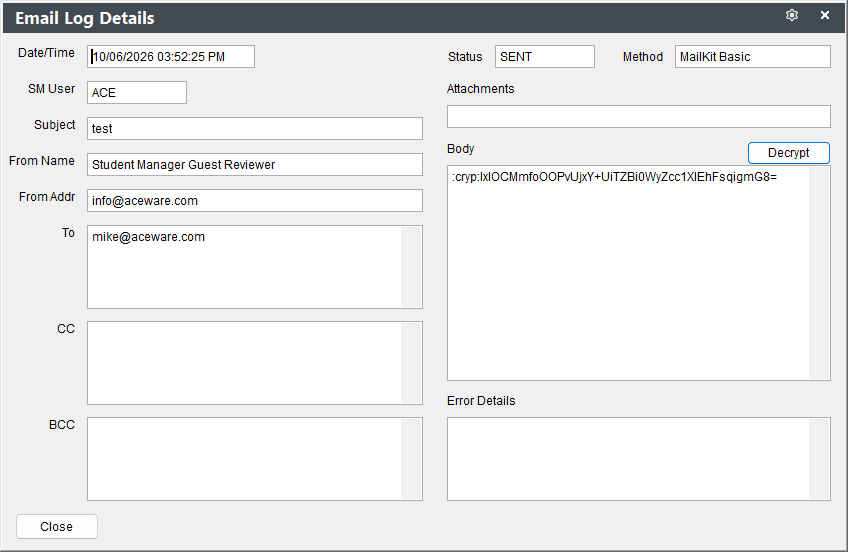
This shows the full message details — From, To, CC, BCC, Subject, Attachments, Status, and Method (e.g. AWS SES, Outlook, MailKit).
The message body is only shown if the email failed to send unless you have full email logging enabled. Message bodies are encrypted--click the Decrypt button to unencrypt the message body.
If the email is still in OUTBOX status, click Resend to reattempt sending it.
AW Payments
If you are using the Stripe, PayPal Expanded, or Authorize.net Accept payment service, the AW Payments tab will be displayed and show ACEweb payment transaction records. This tab is useful for reconciling online payment activity.
| Column | Description |
|---|---|
| Date/Time Created (createtime) | When the payment transaction record was created |
| Date/Time Finished (postend) | When the payment transaction record was finalized by ACEweb |
| Status (status) | The status of the payment transaction (e.g. CREATED, POSTED, CANCEL) |
| Result (result) | The result returned by the payment service (e.G. SUCCESS, DECLINED, ERROR) |
| Amount (amount) | The transaction amount |
| Payment Method (paymethod) | The payment method used |
| Result Description (descript) | The message returned by the payment service if the payment was not successful (e.g. card was declined) |
You may also see additional technical/internal columns used for troubleshooting by ACEware support.
Administrator System Lockout
Before running maintenance routines such as Pack/Reindex or a Backup, you should lock other users out of Student Manager and halt ACEweb. The Administrator System Lockout screen gives you the controls to do both from one place.
To open the screen, select .
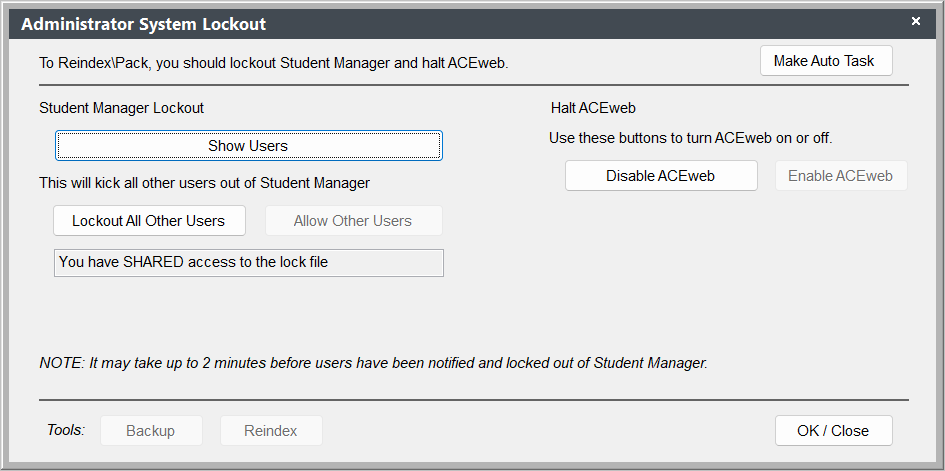
Student Manager Lockout
- Show Users — opens the Show Users list so you can see who is currently logged in.
- Lockout All Other Users — kicks all other users out of Student Manager and prevents them from logging back in.
- Allow Other Users — lifts the lockout and allows users back in. This button is enabled only when a lockout is active.
Note
It may take up to 2 minutes before other users are notified and locked out of Student Manager.
Halt ACEweb
Use these buttons to turn ACEweb on or off so online activity does not interfere with maintenance.
- Disable ACEweb — turns ACEweb off.
- Enable ACEweb — turns ACEweb back on. This button is enabled only when ACEweb has been disabled.
Tools
Once a lockout is in place, the buttons at the bottom of the screen become available:
- Backup — runs a Backup of your data and settings.
- Reindex — runs the Pack/Reindex routine.
Make Auto Task
Click Make Auto Task (top right) to save a lockdown action as an Auto Task. This lets you schedule System Lockout On and System Lockout Off to run automatically — for example, locking the system at night before a scheduled reindex and unlocking it when the routine finishes.
Tips
- Warn users first — Because lockout can take up to 2 minutes to take effect, let users know in advance so they can save their work.
- Halt ACEweb too — Locking out Student Manager users does not stop online registrations. Disable ACEweb as well before running a Pack/Reindex.
- Automate routine maintenance — For recurring jobs (nightly backups, weekly reindexes), pair an Auto Task for System Lockout On with the maintenance task and a follow-up System Lockout Off task.
Check for Updates
You can check for a newer version of Student Manager from .
If a newer version is available, you can download and update it or read the Release Notes.
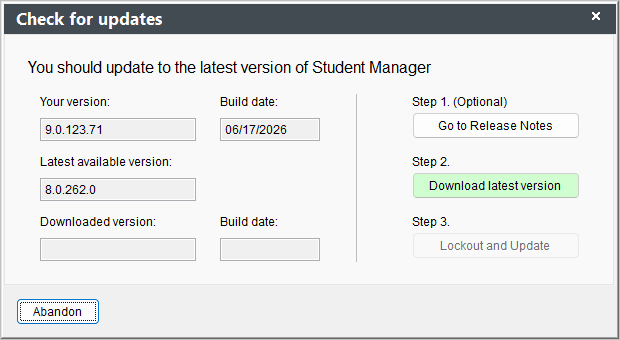
Download/Apply Update
To check for, download, and apply a Student Manager update:
Click the Go to Release Notes button to view version update notes. The system will open the Release Notes in your preferred browser (set in System Preferences).
Click the Download latest version button to download the latest version. The exe will be downloaded to the Updates folder in your Student Manager directory.
Click the Lockout and Update button to open the Administrator System Lockout window. It will check for other users and close them out of the system. When they are all out, it will apply the update and restart Student Manager for you.
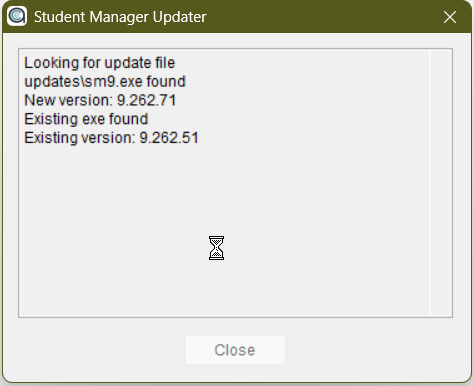
Check for Updates Message
You can enable the Show Update Message if you haven't updated in the last 90 days preference (System Preference) if you want to be notified when new versions are available.
If enabled, Student Manager will check for a new version on Tuesdays, when you log into the system.
Additional Maintenance Tools
Student Manager includes additional data-cleanup and maintenance tools. For detailed instructions on each, see the Help Center.
- Address Cleanup — set standardized abbreviations in Name address fields and fill in missing counties.
- Broken Firm Links — identify and fix broken Firm links.
- Catalog Records — clean up Catalog records.
- Document Cleanup — remove links to missing documents and catalog graphic images.
- Escrow Cleanup — remove registrations from the Escrow course that have no money in escrow.
- Locations, Course Names & Fees — clean up location records, course names, and main fee names.
- Name Interest Codes — remove blank, orphaned, and duplicate Interest Codes from Name records.
- Orphan Registrations & Payments — clean up orphaned registrations and payments.
- Zap Charge — clear balances and credits for courses.
- Course Code Transmogrification — mass edit course codes on existing course records.
- Archive Data — remove outdated data from the live system into a separate set of archive tables.
- Zip Code Updates — apply Zip Code updates when available.
- Auto Tasks — automate Student Manager operations with Windows Task Scheduler.
Student Manager Maintenance Schedule
Use this schedule as a guideline for keeping your Student Manager data in tip-top shape. Each task links to detailed instructions.
| Task | When | How |
|---|---|---|
| *Backup databases | Daily to Weekly | Tools > Backup Data |
| Reindex databases | Monthly (or as needed) | Tools > Database Admin > Pack/Reindex |
| Run The Catch-All tool to clean up various duplicates | Weekly (or as needed) | Tools > Data Cleanup > The Catch-All, Registration, Name (IDs Only), Cost Center Codes, Missing Course/Instructor Links, & UDF |
| *Remove (pack) records marked for deletion | Monthly (or as needed) | Tools > Database Admin > Pack/Reindex |
| Deactivate Courses (i.e. remove courses from registration routines) | Monthly (or as desired) | Module > Courses > Mass Change/Update/Delete/Archive |
| Upgrade system | Quarterly | Download file is available on our Downloads page |
| Clean up User Records (delete records, review access levels, etc.) | Quarterly | Tools > Password Maintenance |
| Purge Waitlists | End of Term (or as desired) | Module > Courses > Mass Change/Update/Delete/Archive |
| Clean up codes (e.g. remove unused codes, deactivate/combine codes, etc.) | End of Term | Tools > Data Cleanup > Code Areas |
| Deactivate Tracking Codes | End of Term | Module > Codes > REGISTER: Tracking Codes |
| Combine Duplicate Names | End of Term | Tools > Data Cleanup > Combine Names |
| Purge Room Use Records | End of Term/Year (for previous term/year) | Module > Courses > Mass Change/Update/Delete |
| Combine Duplicate Firms | Twice Yearly | Tools > Data Cleanup > Part 2 Firms |
| Clean up Additional Reports | Twice Yearly | Tools > Reports > Activate/Deactivate Reports |
| Clean up Orphan Registrations and Payments | Monthly | Tools > Data Cleanup > Orphan Registrations & Payments |
| Clean up unused Queries | Twice Yearly | From appropriate Report Area (e.g. Reports > Registrations > Rosters) |
| Lock Courses | End of Fiscal Year | Module > Courses > Mass Change/Update/Delete |
| Archive Data | Annually (or as needed) | Module > Courses > Mass Change/Update/Delete |
| Clear Old Holidays | Annually | Module > Holidays > Clear Old Holidays |
* Database Type Notes
- Backups - if you are using the SQL or Postgres database type, your database administrator is responsible for backing up the database. Running the Backup tool in the SQL/Postgres version only backs up resource files such as .mem files, user files, system files, and logs.
- Pack Procedure - if you are using the SQL or Postgres database type, the Pack procedure is not available because records are automatically deleted in the SQL/Postgres version.