

PostgreSQL (Postgres) Setup
This guide covers moving your Student Manager data to the PostgreSQL (Postgres) version, including setting up the ODBC driver and DSN, preparing the database with pgAdmin 4, and porting your Visual FoxPro (VFP) tables to Postgres.
Requirements for Moving to PostgreSQL Server
- Upgrade Student Manager and ACEweb to the latest versions before you can convert data to PostgreSQL.
Latest version of PostgreSQL installed on the target server (enterprisedb.com ↗️). - Latest Postgres ODBC ↗️ driver installed on any machine that connects to the database (including the server where Student Manager and ACEweb reside).
- Latest version of pgAdmin 4 installed on the target server.
PostgreSQL Installer
The Postgres installer offers to install it, so you may already have it. However, the bundled version may not be the latest, so you may prefer to install it separately from pgadmin.org ↗️.
- Obtain the conversion files from your ACEware technician and place them in your Student Manager folder.
Setting up DSN
The DSN must be set up on the server and all workstations that will access Student Manager.
- On 32-bit machines, find Data Sources (ODBC) in Administrative Tools (usually in Control Panel). On 64-bit machines, open
C:\Windows\SysWow64\odbcad32.exe. - Go to the System DSN tab.
- Click Add.
- Select PostgreSQL ODBC Driver (UNICODE).
- Click Finish.
- For Data Source, give it a meaningful name (e.g.
acewaresm). - For Database, give it a meaningful name (e.g.
acewaresm). - For Server, enter the name or IP address of the server. If installing locally,
localhostshould be fine. - For User Name and Password, use whatever was set during the installation of Postgres. The default is usually
postgres/postgres. - Description is optional.
- Set SSL Mode based on whether this is a secure environment. Hosted environments should be set to
allow; a local environment is usually set todisable(since you don't have a certificate installed).
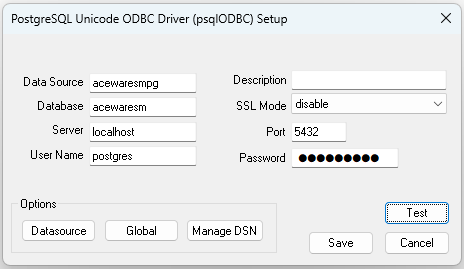
- For the Port, the default is
5432, but use whatever was set during installation. - Click Datasource.
- Uncheck Bools as Char.
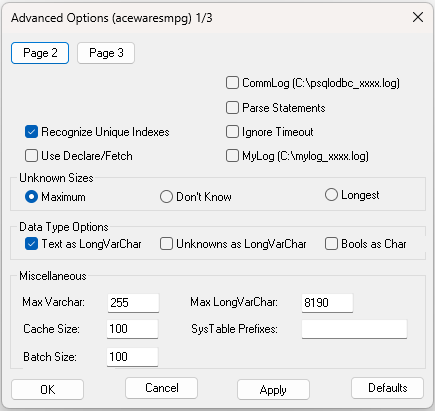
- Click OK to close the Datasource screen.
- Click Test to verify that everything communicates properly. At this point you should get an error that your database name doesn't exist (since it hasn't been created yet) — but there shouldn't be any other issues.
- Click Save to close the Setup screen.
- Click OK to close the ODBC screen.
Database Preparation with pgAdmin 4
- Launch pgAdmin 4.
- It should launch the Register - Server dialog automatically. If not, right-click Servers and click Register, or hit Add New Server from the Quick Links.
- Give it a Name that makes sense to you (e.g.
acewaresm). - On the Connection tab, enter the same Host name/address you used for the Server value in the ODBC Setup.
- Fill in the Port.
- Leave Maintenance database alone.
- Enter the Username and Password, and turn on the Save password slider.
- On the Parameters tab, set your SSL Mode as you did in the ODBC Setup.
- Click Save.
- pgAdmin should now connect to the maintenance database. Click the arrow next to the Name you gave in step 3 to expand it.
- Right-click Databases and go to Create > Database.
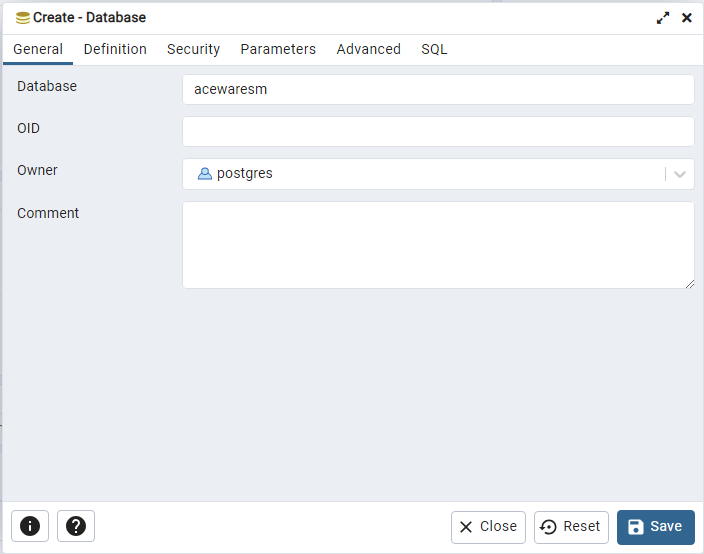
- Give it the same name you used for the Database in the ODBC Setup.
- With the new database name highlighted, go to Tools > Query Tool in the menu (or right-click and select Query Tool). At this point you can retest the ODBC driver, as the database it connects to now exists.
- Click the Open File icon:
 .
. - Find the
student_manager_db_init.sqlfile wherever you saved it and open it. - Click the Execute icon:
 .
. - You should see a Query returned successfully message when it is done.
- Click the Open File icon again.
- Find the
westwind.sqlfile wherever you saved it and open it. - Click the Execute icon.
- You should again see the Query returned successfully message.
- To verify that the tables were created, expand Schemas > Tables. You may need to right-click and click Refresh.
Porting VFP Tables to Postgres
- Get everyone out of Student Manager.
- Run
vfp2pg.exe. - Type in the name of the database you created for the Data Source in the ODBC Setup.
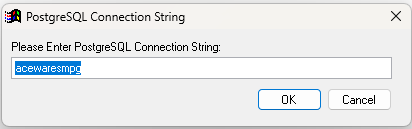
- Click OK.
- Let it run. It will cycle through table names and other relevant messages in the upper-right corner.
- While it is running, create a file named
pgconnect.inicontaining the same Data Source name, and save it to the Manager folder. - In
aceweb.ini, put the Data Source name in theSqlconnectstringin the[Main]section. In the[AceCode]section, put the Data Source name in thePgconnectstringentry (create it if it doesn't already exist). - When you get the Finished message in the
vfp2pg.exewindow, verify that the tables were created in pgAdmin.
Installing ACEweb PostgreSQL Version on a New Server
If you are installing on a new server, obtain the SQL install file from your ACEware technician and install ACEweb.
Upgrading Current ACEweb Install to PostgreSQL Version
If you are upgrading a current ACEweb install, upgrade, obtain the SQL version update file and follow the steps to upgrade to it before continuing these steps.
Registering the aw4.exe
After applying the SQL version upgrade, you must register the new aw4.exe. Open a command prompt window, navigate to the inetpub\aceweb folder, then register aw4.exe, e.g.:
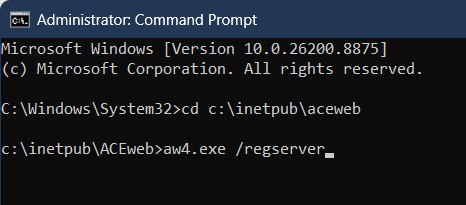
DCOM Configuration
You may need to edit the properties of the new aw4.acewebserver. See the DCOM Settings section of the ACEweb Mode Setup topic for more information.
Web.config and ACEweb.ini Changes
Edit the
web.configin theinetpub\wwwroot\wconnectfolder and make the following changes:- Change the
ComServerProgIdsetting toaw4.AceWebServer. - Change the
ExeFilesetting to point toaw4.exe. - Change the
UpdateFilesetting to point toaw4.exe.

- Change the
Make the following changes in the ACEweb.ini (in inetpub\aceweb):
- Enter the ODBC Data Source Name in the
PGconnectstringin the[Main]section. This is the name entered in step 8 of the Setting up DSN section. For example: `PGconnectstring=acewaresm'. - Set the
DebugFlagsetting toTABLE:(if it's not already set). - If you have not already enabled admin error emails: turn on the
AdminSendErrorEMailINI setting, enter the email server inAdminMailServer, and an email inAdminEmail. - Update
Datapath, andPccPathif necessary, to the Student Manager directory. This is only necessary if you have moved your Student manager folder.
- Enter the ODBC Data Source Name in the
Set Application Pool Identity
You must set the Application Pool to a user that has rights to access the PostgreSQL database.
WARNING
You cannot run the PostgreSQL version under the SYSTEM account. It must run under a specific domain account. See the permissions topic for more information.
Load the COM Server
- Go to the
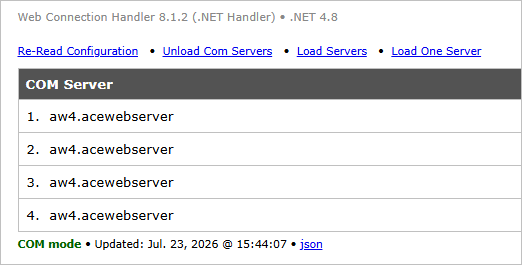
admin.aspxpage and click the Web Connection MOdule Administration link. - Click the Unload Com Servers link, then the Load Servers link.
You should now see the aw4.acewebserver COM Server(s) running.
ACEweb Template Changes
Some template changes may need to be applied to run the SQL version. Run the FileManager.awp tool to see what templates may need to be updated.
Maxlength on Fields
PostgreSQL won't truncate values. If a user tries to enter a value longer than the field length (e.g. a city longer than 20 characters), they will get this error on submit:
[SQL Server]String or binary data would be truncated. [1526:8152]To avoid the error, fields on all templates that submit data to the SQL tables must have a maxlength set to the maximum length of the field. This applies to the following main templates: Attachments.awp, Attendtrack.awp, ChangePwd.htm, CourseProposal.awp, Credentials.awp, CustomRegister.htm, Gradebook.awp, Person.awp, Proxyreg.awp, Register.htm, Xperson.awp.
You can get updated templates (with maxlength values set) via the File Manager tool.
Re-apply Customization
If you need updated templates, you will need to re-apply any customization to the new template.
This also applies to any custom express registration and data capture templates in use, and to any nameudfs fields used on person.awp and proxreg.awp. If you are adding fields to those templates, ensure they have the correct maxlength value set.
Custom Routines
- Any custom routines or templates you have ordered will need to be reviewed and updated for PostgreSQL.
- Any Express Registration templates you are using must be reviewed for PostgreSQL compatibility.
Please contact your ACEware technician for help with the review.
Compile Framework Pages
Once you have all template updates in place, you must recompile your .awp type templates. Run the AWP Compiler and click the All Templates button to recompile all .awp templates.
Alternate Interfaces Using Different PostgreSQL Database
If your alternate interface uses a different database than the main interface, you must set the AlternateSQL to ON in the alternate interface's ini setting file (e.g. awp1.ini).