

Supplemental Data Capture Page
A Supplemental Data Capture page is used to collect additional name and registration data for a course. For example, collect T-shirt size, meal preference, birth date, age group, etc.
Create Data Capture Template
- You should have a copy of the sample datacapture.htm template in your wconnect\ace\custom folder.
- Make a copy of the file and give it a relevant name (e.g. SDACE010A [SD for supplemental data]).
Note: do NOT use the course or grouping code as the name. Those naming conventions are reserved for custom course status, express registration, and group pages.
- Save the new file, putting it into the Custom Templates folder (i.e. wconnect\ace\custom).
Associate Template w/Course
Associate your Supplemental Data Capture template with the course by entering the file name into the Data Capture Page field on the Course ACEweb Info tab.
When the user adds the course to the Enrollment Cart, ACEweb will check the field to see if there is a supplemental data capture template for the course. If there is:
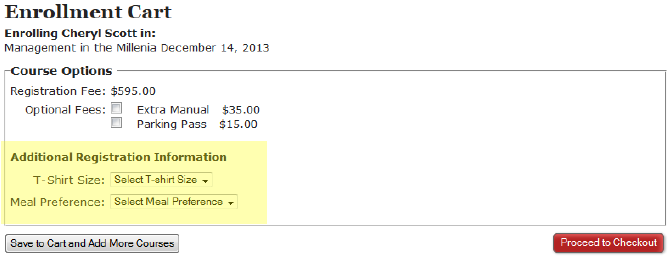
i If you are using the ECDC INI option, the Supplemental Data Capture fields are shown on the Enrollment Cart page:
i If you are not using the ECDC INI option, the Supplemental Data Capture fields are shown on a separate page that comes up after the registrant clicks an Add button (e.g. Add More Courses or Proceed to Checkout):

Adding/Editing Fields
Follow these rules when adding/editing fields:
The Name attribute of your fields must conform to the following conventions:
Example: name="txtc0rudfc1"
Characters 1-3 - HTML field type:
- txt – open box for entry of text, numbers or dates
- lst (letter L, not number 1) – drop down selection list
- chk – check box or radio button
Character 4 - Database field type:
- c–character
- n–numeric
- d–date
- l-logical
- memo
Character 5 - Required flag:
- 0 – not required
- 1 – required (user must fill out field before continuing)
Remaining Characters - the full field name.
Available fields: rgcode, rgstatus, rgcnfirm (date), rgptcert (date) from REGISTER, any field from NAMES, any Name or Register UDF.
Please see Requiring Fields section (below) for more information about required fields.
Each field must include a Value attribute, even if it has no entry. E.g.:
Text/Numeric/Date Field: value=""
Checkboxes: the Value on checkboxes must be set to ON (value="ON").
Radio buttons: the value of the Yes option must be set to ON (value="ON"); the value of the No option must be blank (e.g. value="").
Option in a select box: value="Small".
To display an existing NAMES or NAMEUDFS entry, enter the appropriate expression in the Value attribute, where field is the name of the field.
NAMES fields: value="##oName.oData.field##"
NAMEUDFS fields: value="##oName.oUDF.oData.field##"
NAME/NAMEUDFS/REGUDFS Checkboxes - if using checkboxes from NAMES, NAMEUDFS, or REGUDFS the following hidden field must be added* to your Supplemental Data Capture template, below the ##ECDC## tag:
<input type="hidden" name="ReqChex" value="">The value attribute must list the full names of any logical fields you are using. Multiple fields should be separated by commas, e.g.: value="chkl1nmsmsopt,chkl1nudfl2".
*This hidden field is included on newer sample templates. If it already exists on your template, just add the names of your required fields to the value setting.
SQL Users - Maxlength
If you are using an SQL database, all the open fields must have a maxlength value set to the length of the field. E.g. nameudfs character type field # 1 (nudfc1) has a length of 20 characters so you need to have maxlength="20" set on the field.
Note: you do not need to set a maxlength on drop down fields, checkboxes, radio buttons, textarea fields, or date fields.
Requiring Fields
Requiring a field means the user must select a valid, non-blank, option. Here are specific rules when creating required fields:
- You CANNOT require a checkbox or radio button type field with Yes/No options. The No option is the logical equivalent of a blank value.
- You CAN use a checkbox type field to require the registrant to check some kind of "I agree..." box. If you use this option, the following hidden field must be added* to your Supplemental Data Capture template, below the ##ECDC## tag:
<input type="hidden" name="ReqChex" value="">The value attribute must list the full names of any logical fields that the user must check. Multiple fields should be separated by commas, e.g.: value="chkl1rudfl1,chkl1rudfl2".
*This hidden field is included on newer sample templates. If it already exists on your template, just add the names of your required fields to the value setting.
- Selection Drop Down Lists - there are 2 rules that apply to select tags:
- You must add a "Select [something]" option to your select tag with a blank value. This "Select.." option must be the first one in your list. The blank option will be displayed in the drop down and the system will not allow the user to continue until they select a valid option from the list. E.g.:
html<select size="1" name="lstc1RgCode" value=""> <option value="">Select T-shirt Size</option> <option value="Small">Small</option> <option value="Medium">Medium</option> <option value="Large">Large</option> </select>produces this selection drop down box. The user cannot continue until they select a size from the drop down because the value of the Select -T-shirt size option is blank.

- If using a numeric field, all options must be valid values that are greater than 0.00 because 0.00 is the numeric equivalent of a blank value.
ECDC INI Option Users
If you are using the ECDC INI option, you must add the ECDCflag hidden field to the ##-DataCapture-## section of the XEnrollCard.htm template, with the value set to On:
<input type="hidden" name="ECDCflag" value="ON" />
ACEweb will check that required fields have been completed before the registrant continues past the Enrollment Cart page.
To enable validation for required fields, add a required class to the input tag (or select tag if using) of the required field, e.g.:
<input name="txtc1nmmembnum" id="MemberNumber" class="required" size="14" value="##oName.oData.nmmembnum##" />
This option requires an updated copy of XEnrollCard.htm. Please contact your ACEware technician for more information.
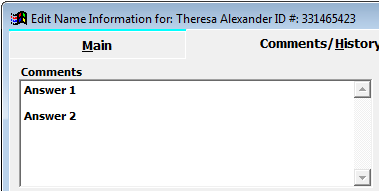
Append Data to Name Comments
You can append several values to the Name Comments field on the Comments tab. For example, you can save several essay answers to the field. To do so, name each field you want appended to the Name Comments field: txtm0appendnmcomm:
Question 1:
<textarea name="txtm0appendnmcomm"rows="2" cols="50" value="" tabindex="75"></textarea>
Question 2:
<textarea name="txtm0appendnmcomm" rows="2" cols="50" value="" tabindex="80"></textarea>
Note: if the fields will be required, change the 0 to a 1 (i.e. txtm1appendnmcomm).
The information entered in the fields will be appended to the Name Comments field--with line breaks between the field entries, in the order in which they appear on your template:
Unlimited UDFS
To use Unlimited user defined fields:
- (Configure) the fields in Student Manager
- You must use the embedded Data Capture form method, by setting ECDC INI to ON in your ACEweb.ini
- If you need to require a field, you must use the appropriate javascript provisions for those fields
- The ECDCflag hidden field must be added to the ##-DataCapture-## section of the XEnrollCard.htm template, with the value set to On:
<input type="hidden" name="ECDCflag" value="ON" />
- The Name attribute must use the "txt" prefix, followed by "nudfu_" if a Name Unlimited UDF, or "rudfu_" if a Registration Unlimited UDF, followed by the UU field name. Example:
<input name="txtrudfu_dance_partner" id="rudfu_dance_partner" value="" size="20" tabindex="43" maxlength="20" />
- For Name records, you can prepopulate the value attribute by referencing properties of the oName.oUUData object, whose values will match the stored UUDFs values.
<input name="txtnudfu_fun_code" id="nudfu_fun_code" value="##oName.oUUData.fun_code##" size="20" tabindex="40" maxlength="20" />
- If the UUDF has been configured with a set of drop down choices, you can generate an HTML dropdown by referencing a session var with the prefix NUDFDrop_(or RUDFDrop_ ) followed by the field name. i.e:
##Session.GetSessionVar([NUDFUDrop_movie_genre])##