Editing Queries
You can edit, copy, and rename queries.
Edit Query
- Highlight the query you want to edit.
- Click the Edit button.
- The Query screen opens.
You can now edit the query elements.
Add Additional Elements
To add another element to a query:
- Click the Add button.
- Select the connector you want between the two elements:
- And - means that BOTH items must be true for a record to be included in the result.
- Or - means that if ‘EITHER ONE’ of the items is true it will be included.
- Continue with the query process (selecting field, etc.).
- After completing the steps, you'll be returned to the Query screen. Click the OK button to save your query changes.
Edit Query Elements
To edit a query element
- Click the Edit button.
- Click the element you want to edit. Note: if there is only one element in your query, the system will skip this step and take you to step 6.
- The Query Editing Instructions window opens. After reading the instructions, click OK to close the window.
- When editing query elements, the system starts with Step 3 of the Creating a Query routine and works backwards through the steps.
- If you need to edit Step 3: Enter Value only - make the necessary change and click the OK button. This will return you to the Query window.
- If you need to edit Step 2: Pick Operator - click the Cancel button. This returns you to Step 2. If the change you need to make is on Step 2 (i.e. change from 'Begins with' to 'Exactly Matches') you can make it now. The system will then move you forward to Step 3.
- If you need to edit Step 1: Select a Field - click the Cancel button on Step 3 then click 'Step Back' on Step 2. This will return you to step 1 where you can select a different field. Since you selected a new field, you must complete Steps 2 (pick the operator) and 3 (enter a comparison value) again.
- After completing the steps, you'll be returned to the Query screen. Click the OK button to save your query changes.
Delete Query Element
To delete a query element:
- Click the Delete button. The first element in the list is automatically highlighted.
- Click the element you want to delete.
- The element is removed from the Query screen.
Move Query Elements
To move a query element:
- On the Query screen, click the Move button. The first element is automatically highlighted.
- Click the query element you want to move (e.g. if you want to move the second element, click it).
- Click where you want to move the query element (e.g. if you want it to be the first in the list, click the first query element). The element will move to your chosen position--the other query elements will be shifted down.
Note: when moving queries, you may also need to change the connector (AND/OR) and/or re-bracket elements.
Multiple Element Connectors
You may occasionally need to create a query with a combination of elements. For example, you need courses between two dates except for courses which have "MGT" in the course code AND are offered by a specific department.
The most important thing to keep in mind is whether you want one, some, or all the conditions to be true:
All conditions must be true - make certain you use the AND connector. This means that if any single condition is not met, the record is not included (e.g. the course must begin between the two dates, AND not include "MGT" in the course code, AND have a specific coordinator).
One of the conditions must be true - use the OR connector. This means that if the record meets one of the conditions, it will be included (e.g. the course must begin between two dates, OR must not contain "MGT" in the course code, OR must have a specific coordinator).
Combination of conditions must be true - you may need to use a combination of connectors along with the bracketing feature to govern how the query is analyzed.
Bracket Query Elements
Some queries cannot be reliably used unless elements are bracketed to determine the order of execution of the elements. Conditions inside the brackets will always be evaluated before any conditions outside of the brackets. If you are using a combination of ANDs and ORs you should ALWAYS use brackets!
To insert brackets:
- Click the Bracket button.
- Click the Insert button.
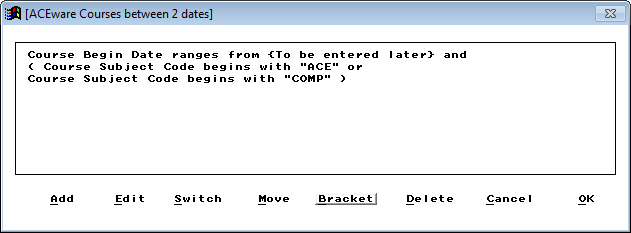
- Click the first condition you want included inside the brackets (e.g. Course Subject Code begins with ACE).
- Click the second condition you want to include inside the brackets (e.g. Course Subject Code begins with COMP).
You're conditions will now be bracketed (i.e. parenthesis are placed around the conditions):