

Blacklisting Email Addresses
Student Manager can keep a Blacklist of email addresses of people who no longer want any emails from your office.
Blacklisted emails are added to a database, if you try to add that address again at a later time (into a Name record), the system will warn you that you have previously blacklisted the email.
To enable the blacklisting option, select then select the System tab and check the Enable Email Blacklist System box.
Blacklist Single Email
To blacklist a single email address, open the Name record and delete the email address from the E-Mail field then click the Save button.
When you save the record, the system will ask you if you want to blacklist the email address:
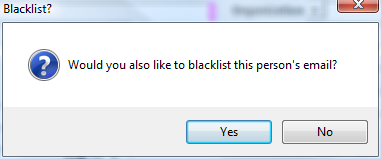
Click Yes to blacklist the email address.
Blacklist Multiple Emails
To blacklist a series of email addresses-OR-a single email address that is assigned to multiple Name records:
- Select .
- Enter the email address you want to blacklist in the Email Address field.
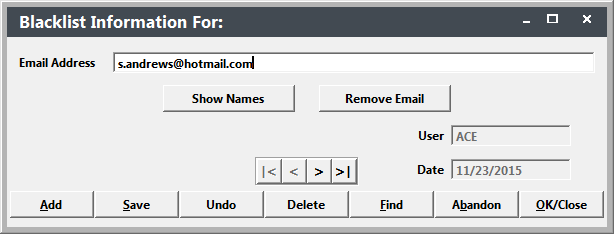
- If you want to see the Name records associated with the email address, click the Show Names button.
- To remove the email address from all Name records, click the Remove Email button.
Entering Blacklisted Email Address in a Name Record
If you add the email address to a Name record after blacklisting it, the system warns you that it's been previously blacklisted:
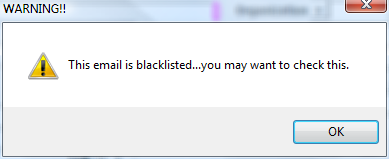
Note: this is only a warning. The system will not remove the blacklisted email address from the record when you click the OK button on the WARNING!! window.
Deleting Email from Blacklist
To delete an email address from the Blacklist:
- Find and select the email address.
- Click the Delete button.
- Confirm the deletion by clicking Yes on the Confirm Delete window.
IMPORTANT
This only removes the email address from the Blacklist. It does NOT add it back to Name records it was previously associated with.