

Group Registrations
The Grouping feature allows you to group registrations together. You can then make a single payment that the system automatically distributes among the registrations in the group. You can also print a single receipt that will show the payment detail for the grouped registrations.
If you have the Prompt for Grouping feature enabled, the system will prompt you to group when adding new registrations.
Click the Yes button to group the registrations together then continue with the registration process (i.e. select the course in which to register the individual).
When you're returned to the Registration screen again, you'll see the Group box is checked.

You'll also see new information in the Totals Box (Group Total Due, Group Total Paid, and Group Balance).

View Group Members
You can view the members of your group by clicking the Show Group button. This allows you to verify that you have grouped the correct records together before making a payment.

You may view the other member's registration records by selecting the appropriate individual from the list and pressing the ENTER key.
Group Existing Registrations
Group existing registration records together (e.g. employees of a company register in courses that will be paid by the company with one check).
- Find and select the first individual in the group.
- When the Registration screen opens, check the Group box.
- You’ll be asked if you want to link the registration with another group. Click the Yes button.
- *Select the registration you want to include in the group.
- After you select the course, you’ll be returned to the registration screen. Click the Save button.
*By default, the search list will only include registrations added in the time period you have set in the Show Groupings for the last days preference in Registration Preferences. You can override that by changing the Show groupings for the last days number on the Search window:

Mass Group Registrations
The Mass Group tool finds classifications of people and allows you to group registrations with balances.
Run the Mass Group tool by selecting or pressing the F8 key.
When the option window opens, select the appropriate option:

- Select the group. E.g. if you chose Firm in step 2, find and select the Firm.
- Select the Invoice option.
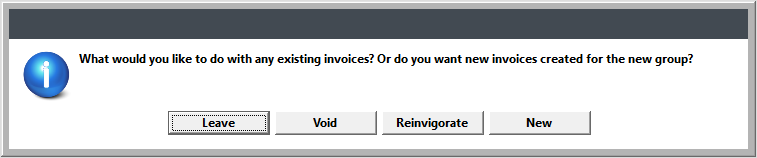
- Leave - All invoices are left alone.
- Void - Voids any invoice(s) attached to these registrations.
- Reinvigorate - Voids any invoice(s) attached to these registrations. Only creates a new billing record for those that already were being billed.
- New - Voids any invoice(s) attached to these registrations. Everyone gets a new bill!
- The system brings up a list of registrations with the group you selected in step 3. Check all you want to include in the group.
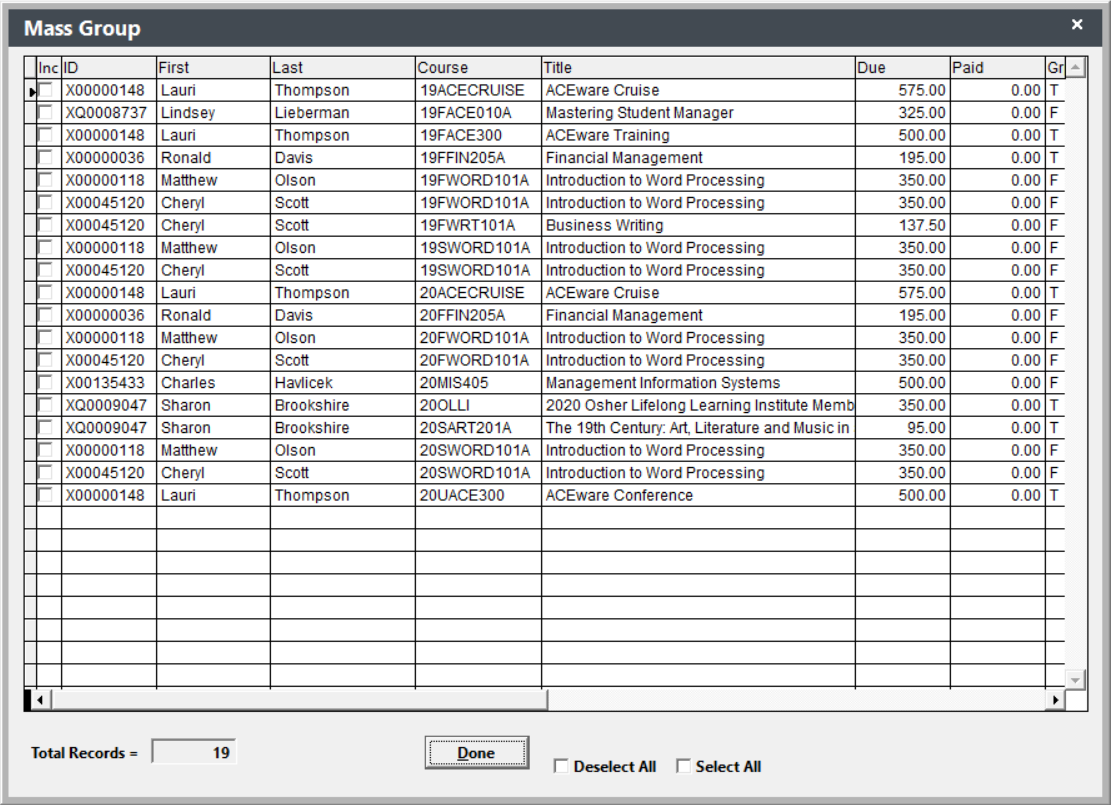
- Click the Done button to group the registrations.
- Click OK on the Process Complete notification window.