Email Confirmations/Receipts
To email a receipt:
- Open the appropriate Registration record.
- Click the Print Receipt button to open the Receipt Options screen.
- Select the appropriate option from the Receipt drop down menu:
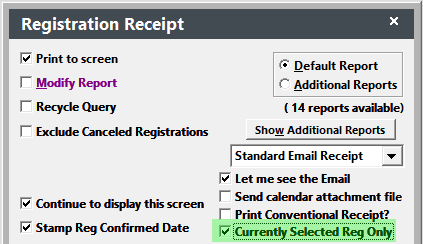
- Standard Email Receipt – send an email using the default template (E_Mail) (see Note below).
- User Defined Email Receipt – send an email using a user defined email template.

Note
You can set the Email template to be used for a course when selecting the Standard Email Receipt option. To do so, select the template from the Receipt Template drop down list on the course Additional Info (UDFs) tab.
However, the template will ONLY be used if the registration is not grouped with others. If it is grouped, it will use the E_MAIL template when choosing the Standard Email Receipt option.
- If you want to preview the email before it's sent, also check Let me see the Email. Otherwise, the email will be automatically sent when you click the OK button.
- If you don't want to also print a conventional receipt, uncheck the Print Conventional Receipt? box.
- If you want to include a Calendar attachment file (file with session information that registrant can import into their Calendar software program--IF--the software program supports .ics files), check the Send Calendar Attachment File box. It will also include links to add the event to the users' calendar.

Note, this option will only add the first session to the Calendar. It will add a note about additional sessions:

- If you have a registration group, and want to send an email for one registration in that group, click the Currently Selected Reg Only box. It will generate the registration confirmation/receipt for the current registration only.
Click the OK button. If you did not select the option to see the email, you will now see a notification window telling you the email was sent.
If you selected the option to see the email, the Email screen opens. Select the appropriate email options then click the Send button to send the email. If you did not select the option to see the email, the system will take you to step 9.
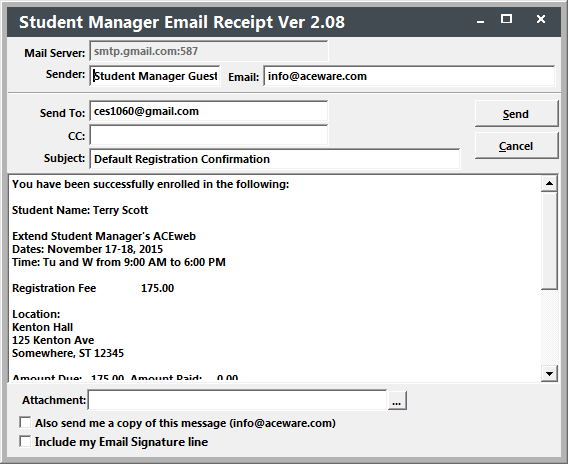
- You’ll also be asked if you want to now print a conventional receipt. Select the appropriate option.

- If you selected the Auto Stamp today’s date in rgconfirm field option in your Email setup, the system will stamp the current date in the Confirmed field.

Confirmation/Receipt Subject
You can use the following options for the Confirmation/Receipt Subject:
- Default Text Subject
- Default Text Subject with Course Code and Title
- Email Template Name
Default Text Subject
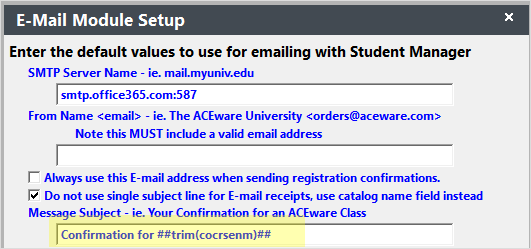
The Default Subject is set in the Email Settings, in the Message Subject field. To edit the setting:
- Get everyone else out of Student Manager.
- Select .
To include the course code and title:
- In the Message Subject field, enter the course fields enclosed in the ## delimiter. E.g. ##trim(cocrse)## for course code, ##trim(cocrsenm)## for course title.
Email Template Name
For this option, you must enable the Do not use single subject line for E-mail receipts, use catalog name field instead box checked in the Email Settings.
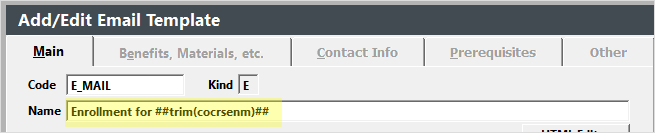
This option uses the Email template's Name value as the subject of the confirmation/receipt.
You can also include Course Code and Title in the Email Template Name:
- Select or .
- Select the template you want to edit.
- In the Name field, enter the course fields enclosed in the ## delimiter. E.g. ##trim(cocrse)## for course code, ##trim(cocrsenm)## for course title.