

Windows Server Configuration
Configuration requirements for the server on which ACEweb is installed.
Web Server (IIS) Role
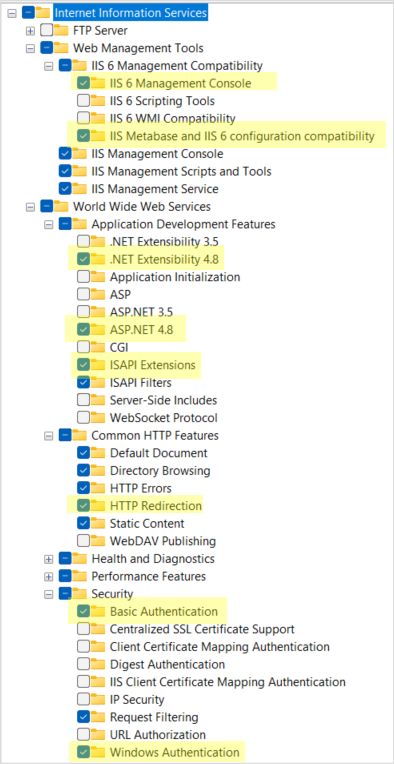
The *Web Server (IIS) role- must be installed and correctly configured before you install ACEweb. In addition to the default role services (e.g. Common HTTP Features, etc.), ACEweb requires these additional services to be installed:
- IIS Metabase and IIS 6 Configuration compatibility
- IIS Management Console
- ASP.NET (4.0 or later)
- .NET Extensibility (4.0 or later)
- ISAPI Extensions
- Basic Authentication
- Windows Authentication
- HTTP Redirection
*For more information about installing the Web Service (IIS) role, please see Windows Server documentation ↗️.
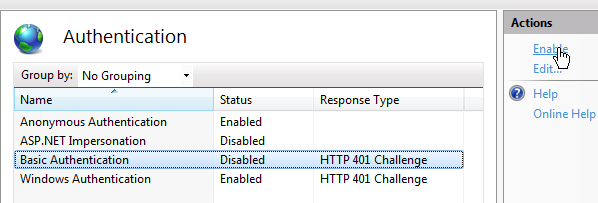
Enable Authentication in IIS
The installation of Basic and Windows Authentication with the Web Service (IIS) role does not enable the options. You must enable them in IIS to log into Web Connection Server Maintenance routines.
To enable them, start Internet Information Services (IIS), navigate to the Default Web Site, and double-click the Authentication icon. Click on the authentication option then click the Enable link in the Actions section.
West Wind Application Pool
The West Wind Application Pool should have been created during the install process and set on the Wconnect Application. This will allow you to run ACEweb pages with wconnect in the URL (e.g. ../wconnect/showgroups.awp).
If you want to run ACEweb pages from the web server root, you must also assign the West Wind Application pool to the Default Web Site. To do so, right-click the Default Web Site then choose Manage Web Site > Advanced Settings. You can then change the Application Pool value.

If you cannot use the West Wind WebConnection application pool on the Default Web Site, please see the Default Web Site Application Pool section.
Required .NET Version
ACEweb requires .NET version 4.5 or higher. The correct version must be set in the West Wind WebConnection application pool's Advanced Settings (set to v4.0):

If you don't have v4.0 listed in the drop down, you will need to install it on the server. Get the latest .NET Framework for the Microsoft site:
https://www.microsoft.com/net/download/framework ↗️
To determine what version of .NET is installed on your server:
Default Website Application Pool
If you cannot use the West Wind WebConnection Application Pool on the Default Web Site (or the website in which you installed ACEweb), you will need to remove the .AWP, .WC, and .WCS script maps from the Default Web Site. If you don’t, and you are running in COM mode, you may see some errant behavior issues.
You MUST also add wconnect to the path of your ACEweb links (e.g. /wconnect/showgroups.awp), using the Template Converter. For more information, contact your ACEware technician.
Note: removing the scripts from the Default Web Site may also remove them from the Wconnect application/virtual directory. So you may need to manually add them back after removing them from the Default Web site.
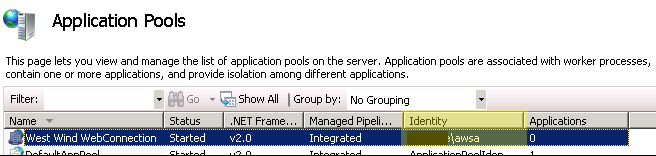
Application Pool Identity
If you are using the VFP version and your data resides on the same server as ACEweb, the Application Pool Identity can be set to the LocalSystem.
If the Student Manager data resides on a different server or you are using the SQL version, the West Wind Application Pool Identity must be set to the ACEweb User account.
To check the Identity, select Application Pools (from the IIS Connections pane) and check the Identity for the Web Wind WebConnection application pool.
To set the Identity, please see the Setting the Application Pool Identity section of the COM Mode Setup topic.
DCOM Security
If you are setting Application Pool Identity to the ACEweb User account, you may also need to give the user Launch and Activation permissions. Please see the ACEweb DCOM Settings section of the COM Mode Setup topic for more information.
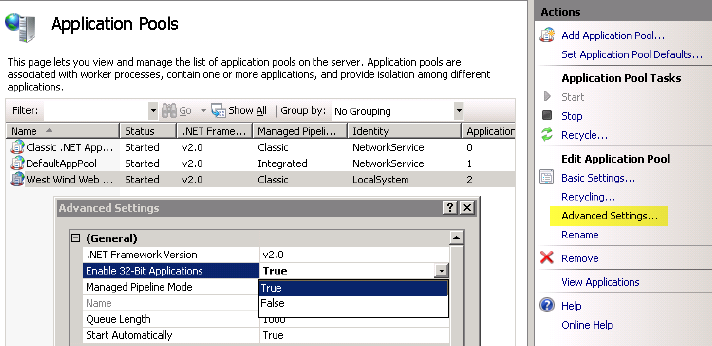
64-Bit Configuration
To run ACEweb on a Windows 64-Bit server, you must enable the 32-Bit Applications option on the West Wind Web Connection Application Pool (in IIS Manager):
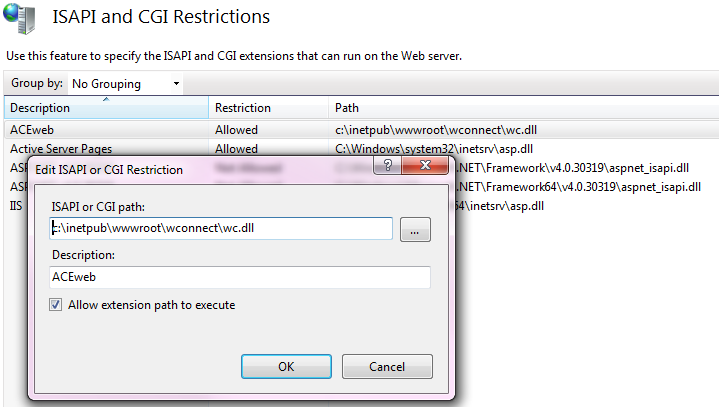
Allowing ISAPI Extension
After installing ACEweb, you may need to allow the ISAPI Extension for the wc.dll in IIS.
In the IIS Manager, click on the Computer Name in the left pane, then double-click the ISAPI and CGI Restrictions icon. Make certain that the Allow extension path to execute box is checked on the ACEweb Extension (Path should be to wconnect\wc.dll):
ACEweb Manager Handlers
ACEweb requires .AWP, .WC, and .WCS managed handlers. These handlers are added to the web.config installed into the wconnect folder during the install process.
To manually create Managed Handlers:
- Select the Default Web Site in the IIS Manager.
- Double-click the Handler Mappings icon in the IIS section.
- Click the Add Managed Handler link in the Actions sidebar.
- On the Add Managed Handler window, enter:
*.awp in the Request Path field
Westwind.WebConnection.WebConnectionHandler in the Type field
AWP in the Name field
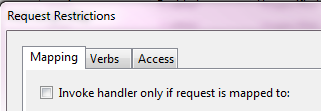
- Click the Request Restrictions button and make sure the Invoke Handler only if request is mapped to: box is NOT checked. Then click the OK button on the Request Restrictions window.
- Click the OK button.
Repeats steps 4-6 to add the WC and WCS managed handlers (entering the appropriate values in the Request Path/Name fields, e.g. *.wcs/WCS and *.wc/WC).
Web Domain
You will need to set up a web domain for the ACEweb server (e.g. webreg.youruniversity.edu).
SSL Certificate
If you will allow users to add/edit personal information and process credit card charges online, we strongly recommend you purchase and install an SSL certificate on the ACEweb server.
You will enable SSL and use the https:// designation in the Web Server URL during the install process.