

Formatting Elements
Once you’ve added fields to your report, you may need to apply special formatting. For instance, you may want a dollar sign in front of a money field and commas in the appropriate places. To apply formatting to a field:
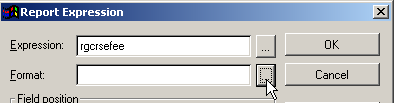
- Double click the appropriate field to open the Report Expression window.
- Click the Ellipsis button to the right of the Format Field to open the Format window.
This window allows you to set the appropriate formatting options. When setting formatting options, you use the 9s as placeholders for the field characters. For example, the following displays the Registration Fee field with the dollar sign in front of the amount. The 9s entered are place holders, telling the system how many digits of the amount to display. In this case, it displays 4- digits of the dollar amount and two digits of the cents. It will also include the thousand comma if the amount is 1,000 or greater.

*Note: in currency fields, you must always put in one more place holder for the $ sign. For instance in the above example, there are 5 digits for the dollar amount but only 4 digits of the dollar amount will show for this field because the 5th digit is the place holder for the $ sign.
Character Options
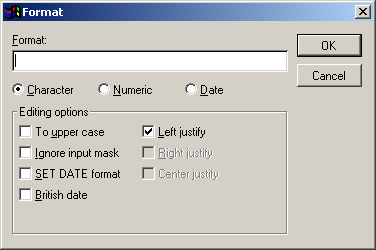
Example:
(999) 999-9999 X9999
Applies the standard phone format to a phone field, e.g.:
(785) 537-2937 X1234
Note: when applying formats to character fields, you MUST also enable the Ignore Input Mask option.
Number Options
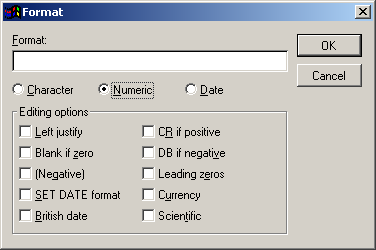
Example:
999,999.99
Displays 6 digits of the amount and 2 decimal places with a comma in the 1,000 place.
Note: if you want the dollar sign to be displayed, enable the Currency option (remember you must put in one more placeholder for the dollar sign).
Date Options
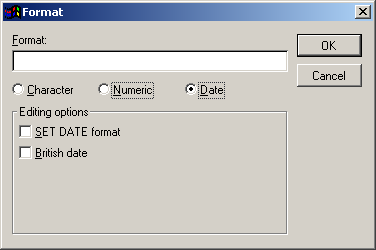
For the most part, Report Functions are used to format date fields instead of the Date Format options. However, if you want to display the date in British format (i.e. dd/mm/yyyy), you may set that option on this window.
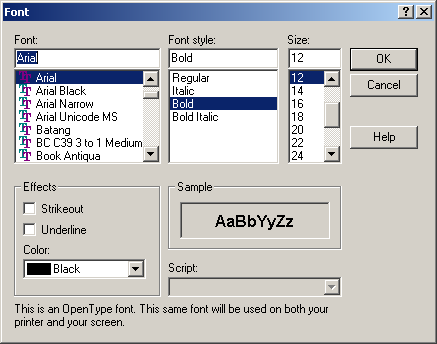
Default Font-New Elements
You may change the report's default font for all NEW elements added to the report (it will not change the font on existing report elements). To set the default report font:
- Select .
- Select the Default Font for the report.
- Select any appropriate Font Style, Size, and Effect options.
- Click the OK button.
The default font is now set for all new report elements.
Font Properties-Existing Elements
To change the font properties of a text entry or field/expression box:
- Click on the text/expression box to highlight it (highlighted elements have small black handles, called Adjustment Handles, around them).

- Select Format > Font to open the Font Properties window.
- Select the appropriate font properties (e.g. style, size, etc.).
- Click the OK button to save your font changes and return to the report template. Your changes will be applied to the element(s) selected.

Resizing Expression Boxes
You can make an expression box wider so that the contents fit on one line (unless you're working with a Memo field which has more than 1 line of data. For these fields, you will want to enable field stretching--see below). To resize an expression box:
- Click on the expression box to highlight it. This displays the Adjustment Handles.

- Grab the appropriate Adjustment Handle and drag it to expand or retract the field.

Stretch with Overflow
You may choose to let the contents of a field wrap to the next line if the expression box is not wide enough to display the entire field contents.
- Double click the expression box to open the Report Expression window.

- Select the Stretch with overflow option.
- Click the OK button to close the window and return to the report template.
Object Positioning
If you are using variable length fields with the Stretch with Overflow option, you may need to set the position of other elements in the report band with the Field/Object Position option.
For example, you enabled stretching on the course title field. You've also placed the course begin date field directly under the course title field. With no position option set on the course begin date field, if the course title wraps to the next line it will print over the course begin date.

To keep this from occurring, you must set the appropriate position option for other objects under the variable length fields. To set the position:
- Double click the object to open the Properties window.
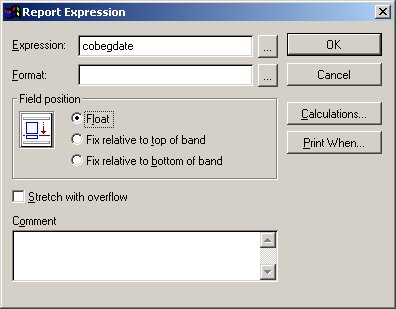
- Select one of the following options:
- Float – maintains the position of the object relative to the other fields (information moves down according to length of field information above it). This is the best option to use if you have several variable length fields in the report band.>
- Fix relative to bottom of band – maintains the position of the object relative to the bottom of the band (information will always display at the bottom of the band). This is the best option to use if you only have one variable length field in the report band.>
- Fix relative to top of band – maintains the position of the object relative to the top of the band (information will always display at the top of the band). This is the default option and is best to use when none of the fields in your report band are of variable length.
- Click the OK button to close the window and return to the report template.