

Make Payments to an Invoice
There are several ways to pay invoices.
Single Registration
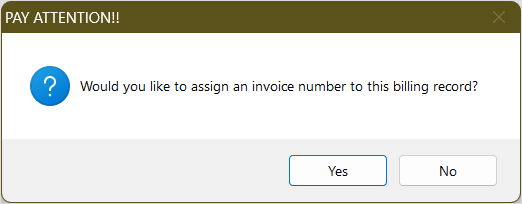
If an invoice includes one registration only, you can apply a payment using the regular payment routine with the Apply Payment (to Invoice) button. Note, if you have not yet assigned an invoice number, this routine will ask you to assign one:
Multiple Registrations
To make a payment to an invoice that includes multiple registrations:
- Select or Module > Invoices > Outstanding Invoices (by Date Range).
- If viewing all outstanding invoices, find and select the appropriate invoice. If viewing outstanding invoices by date range, enter the range of dates then select the appropriate invoice.
- The Payments for Invoice screen opens. Enter the payment information, then click the OK/Close button.
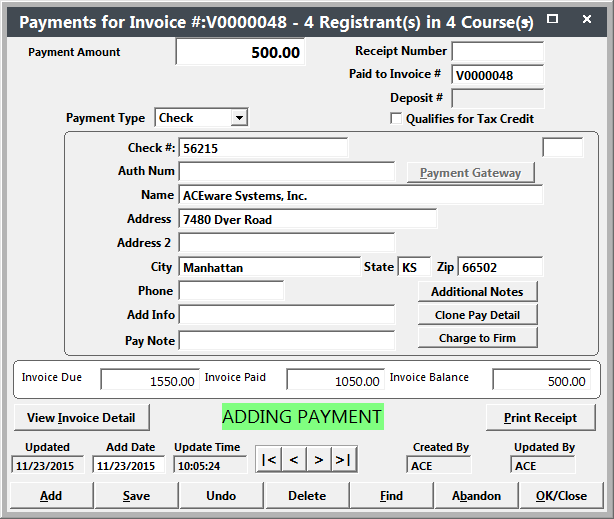
- The system will distribute the payment among all registrations assigned to the particular invoice (i.e. divides the payment among all registrations associated with the invoice, creates a payment record for each registration with the appropriate payment amount, and assigns the same receipt number to all the payment records). It also enters the Invoice number in the Paid to Invoice # field on each payment. The system uses this field when determining if an invoice is paid.

Multiple Invoices
You can pay multiple invoices with a single payment.
- Select .
- Select the invoices you want to pay on the Select Invoices to Pay screen, then click the Done button.

- The Payments for Invoice screen opens. Enter the payment information, then click the OK/Close button.
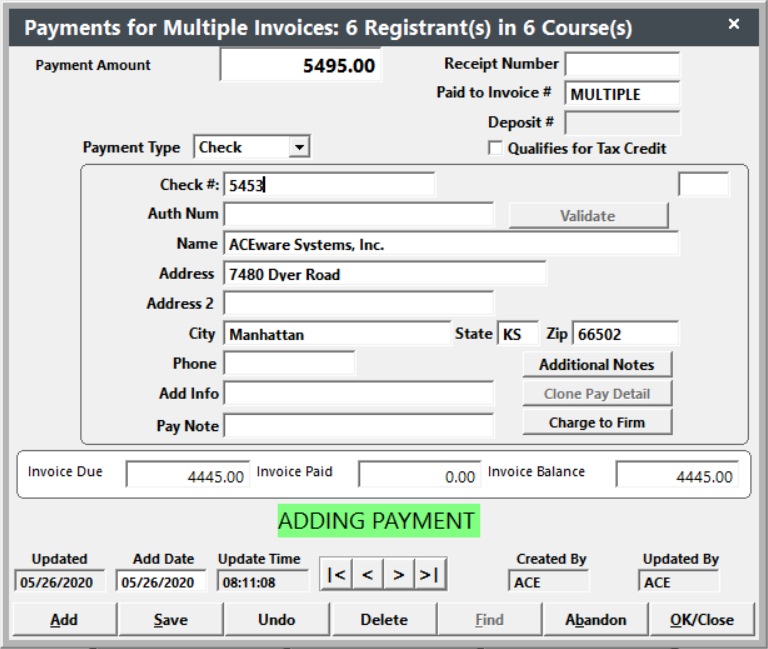
- The system will distribute the payment among all registrations assigned to the invoices you selected. The correct invoice number will be entered in the Paid to Invoice field on each payment.
- You can also print receipts by clicking Yes on the Print Receipt? window.
No Invoice Number
Occasionally, you may have someone who makes a payment to a billing that has not been invoiced yet. It's possible to make a payment to these billings without first creating an invoice.
Note: if there is more than one registration which should be part of this invoice, you must group the registrations before you complete this routine to have them assigned to the same invoice.
To make a payment to billings which haven't been invoiced:
- Open the registration and click the Payments button to open the Payment screen.
- On the Billing record, click the Apply Payment (to Invoice) button. When you click this button:
- The system assigns an invoice number to the billing record(s).
- Opens a new payment record and enters the assigned invoice number in the Paid to Invoice # field.
- Enter the payment details (i.e. select pay type, enter payer details, etc.).
- Click the Save button to save the payment.
Partial Payments
To make a partial payment to an invoice:
- Select .
- Find and select the appropriate invoice from the Invoice list.
- The Payment for Invoice screen opens. Enter the appropriate payment information (i.e. payment type, amount, etc.). Note: by default the Payment Amount field will show the entire amount owed for the invoice. Be certain to enter the correct amount before continuing with step 4 (e.g. if $1200.00 is owed on the invoice but only $800.00 was paid, you must change the amount to $1000.00).
- Click the OK/Close button.
- The system will now ask how you want to distribute the payment. Choose the appropriate option.
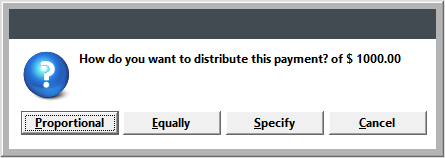
- Proportional - applies percentage of payment to each registration (e.g. 40% of total due is assessed to one registration, so 40% of payment is applied to that registration).
- Equally - applies an equal amount to each registration.
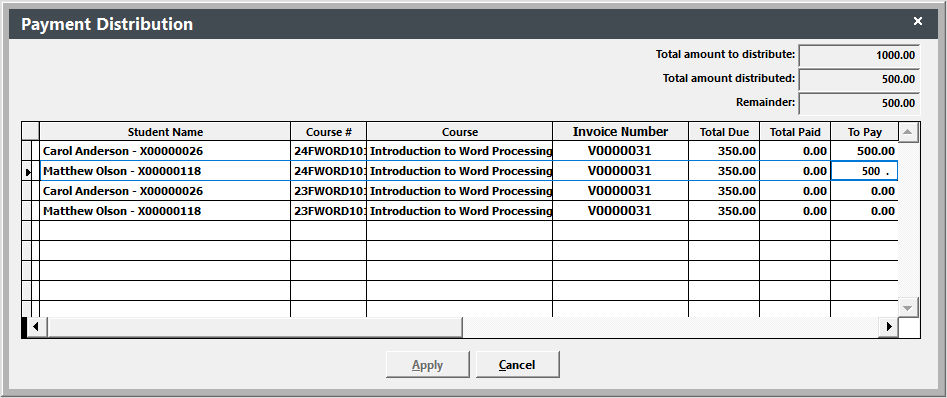
- Specify - allows you to determine how much to apply to each registration. When you select this option, the Payment Distribution screen opens. Enter the amount you want to apply to each registration in the To Pay field. Then click the Apply button to save the payments and return to the Payment screen.
- Click the OK/Close button to close the Payment screen.