

Installing ACEweb
Installation Instructions for installing ACEweb.
Before You Install
Please verify that these conditions are met before you begin the installation process:
- The server meets the System Requirements ↗️.
- You have physical or remote access (e.g. via Remote Desktop) to the web server on which ACEweb will be installed.
- You are logged in to the web server as an Administrator.
- The Administrator account you log in with must have full control of the Student Manager data folder (i.e. rights to access/add/edit/delete files in the folder).
- Windows Internet Information Server (IIS) is installed on the web server with the appropriate features enabled (Server Configuration).
- IIS is running when ACEweb is installed.
- You have a Student Manager logon with administrator rights. You will need this to verify install paths, edit INI settings, etc.
- Determine the ACEweb Running Mode you will use and set up the appropriate account permissions (give the account access to the data folder, etc.). Note: some permissions will not be set until after ACEweb is installed.
Information Requested
You will need to provide the following information during the installation process.
- Data Path – you must enter the location of the Student Manager program folder.
- Web Server URL - URL that will be used for the ACEweb site, e.g.
https://www.aceware.com. - Logo – used in web page headers.
- Organization Name/Address – used in the web page footer.
- Organization Contact Phone/Email - used on Help pages, and in emails.
- Webmaster Email Address - who to contact if there are web page issues.
- SQL version: SQL Connection String - the SQL database name.
Installation Instructions
- Your ACEware technician will send you the install file. Copy it to the server where ACEweb will be installed.
- Double click the install file to start the ACEweb install procedure.
- The ACEweb Welcome screen opens. Click the Next button to proceed.
- The Choose Setup Folder screen opens next. The default install path will be listed in the box. You may choose another install directory if you wish, but you will need to change the future instructions accordingly (i.e. steps 7a, 16).

- After selecting the install folder, click the Next button to proceed. The ACEweb files will now be extracted.
- When the extraction process has been successfully completed, the Setup Complete screen opens. Click the Finish button to complete the install process.
- The ACEweb Installer screen opens next. Enter the following information on the System Info tab:
- the path to your Student Manager data directory (e.g. c:\manager8). Note: if the Student Manager database is on a different server, you must enter the NetBios name (e.g. =\\DataServer\SharedFolder\Directory\).
- your Web Server URL (e.g.
https://www.yourdomain.edu) - don't enter the trailing slash. If you have an SSL certificate already installed, enter the https:// designation and check the SSL box. You can enter the IP address of the server, or use localhost (e.g. http://localhost) if a web domain has not been set up yet.- ACEweb SQL Version: if you are installing the SQL version of ACEweb, check the SQL Server Data box and enter the SQL database name into the SQL Connection String box:

- Click the Next button then enter the requested information on the Organization Info tab:
- Institution Name - used in web page Headers, contact/help messages, and emails.
- Address - used in web page Headers.
- City/State/Zip - used in web page Headers.
- Webmaster’s address - used in web page Footer, and for some error messages.
- Helpdesk Phone and Helpdesk Email - phone and email address shown to users who need help.
- Hours of Operation - shown on Contact Us page.
- Location of your logo image - used in web page Headers. The system will copy it from its current location into the wconnect/ace/images folder. If you don’t want to use a logo on the page, check the Remove Logo box. If you want to use a logo but don’t know the location of your logo, leave this field blank. The default logo will be used until you place a copy of your logo in the Images folder.
- Click the Next button to continue.
- The Server Configuration Wizard screen opens at Step 1 – Create virtual directory. Complete the following:
- Select the IIS .NET Handler (Win 10,8,7,Vista,2008,2012) (preferred) Web Server version from the Please start by selecting the Web Server you want to configure drop down list.
- If you are not setting up the virtual directory in the Default Web Site, click the Advanced IIS Site Selection link and select the appropriate Web site.
- Check Create or update a Virtual Directory. The Virtual and the Path fields should be entered for you based on your install path.
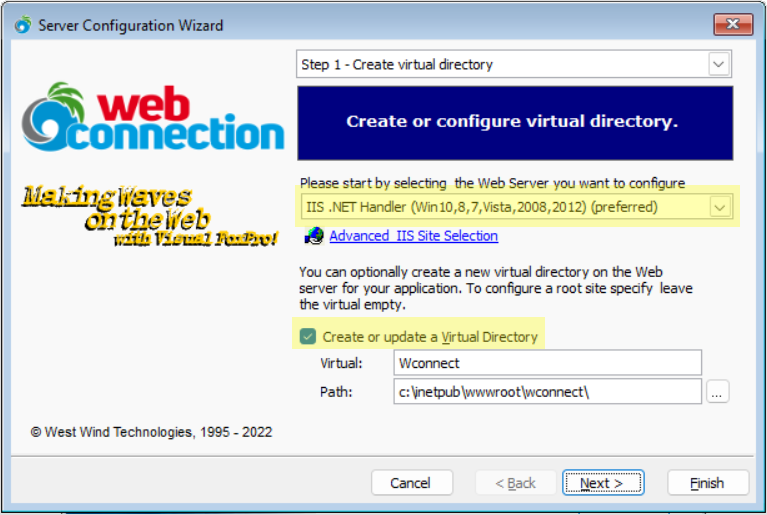
- Click the Next button to proceed.
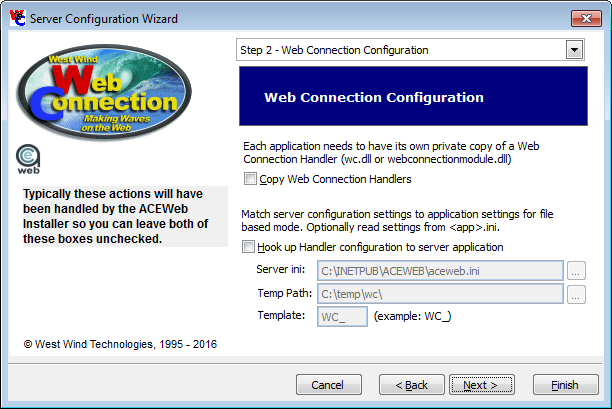
- On Step 2 – Web Connection Configuration, you do not need to check anything on this step. Just click the Next button to proceed.
- On Step 3 – Create scriptmap, complete the folowing:
- Check the Create ScriptMap box (AWP,WC,WCS should already be entered in the Script Map field).
- Make sure the Make Scriptmap available to Virtual only is NOT checked.
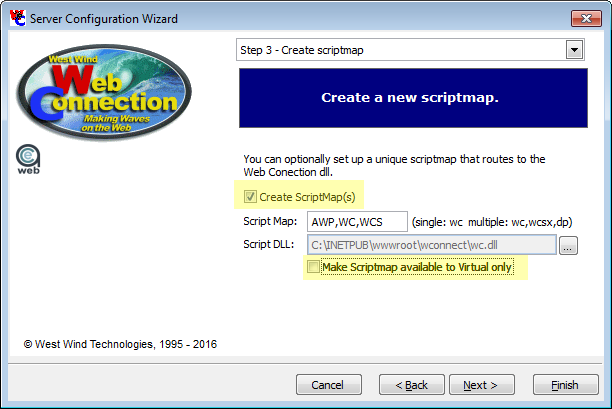
- Click the Next button to proceed.
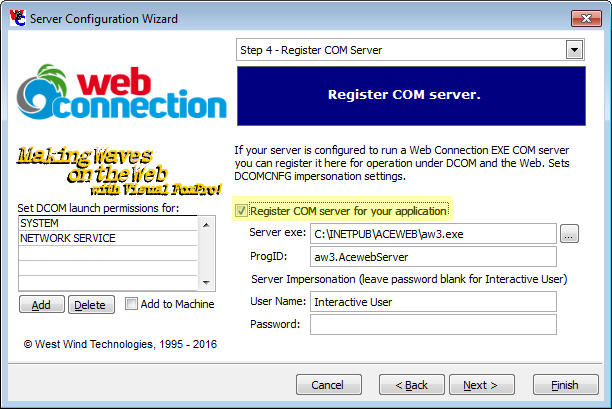
- On Step 4 – Register COM Server, check the Register COM server for your application box then click the Next button to proceed.
ACEweb SQL Version: if you are installing the SQL version of ACEweb, the Server exe will point to the aw4.exe file, and the ProgID value will be aw4.AcewebServer.
- On Step 5 – Finish: click the Finish button to configure your server. You may be asked to create the Temp Directory. If so, click the Yes button.
- Initialize your INI settings by opening and closing the ACEweb application:
- Navigate to the c:\inetpub\aceweb\ directory.
- Find and double click the ACEweb application file to open the Web Connection window.
VFP version: the application file is named aw3.exe. SQL version: the application file is named aw4.exe.
- Click the Exit button to close the Web Connection window.
- You can now open your Web browser and navigate to your ACEweb home page (where yourwebdomain is your ACEweb server's web domain):
https://yourwebdomain/wconnect/ace/home.htm
- Click the Currently Scheduled Courses link to verify that ACEweb has connection to the Student Manager data.
- Give the IIS Internet User Account the correct permissions.
- Once you have verified connection to the database, complete the appropriate ACEweb Running Mode setup steps.