

Person.awp
The Person.awp template is used to add/edit accounts (i.e. name records).
IMPORTANT
The person.awp template must be recompiled after making any changes to it. Changes will not display on the page until the template is recompiled.
Enable/Disable Fields
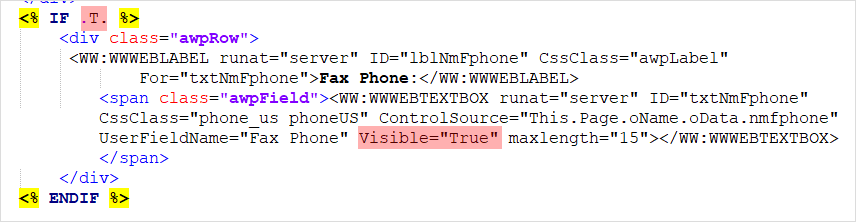
To enable a field, set .F. to .T. in the associated <% IF .F. %> statement. And set the Visible attribute in the control to True (e.g. visible="True"). E.g.
Field Labels
If you need to change a field label (ww:wwWebLabel), you will also need to change the UserFieldName and Placeholder parameters in the corresponding ww:wwWebTextBox.
Disable Fields
To disable* a field, enable a field, set .T. to .F. in the associated <% IF .T. %> statement. And set the Visible attribute in the ww:wwWebTextBox to True (e.g. visible="False").
IMPORTANT
You can't disable the standard fields (i.e. first, last, address1, city, state, zip, email).
Enable Code Lists
If you want to use code fields and have them populated with the associated Student Manager code list, you must add the appropriate cursor name to the Text attribute in the ChoiceList hidden field:
<ww:wwWebHiddenField ID="ChoiceList" Text="srce\* sex" runat="server"> </ww:wwWebHiddenField>
Available Cursors: srce* sex edlv disa ethn lang nmsc mart occ org ninc ftyp hmow
Values should be added separated by spaces, e.g. Text="srce* sex disa"
Hide for Existing Users
If you want to hide a field or section from existing users, you need to surround the field/section code with this If statement (will only show it when in adding name mode):
<% if this.Page.cMode = [NEW] %>
Field/section code
<% endif %>
Birth Year Only
By default, person.awp uses 3 fields for birthdate, i.e. month, day and year are entered into individual fields.
You can only use Birth Year if desired. ACEweb will set birthdate value to January 1 on the year entered.
To use Birth Year only, remove the month and day expressions (in red below) from the page and change the label for the BYr field from the / to Birth Year (in green below):
<div class="awpRow">
<ww:wwWebLabel runat="server" ID="lblBMo" CssClass="awpLabel" For="txtBMo"> Birthdate:</ww:wwWebLabel> <span class="awpField"><ww:wwWebTextBox runat="server" ID="txtBMo" size="2" ControlSource="This.Page.cBMo" TabIndex="270" IsRequired="False" UserFieldName="Birth Month"></ww:wwWebTextBox> <ww:wwWebLabel runat="server" ID="lblBDay" for="txtBDay" IsRequired="False" UserFieldName="Birth Day"> / </ww:wwWebLabel> <ww:wwWebTextBox runat="server" ID="txtBDay" size="2" ControlSource="This.Page.cBDay" TabIndex="271"> </ww:wwWebTextBox>
<ww:wwWebLabel runat="server" ID="lblBYr" for="txtBYr" > / </ww:wwWebLabel>
<ww:wwWebTextBox runat="server" ID="txtBYr" size="4" ControlSource="This.Page.cBYr" TabIndex="272" UserFieldName="Birth Year" IsRequired="False" visible="False"></ww:wwWebTextBox> <span class="awSmall">(mm/dd/yyyy)</span></span>
</div>Set Fields to ReadOnly
You can set text fields to readonly for existing users by adding the readOnlyForOldUser hidden field to the person.awp form and entering the HTML field names in the Text attribute. Fields should be separated by a space. E.g. this example set first and last name to read only when in EDIT mode:
<ww:wwWebHiddenField ID="readOnlyForOldUser" Text="txtNmname1 txtNmname3" runat="server"></ww:wwWebHiddenField>
IMPORTANT
The ReadOnly attribute only works on text fields. You cannot set select boxes, checkboxes or radio buttons as read only. It's suggested to hide those fields from existing users instead (see above section).
Required Fields
See the RequiredFields INI setting for more information on requiring fields.
If You Do NOT use Passwords
If you don't use passwords (as set in UserIDSource ini setting), you will need to complete the following steps:
- Set the Text value to ON in the NoPasswordDialog field:
<ww:wwWebHiddenField runat='server' ID="NoPasswordDialog" Text="ON"\></ww:wwWebHiddenField>
- Add visible="False" to the pnlPwdBtn panel:
<ww:wwWebPanel ID="pnlPwdBtn" runat='server' visible="False">
- Add the :BOK setting to the UserIDSource INI setting. This is the setting that allows blank passwords. If it is not present, the user will be required to enter a password even though they don't use them when logging in.
Email Address Verification
Email Address Verification adds a 2nd Email field to the person.awp template. Users are required to enter their email address twice to verify they entered it correctly.
To enable the option:
- Set Visible to True on the pnlVerifyEmail webpanel.
- Set IsRequired to True on the ww:weWebTextBox
<ww:wwWebTextBox runat="server" ID="txtNmEmail2" size="30" TabIndex="7" ControlSource="This.Page.oName.oData.nmemail" IsRequired="True" UserFieldName="Email Verification" ValidationExpression="this.Page.VerifyEmail(This)"></ww:wwWebTextBox>
- Find and comment out this line in the javascript: (you comment out a javascript code line by putting 2 slashes and a space in front of the line):
// $("#verifyEmail").hide();
Firm Matching
If you enable the Firm Matching option, when users submit the profile, the system will check the Firm table for a matching Firm.
- If it finds a matching firm, it will enter the Firm Name into the Firm field and the Firm's ID number into the Firm ID field (not visible from the Names screen), linking the record to the associated firm.
- If it does not find a matching firm, it will enter the firm name into the Firm field, and the Firm ID for the default ACEweb firm. You can use the Web Firm validation option to find these Name records and create firm records for the new firms.
For example, if the firm name is ACEware Systems, Inc., the user must enter ACEware Systems, Inc. If they only enter ACEware Systems, ACEware, leave the period off of the Inc., or misspell any of the words, the system will not consider it a match and will not link it to the ACEware Systems, Inc. firm record.
Interests
Users may add/edit their interests, and request a catalog or information on specific interests.
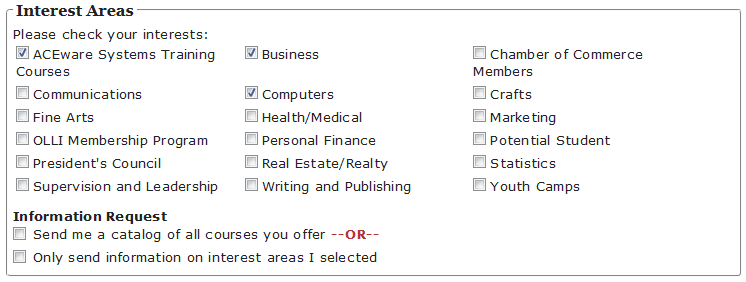
If the user requests information, the Label flag is checked on their name record, and a value is entered into the Label field:
- WCAT: - if they select the Send me a catalog of all courses you offer option.
- WINF: - if they select the Only send information on interest areas I selected option. Interests they select can be viewed in the Interests area of the Names Main tab.
Disable Interest Codes Section
You can disable the Interest Codes section entirely by changing the section's IF statement from this:
<% IF (this.Page.cMode = [NEWUSERSIGNUP] OR this.Page.cMode = [EDIT]) AND this.Page.pnlPersonal.visible %>
To this:
<% IF .F. %>
Memberships
If using the Membership feature, you can enable the Memberships section on the Profile page so users can see what memberships they have and their membership expiration:

To enable the Membership section, set the .F. to .T. in the section's <% IF .F. and this.Page.cMode <> [PWD] %> statement.
Household Members
Users may add household member profiles, and edit profiles in the primary user's Name group.

Enroll Others
If using the Proxy Registration option, users can remove a person from their list. For example, remove a former employee.

The ID of the person you remove is added to the Removed Proxies list on the Name Demographics tab.
Removing a name from the list will remove it from the Select someone you have previously enrolled list on the Enroll Someone Else page:

It does not remove the person from the logged on user's Name Group list. Nor will it remove the person from the user's Registration History list--users will still be able to view registrations they have previously added for other people. It only removes their name from the list for future registrations.
SQL Database Users
If you are using an SQL database, all the open fields on person.awp must have a maxlength value set to the length of the field. E.g. first name is 30 characters so you need to have maxlength="30" set on the field.
Note: you do not need to set a maxlength on drop down fields, checkboxes, radio buttons, textarea fields, or date fields.
You can get an updated copy of person.awp files for you site from our ACEweb Templates folder. However, just note you will need to re-apply any customization to the template (e.g. enable additional fields).
Unlimited UDFS
Unlimited user defined fields are supported on ACEweb versions .051 and later (with the person_page.prg in the ACEweb update zips)
To activate this feature, add this hidden field to Person.awp:
<ww:wwWebHiddenField ID="unlimitedUDFs" runat='server' Text="ON"></ww:wwWebHiddenField>
You can then reference oName.oUUData properties as control source items. E.g.
<div class="awpRow">>
<ww:wwWebLabel runat="server" ID="lblNmFunCode" CssClass="awpLabel" For="txtNmFunCode">Fun Code:</ww:wwWebLabel>>
<span class="awpField"><ww:wwWebTextBox runat="server" ID="txtNmFunCode" size="30" ControlSource="This.Page.oName.oUUData.fun_code" UserFieldName="Fun Code" Visible="True" placeholder="Fun Code" maxlength="14"></ww:wwWebTextBox></span>
</div>
When choices have been enabled, it will also generate cursors (named with a "t" followed by the field name) which can be used as drop down menu data sources.
<div class="awpRow">
<ww:wwWebLabel runat="server" ID="lblNmMovie" CssClass="awpLabel" For="lstNmMovie">Movie Genre:</ww:wwWebLabel>
<span class="awpField"><ww:wwWebDropDownList runat='server' DataSource="tMovie\_Genre" id="lstNmMovie" DataTextField="Descript" DataValueField="Identifier" FirstItemText="..." ControlSource="This.Page.oName.oUUData.movie\_genre" UserFieldName="Movie Genre" Visible="True"></ww:wwWebDropDownList></span>
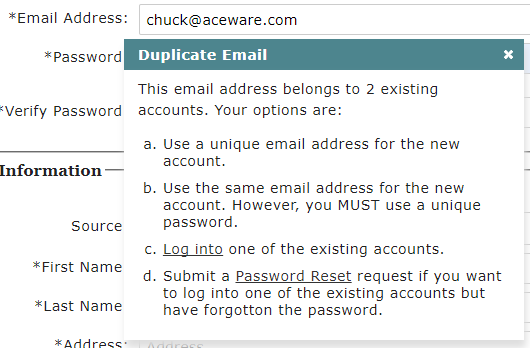
</div>Duplicate Email Messages
Customize the pop up messages that display when users are creating a new account and enter an email address that is already assigned to a name record.
To use the custom messages:
- This feature requires new person template files (person.awp/person_page.prg). If you have customized your current copy of person.awp, you will need to re-apply the customization to the new template.
- This feature also requires the new personX.txt files to be placed in the Templates folder (e.g. wconnect\ace).
This new feature provides 3 .txt files that are used to build the popup text message.
- Person1.txt - message displayed if you don't allow name records with the same email address (you are not using the :MULT option in UserIDSource INI setting).
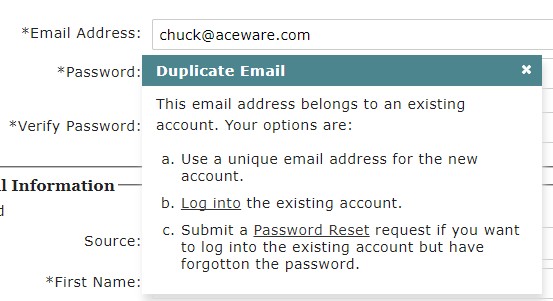
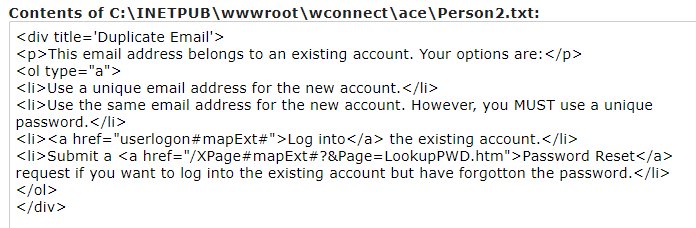
- Person2.txt - message displayed if you allow name records with the same email address and there is another record with the email address the user enters.
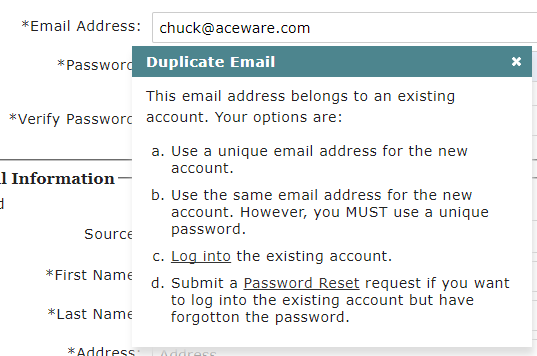
- Person2A.txt - message displayed if you allow name records with the same email address and there are multiple records with the email address the user enters.
To edit the custom .txt files:
- Add the names to the Extras setting in the AWIni.ini file, located in the Program folder (e.g. inetpub\aceweb). The .txt file names must be preceded with the :HTMLPath\ designation:

- Once added, you can edit the .txt files via the INI Editor. Links to the files will be located under the page title:

- Click the appropriate link to edit the .txt file.
- Click the Save Changes button to save your changes.
Enhanced BOT Protection
We recommend using the reCaptcha option to help prevent bogus Name record creation via BOTs. You can add a 2nd level of BOT protection with the CUEFlag.
Spam Bots tend to enter values in hidden fields too. To attempt to disallow these bogus accounts, ACEweb will check the form for a hidden variable called “CUEFlag”.
To enable this option:
- Add this hidden field to your person.awp template, inside the
<form>with a blank value:
<input type="hidden" name="CUEFlag" value="" />
- Recompile the person.awp template.
When 'real' users submit the Sign Up page, the value will be blank so the account creation will be allowed. If a Spam Bot enters a value in the field when submitting the bogus account, Name record creation will be disallowed.
Block Name Creation
You can block Name record from being created when certain conditions are met. For example if bots are entering characters such as links or multiple ??? in Special Needs.
To block creation:
Update ACEweb to version 074 or later.
Add a text file called blockNames.txt to the inetpub\aceweb folder, with the conditions added on separate lines. E.g.
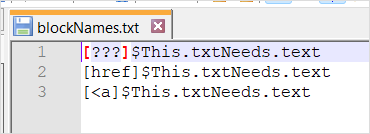
Note, a sample blockNames.txt is available in the 074 update zips.
You can add additional block conditions as needed.