

Proxy Registration (Enroll Someone Else)
The Proxy Registration feature allows one user to enroll other individuals in a course and make one payment for all the registrations. For instance, a mother can enroll her 3 children in a course and make one payment for all 3 registrations.
IMPORTANT
The proxyreg.awp template must be recompiled after making any changes to it. Changes will not display on the page until the template is recompiled.
Enable Proxy Registration
To enable the Proxy Registration feature:
- Set the ProxyReg INI setting to ENABLED.
- If you don't already have copies of Proxyreg.awp, Proxyreg_page.prg and Proxyreg_page.fxp in your ACEweb installation, please contact your ACEweb technician to obtain them.
Enable/Disable Fields
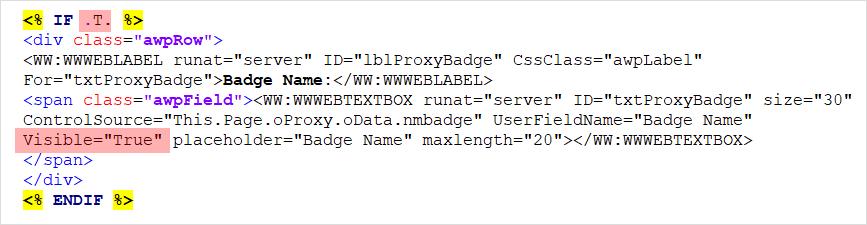
To enable a field, set .F. to .T. in the associated <% IF .F. %> statement, and set the Visible value to True. E.g.
Field Labels
If you need to change a field label (ww:wwWebLabel), you will also need to change the UserFieldName and Placeholder parameters in the corresponding ww:wwWebTextBox.
Disable Fields
To disable* a field, enable a field, set .T. to .F. in the associated <% IF .T. %> statement, and set the Visible value to False.
IMPORTANT
You can't disable the standard fields (i.e. first, last, address1, city, state, zip, email).
Add Name Fields to Javascript
If you are adding a name field to proxyreg.awp, you must enable the field in the javascript code to blank the field on new records or the field will show the value from the logged on user's record.
To enable a field remove the // from the beginning of the field name in both the newMatchClick() and switch (nameCount) case 0 functions:
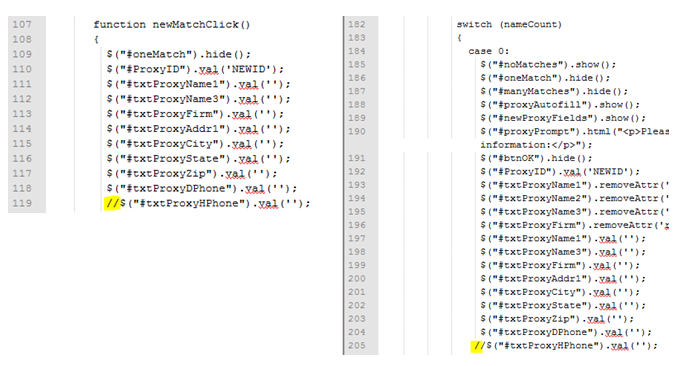
If the field isn't listed, you must add it to both sections. The value in the quotations is the ID of the field. ID values are case-sensitive.
Enable Code Lists
If you want to use code fields and have them populated with the associated Student Manager code list, you must add the appropriate cursor name to the Text attribute in the ChoiceList hidden field:
<ww:wwWebHiddenField ID="ChoiceList" Text="srce\* sex" runat="server"> </ww:wwWebHiddenField>
Available Cursors: srce* sex edlv disa ethn lang nmsc mart occ org ninc ftyp hmow
Values should be added separated by spaces, e.g. Text="srce* sex disa"
Require Fields
ProxyReg.awp does NOT reference the RequiredFields INI setting to determine which fields are required. To require fields for new records, you must enter the required fields into the Text attribute of this hidden field:
RequiredNewProxyFields – will only be required when creating new Name records via the proxyreg.awp page:
<ww:wwWebHiddenField ID="RequiredNewProxyFields" runat="server" Text="nmEmail nmName1 nmName3 nmAddr1 nmCity nmState nmZip" />
To require additional fields, enter the full html field name from the template. E.g. txtBMo, txtBDay, txtBYr, lstProxySex.
Birth Year Only
By default, proxyreg.awp uses 3 fields for birthdate, i.e. month, day and year are entered into individual fields.
You can only use Birth Year if desired. ACEweb will set birthdate value to January 1 on the year entered.
To use Birth Year only, remove the month and day expressions (in red below) from the page and change the label for the BYr field from the / to Birth Year (in green below):
<div class="awpRow">
<ww:wwWebLabel runat="server" ID="lblBMo" CssClass="awpLabel" For="txtBMo"> Birthdate:</ww:wwWebLabel>
<span class="awpField">
<ww:wwWebTextBox runat="server" ID="txtBMo" size="2" ControlSource="This.Page.cBMo" TabIndex="270" IsRequired="False" UserFieldName="Birth Month"></ww:wwWebTextBox>
<ww:wwWebLabel runat="server" ID="lblBDay" for="txtBDay" IsRequired="False" UserFieldName="Birth Day"> / </ww:wwWebLabel>
<ww:wwWebTextBox runat="server" ID="txtBDay" size="2" ControlSource="This.Page.cBDay" TabIndex="271"></ww:wwWebTextBox>
<ww:wwWebLabel runat="server" ID="lblBYr" for="txtBYr" > / </ww:wwWebLabel>
<ww:wwWebTextBox runat="server" ID="txtBYr" size="4" ControlSource="This.Page.cBYr" TabIndex="272" UserFieldName="Birth Year" IsRequired="False" visible="False"></ww:wwWebTextBox>
<span class="awSmall">(mm/dd/yyyy)</span>
</span>
</div>Enroll Someone Else
To enroll another individual in a course:
- Look up the course in which you want to enroll the other person.
- Click the Enroll Someone Else button.
- The Logon page opens for you to log in, or if you don't have an account yet, you can create one (the proxy registration process will continue after you create your record).
- After you log in (or create your record) the Proxy Registration page opens for you to select the person to enroll.
The list of previously registered individuals comes from the list of people the logged on use has previously registered--AND--the list of people the logged on use is grouped with.
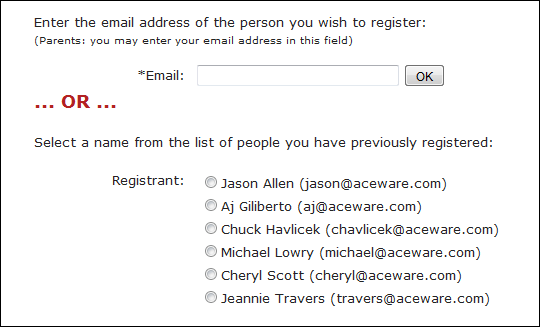
- If the person you want to register is listed, select them. If not, enter the person's email address then click the OK button.
Note
A parent using the same email address for themselves and their children can enter their email address in the Email field.
- The Account Details opens next.
- If you select a person from the list (step 4 above), their account details will be displayed.
- If you entered an email address for an existing account, you will be told the email is associated with other records. You can choose the person you want to enroll or select the New Name and create a new name record.
- If you entered an email that is not already assigned to an account, you will be able to create a new account.
- Click the Confirm and Continue button to continue the registration.
- You'll now continue the regular registration process.
Remove Person from Enroll Someone Else List
ACEweb offers the ability for users to remove a person from their Enroll Someone Else list (step 4 of the Enroll Someone Else section). Please see the Proxy Candidates section of the Person.awp topic for more information.
Who Registered Person
When viewing the registration in Student Manager, you will see the name of the individual who registered the person displayed on the Registration screen:

Confirmation Emails
The registrant and the initiator will receive email confirmations.
SQL Database Users
If you are using an SQL database, all the open fields on proxyreg.awp must have a maxlength value set to the length of the field. E.g. first name is 30 characters so you need to have maxlength="30" set on the field.
Note
You do not need to set a maxlength on drop down fields, checkboxes, radio buttons, textarea fields, or date fields.
You can get an updated copy of proxyreg.awp files for you site from the ACEweb Update zip. However, you will need to re-apply any customization to the template (e.g. enable additional fields).
Add Others to Waitlist via ACEweb
Users can also add others to a Course Waitlist.
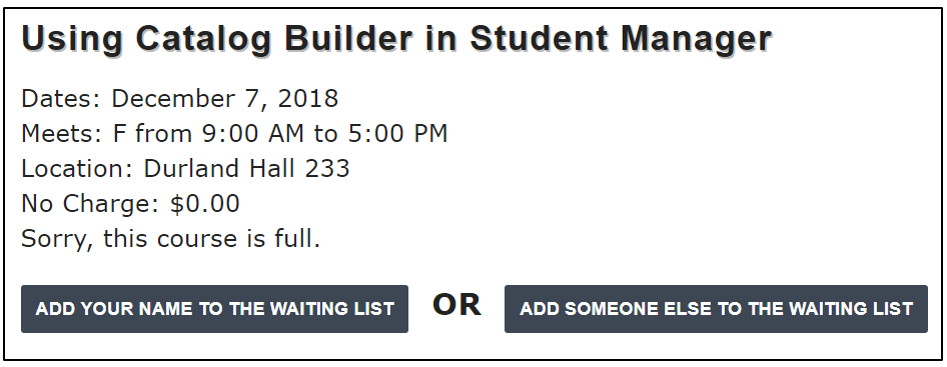
When a user clicks the Add Someone Else to the Waiting List button:
- If they are not logged in yet, they must log into their ACEweb account.
- They are presented with the regular Enroll Someone Else routine to select or add the person they want to add to the course waitlist.
- The Add to Waitlist page opens. They click the button to confirm adding the person to the waitlist:
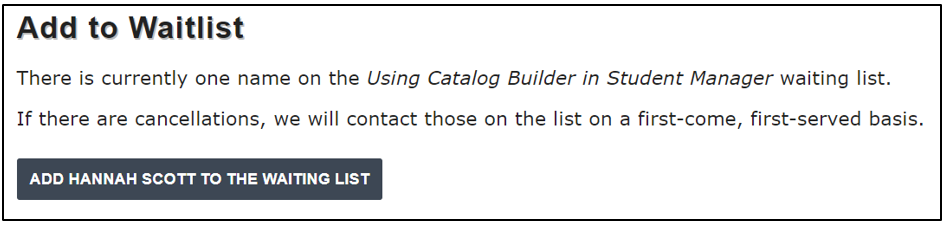
- The Waiting List Confirmation page is displayed and emails are sent to the person being waitlisted and a notification is sent to staff.
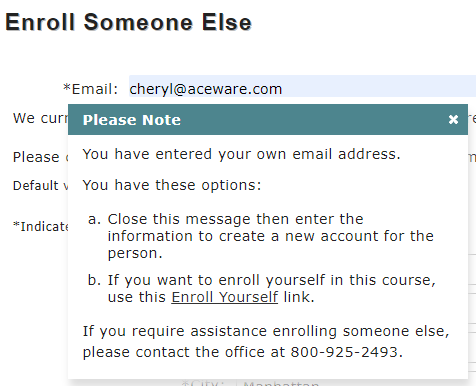
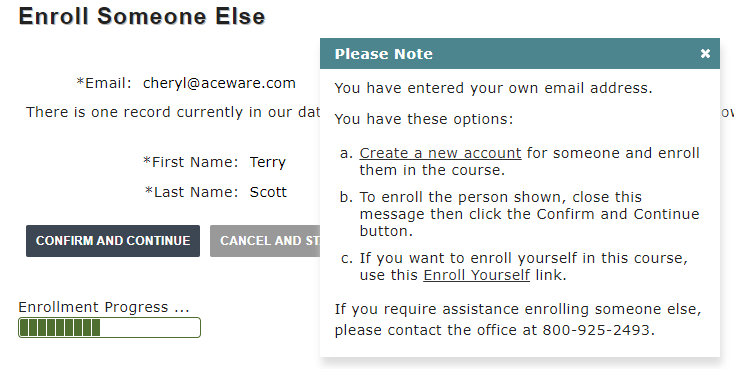
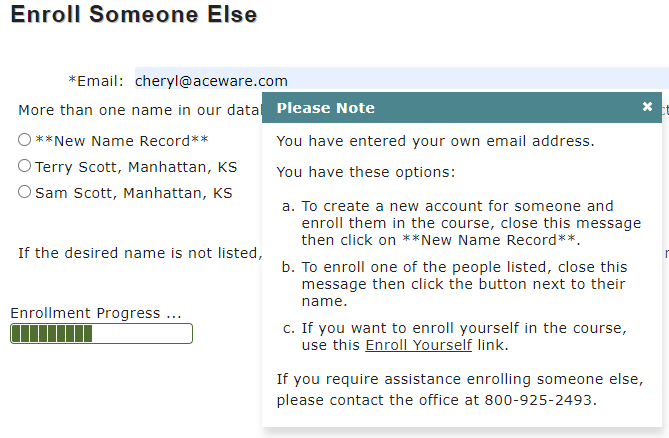
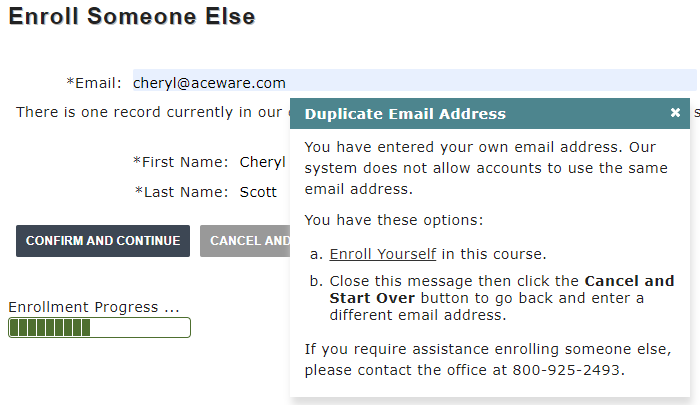
Duplicate Email Pop Up Messages
Customize the pop up messages that display when users are enrolling someone else and enter an email address that is already assigned to a name record.
- ProxyReg1.txt - message displayed if you allow name records with the same email address and there is only the logged on user's record with the email address the user enters.
- ProxyReg1A.txt - message displayed if you allow name records with the same email address and there is another record with the email address the user enters.
- ProxyReg1B.txt - message displayed if you allow name records with the same email address and there are multiple records with the email address the user enters.
- ProxyReg2.txt - message displayed if you don't allow name records with the same email address (you are not using the :MULT option in UserIDSource INI setting).
Editing the ProxyregXX.txt Files
To edit the custom .txt files:
- Add the names to the Extras setting in the AWIni.ini file, located in the Program folder (e.g. inetpub\aceweb). The .txt file names must be preceded with the :HTMLPath\ designation:

- Once added, you can edit the .txt files via the INI Editor. Links to the files will be located under the page title:

- Click the appropriate link to edit the .txt file.
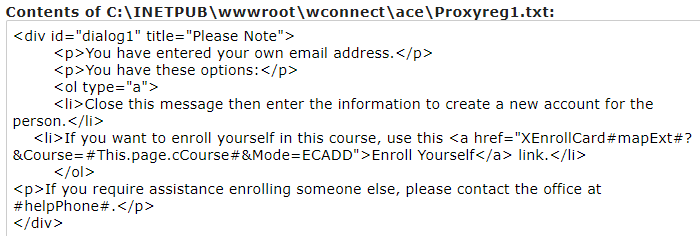
- Click the Save Changes button to save your changes.