

Print a Transcript
Print transcripts for a single person or a series of courses.
Transcript for Person
Print a transcript of all courses an individual has taken.
- Open the Name record.
- Click the Quick Reports button.
- Select the *Default report option.
- Click the OK button.
- The Transcript report now opens for you to view/print.
*In the default report set, the Transcript report is the Default report. However, at your institution it may be an Additional report so you may need to select that option instead then select the Transcript report when the Select Additional Reports window opens.
Tip
If you need to include a subset of courses (e.g. only include courses for the current term), you must go to the report area and run a query to return specific courses for the person (.e.g one that asks for the person's name and course number begins with value).
Transcript for Courses
Print a transcript for course(s).
Select .
Select the appropriate options on the Report Options screen (e.g. show waitlisted registrations).
Select Default or Additional report option.
Click the OK button.
Run the appropriate query.
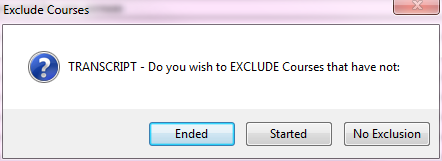
Select an exclusion option:
If you selected the Additional report option in step 3, select the report you want to run from the Select Additional Report listing.
The Transcript report now opens for you to view/print.
Individual PDFs
To print individual PDFs for all users in a transcript report, check the Generate Individual PDFs box on the Report Options screen. After running your query, you'll be asked to select a location to save the PDFs:
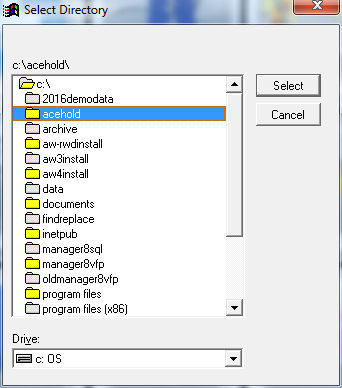
After selecting the location and clicking the Select button, the system will save the individual PDF files using LastNameFirstNameID as the name of each PDF. E.g. DoeJohnX00000012.pdf.
Email Separately
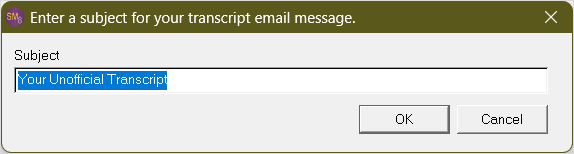
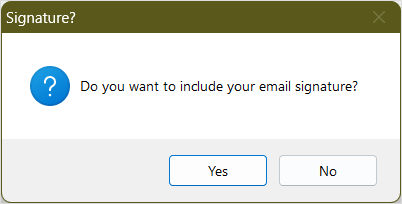
To email transcripts, check the Email Separately box on the Report Options screen. After the report runs, the email routine starts.
Subject:
Message:

Signature:
A PDF is generated for each student in the report and emailed to the individual students.