Custom Registration Confirmation Page
You may create custom Registration Confirmation pages to show users when the registration process is complete.
Important: the custom confirmation will be used when registrants enroll in the single course. If they enroll in multiple courses at a time, the default registration confirmation template (regconfirm.htm) will be used.
Create Template
- Make a copy of the RegConfirm.htm template and name it RC+the appropriate course code, e.g. RC25FACE010A.htm. You can also create a template to use with multiple courses by naming it RC+XXXX, where XXXX is what is specified in the information page field of the course on the ACEweb info tab.
- Place your custom information on the template.
- Information you want to display before the course table should be placed after the ##-Intro-## tag.
- Information you want to display after the course table should be placed after the ##-Closing-## tag.
- If you don't want the page to use the header tags from Standard.htm (e.g. you want to apply different style sheets to this page), add a Config section with the StandardHeader entry set to OFF, after the ##-End-## tag:
txt##-Config-## <StandardHeader>OFF</StandardHeader> ##-EndConfig-##
Then replace the ##Standard.Sectionx## tags (e.g. ##Standard.Section1##) with your custom design coding.
- Save your custom registration confirmation template.
- Put the template in the wconnect\ace\custom folder.
Customize Page Heading
The ##pcHeading## tag generates the 'Transaction Completed' heading. You can replace the ##pcHeading## tag with your own page heading text. ACEweb will use the custom text for the <h1> page heading and move the 'Transaction Completed' text to an <h2> heading tag.
If you want to completely remove the 'Transaction Completed' heading, also add the <PageHeading>OFF</PageHeading> entry to the Config section:
txt##-Config-## <PageHeading>OFF</PageHeading> ##-EndConfig-##
Customize Course Information Table
You can also display a custom course listing table on the Registration Confirmation page. The course listing table displayed on the page is based on the ECTable.htm template.
To use a custom table:
- Make a copy of the ECTable.htm template and give it a custom name (e.g. CustomTable.htm).
- Edit the template to include your custom information (i.e. add additional info from the course record, change text messages, etc.).
- Save your custom ECTable.htm using one of the following naming conventions:
- ECTxxxxx.HTM, where xxxxx matches a specific course code. This custom form will be used for that course.
- ECTyyyyy.HTM where yyyyy matches the Information Page code assigned to a selection of courses. The custom form will be used for all such courses.
- zzzzz.HTM where zzzzz is a name of your choosing. Note this is a legacy option and not currently recommended. If you are using this option, you must also complete step 5.
- Put the template into the wconnect\ace\custom folder.
- Complete this step --IF-- you are using step 3.c. Add the following Config section to the bottom of your custom Registration Confirmation template, below the closing
</html>tag, with NAME being the name of your custom ECTable.htm template:
txt##-Config-## <ECTable>Custom\NAME.htm</ECTable> ##-EndConfig-##
Display Additional Information
You can display additional information on the custom registration confirmation page with the ##pcExtraInfo## feature.
To enable the ##pcExtraInfo## feature:
- Add a config statement to the custom Registration Confirmation template, after the closing
</html>tag, with your custom expression enclosed in the ExtraInfo tag:
txt##-Config-## <extrainfo>Your custom expression</extrainfo> ##-EndConfig-##Example: this custom expression will generate a message if the course code begins with 25U.
##iif(tSummary.cocrse=\[25U\],\[Special note for summer courses\],\[\])##
- Add the ##pcExtraInfo## tag where you want the custom expression to be displayed on the web page.
Override PrintCourseNotes and PrintRegWarn INI Settings
You can override the PrintCourseNotes and PrintRegWarn INI settings on a custom Registration Confirmation page.
To override the INI setting, add a config statement to the custom Registration Confirmation template after the closing </html> tag with the appropriate parameter set to SHOW or HIDE.
txt##-Config-## <CourseNotes>SHOW or HIDE</CourseNotes> <RegWarn>SHOW or HIDE</RegWarn> ##-EndConfig-##
Example: if PrintCourseNotes is ON, you can suppress the Notes field by setting the CourseNotes tag to HIDE.
<CourseNotes>HIDE</CourseNotes>
Custom Total Charges Text
Override the default text for the Total Charges line on the confirmation page and in confirmation emails.
To override the default text, add a config statement to the custom Registration Confirmation template after the closing </html> tag with your custom text enclosed in the Totaltext tag:
txt##-Config-## <Totaltext>custom text</Totaltext> ##-/Config-##
The Totaltext value will replace the text in the ##lcTotals## expression, used on ecTable.htm and regconfirm.txt. The default wording is:
Total Charges: [$amount]
Your Totaltext value will replace the Total Charges part.
Log Off/Redirect Options
Log Off/Enroll Someone Else
If using a script-based express registration template, you can add a link to log off the user then redirect them back to the custom express registration page to register someone else. E.g. this link logs off the user then sends them back to the xreg-new.wcs page to enroll someone else in the 25SACE010A course:
<a href="/wconnect/ace/custom/xreg-new.wcs?&course=25SACE010A&logoff=NOW">Enroll Someone Else</a>
Log Off/Redirect to External Site
You can use the redirectURL option in the Log Off link to automatically log the user off then redirect them to an external (outside ACEweb) page.
To do so, add the redirect parameter to the Log Off link's href value, with the URL of the page. E.g.
<a href="/wconnect/UserLogon.awp?&Action=LOGOFF&redirectURL=https://www.aceware.com">Log off</a>
Notes
- You must muse the full url in your redirectURL value. You cannot use relative URLs such as redirectURL=/wconnect/ace/home.htm.
- You CANNOT send users back to a page with parameters in it. For example, back to a different course info page. Browsers will drop off any parameters in your redirectURL (e.g. drops off the &course=25SACE010A part of your redirectURL).
Log Off/Redirect to an ACEweb Page
To redirect the user to an ACEweb page that has parameters, you must use a form button. E.g.
<form action="/wconnect/UserLogon.awp" method="get">
<input type="hidden" name="Action" value="LOGOFF" />
<input type="hidden" name="redirectURL" value="https://webdomain/wconnect/coursestatus.awp?&course=25SACE010A" />
<input type="submit" value="Log Off" />
</form>
Note: you must use the full url in your redirectURL value. You cannot use relative URLs such as redirectURL=/wconnect/coursestatus.awp?&course=25SACE010A.
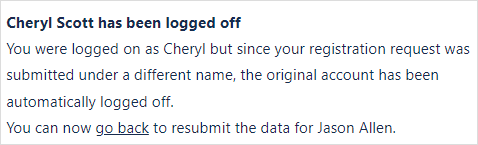
User Clicks the Back button
If the user clicks the Back button to go back to an express registration and submit another registration, they are still logged on as the previous registrant. When the submit the form, they will receive a message telling them they were logged off the previous registrant and they can go back and submit the new registration. For example: